Zaphod's Guide to Safely Consuming PGGB Plus
"What is this? Some sort of galactic hyperhearse?"
Overview
Overview
What PGGB does
PGGB is an offline PCM remastering tool for upsampling or downsampling audio files, with algorithms optimized to maximize reconstruction accuracy to near theoretical limits*. PGGB can apply EQ filters in a transparent fashion. PGGB saves the converted files in .wav or .dsf format by default, or in .wv (WavPack) or .flac (FLAC) format if the user chooses. Image and cover information within the metadata are transferred when possible. All PCM and DSD rates are supported. PGGB will convert to PCM or DSD with an optimal choice of filters.
The PGGB algorithm
PGGB Plus uses a proprietary method different from conventional approaches. PGGB is non apodizing and it does not use windowed sinc functions either, or long filters either. The best way to look at the current approach used by PGGB is that it considers the track as a whole. If no HF filters are enabled (which is the default for CD and 2fS rates), PGGB keeps all of the original samples intact, then creates intermediate samples all at once by time shifting all of the original samples. Our method approaches the theoretical limit of reconstruction accuracy possible for a track of given length and sample rate. This is more accurate than using pure Whittaker-Shannon coefficients with windowing. As the sample rate increases, and the track length increases, our method approaches the mathematical equivalence of using pure sinc based interpolation. The higher the reconstruction accuracy, the more transparent the sound. What this means to you is better depth and layering, improved resolution, a cleaner leading edge, and more accurate timbre.
High precision computing
The ‘Plus’ in PGGB Plus stands for ‘PCM plus DSD, with up to 256 bits of precision’. PGGB implements high precision computing for the entire processing that includes resampling, noise shaping, DSD modulators and EQ. This allows you to optionally choose higher precision computing including double-double 107 bit, quad precision 128 bit (Insane) and octuple precision 256 bits (Ludicrous). Higher precision results in better sound quality due to improved reconstruction accuracy and noise shaping performance.
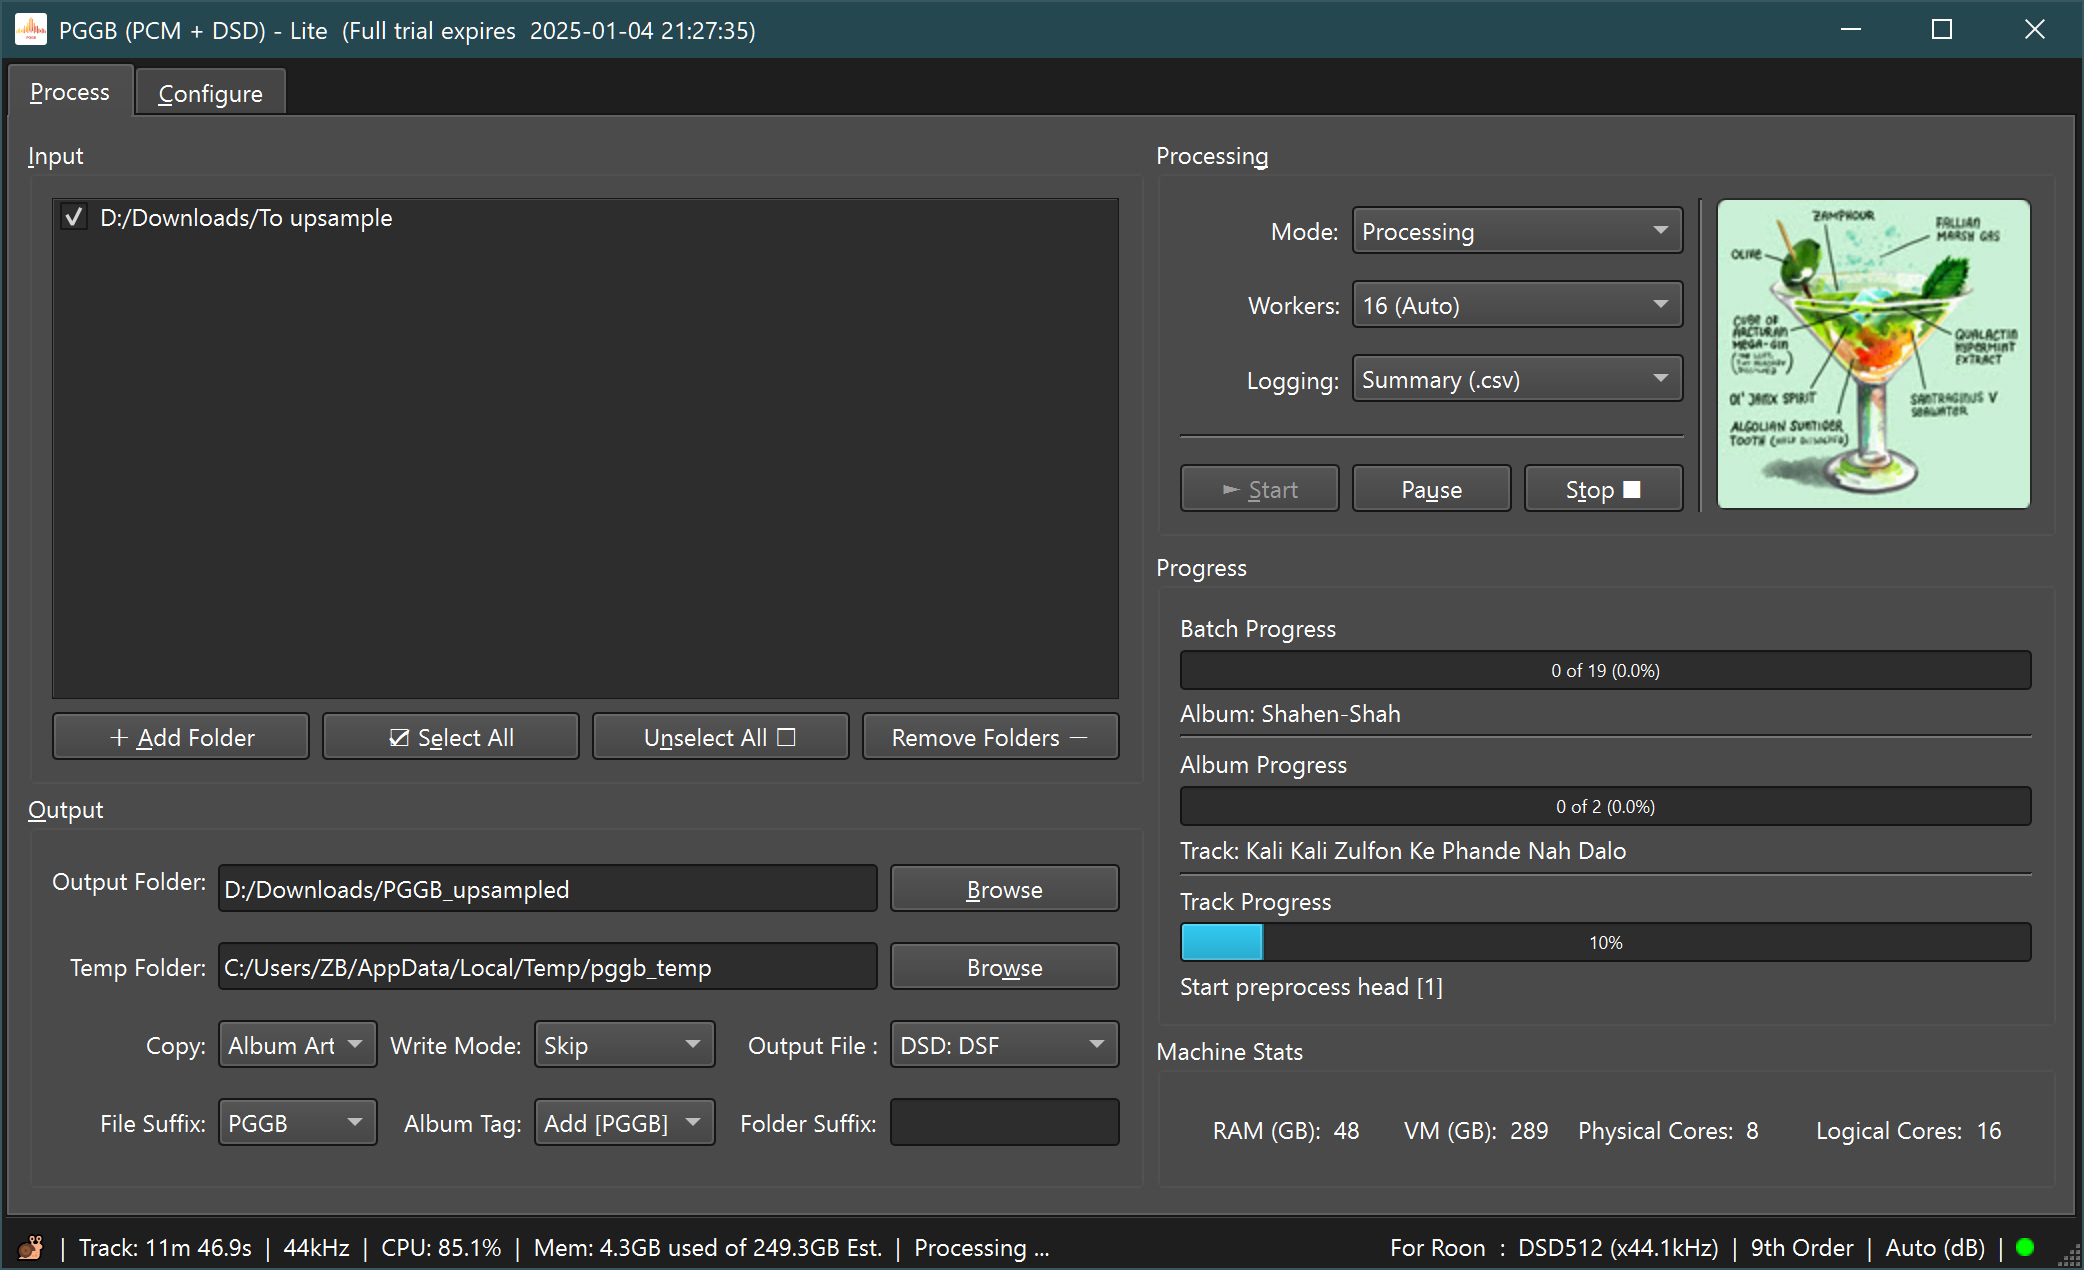
How processing works
PGGB will process all files in the input folder and all folders in the input folders recursively. For example, if you have a music folder 'C:\Music' and the folder contains albums organized in multiple folders like C:\Music\Album-1, C:\Music\Album-2. It will process any music file with extensions (.wav, .flac ,aif, .aiif, .m4a, .dsf) in both C:\Music and also the Album-1 and Album-2 folders. The upsampled files will be found in output folder and they will be organized in the same way in sub-folders. PGGB also copies jpg, png and pdf files to the destination folders.
It is very simple to use. Once you have chosen the input and output folders (both are required) and you may drag and rop the folders into PGGB UI too. Press ‘Start’ to start processing. Use Pause to pause processing and ‘Stop’ to stop processing. Stop and Pause may take a few seconds to a few minutes depending on what PGGB is processing. Once the processing has started, you may also add new folders inside the input folder. PGGB will discover them and will process them too after it has completed the current set of folders. You may add multiple input folders using the ‘Add Folder’ button or dropping them into the 'Input' box, you may also remove an input folder by selecting one or more and pressing ‘Remove Folders’. You may also drag one or more folders out of the Input box to remove them. Use the checkbox next to each folder to enable or disable the folder for processing
UI elements
Status bar: The status bar displayed at the bottom of PGGB window is information rich. The right side of the status bar is dedicated to showing the current configuration you are using. The left side of the status bar is dedicated to showing the current activity. When you are processing tracks, the left side of the status bar shows information regarding the track you are processing and also CPU and memory information. Once the processing is done, it shows you how many tracks were successfully processed and also if any were skipped or failed to process.
Output Folder: This is where the processed files will be saved. You can either browse to or drag and rop a folder of your choice.
Temp Folder: PGGB sometimes needs to create temporary files. By default, it will use the system temp folder. You may change this to a folder of your choice.
Write Mode: Writing can be done in three modes. Selecting ‘Create New’ will create a new album folder if the album already exists in the output folder. ‘Skip’ will skip previously processed tracks if they are present in the output folder and ‘Overwrite’ will overwrite the existing tracks.
Output File Format: PGGB will save the processed files in the format you choose. For PCM you have the choice of WAV, FLAC and WavPack. If your player is capable of playing RF64 files, you may choose 'Wav (RF64)', else we recommend 'Wav (4GB)'. 'Wav (RF64)' does not have the 4GB limit of Wav files, so larger files will not be split if you use RF64. If you want to enable lossless compression then choose FLAC or WavPack. For DSD you have the choice of DSF and WavPack. The default is Wav (4GB) for PCM and DSF for DSD.
File Suffix: PGGB will add a suffix to the processed files that will describe the processing that was done. If you do not want the processed files to have a suffix, you may choose 'None'.
Album Tag: To easily identify PGGB processed files using the meta data, PGGb adds [PGGB] to the album tag by default. You can choose 'None' if you do not want PGGB to alter the album tag.
Folder Suffix: PGGB by default create folders with the same name as your album folders when writing to the output folder. You could optionally add a suffix that will be added to the album folders.
Advanced
If PGGB finds 'pggb_to_process.txt' in the input folder, it will process the list of folders in the text file (recursively), in addition to any folders in the input folder. By default, it will create a folder with the name of the parent folder. If the first line in pggb_to_process.txt is 'fqn' (stands for fully-qualified-name), then PGGB will replicate the entire input folder structure inside the output folder.
Example pggb_to_process.txt:
fqn
"Z:\Native\PCM\Jazz\Ella-And-Basie"
"Z:\Native\PCM\Jazz\Ella-Fitzgerald"
On Windows, The very first time PGGB runs it may request permission for firewall. Please accept the request as PGGB needs it for trial license.
System Requirements
System Requirements
DAC
- High rate PCM and DSD: DACs that support PCM rates of 705.6/768kHz or higher and DACs that support DSD rates DSD256 or higher will benefit most from PGGB remastered tracks.
- PCM NOS: DACs that do little to no processing (such as R2R DACs that can be run in NOS mode) and DACs whose oversampling filter can be turned off will benefit significantly from PGGB PCM remastered tracks.
- Pure DSD: DSD DACs that have a pure DSD mode that can be enabled will benefit significantly from PGGB PCM remastered tracks.
- On DACs that support up to DXD rates and DSD128, remastering CD quality tracks using PGGB to DXD rate (352.8kHz) and DSD128 is likely to be beneficial too.
- If you have a DAC that supports PCM only, then you can use PGGB to remaster DSD to the highest rate supported by your DAC with excellent results.
- If you have a DAC that supports only 96kHz or 192kHz, you can use PGGB to remaster DSD or DXD files to rates that are supported by your DAC.
System, OS and Memory
PGGB requires 64-bit Windows 10/11 PC or Mac (Mojave or higher). A minimum of 32GB RAM, 8 core processor and 256GB of free space on a fast internal NVME drive is recommended. The hardware requirement is just a rough guideline as the actual requirement will depend on your music library, the output sample rate you wish to use and the processing efficiency you desire. More Memory allows improved speed as PGGB can keep all the data in memory for processing. More cores allows PGGB to use parallel processing for improved speed, and faster processor (frequency in GHz) provides PGGB with more processing speed. On windows, disable memory compression. Open PowerShell as administrator and enter command Disable-MMAgent -mc so Windows does not trigger compression and inflation while PGGB is paging.
- For PCM conversions: If your library consists of tracks that do not exceed about 12 minutes of length, you may find 16GB RAM and a 4-core processor sufficient for double-double (107 bit) or quad precision (128bits), a fast SSD drive for paging (minimum of 128GB is recommended). The requirements double for octuple precision (256bits). If your intent is to convert 10s or 100s of albums, a 8 core processor, 64GB RAM and and 512GB of free space for paging would be sufficient for most conversions.
- For DSD conversions: A minimum of 32GB RAM and 512GB of free space for paging is recommended for DSD rates up to DSD512 and the requirements double for DSD1024 rate. If your intent is to convert 10s or 100s of albums, a 16 core processor, 128GB of RAM and 1TB of free space would be sufficient for most conversions.
Note: PGGB requires Internet access during installation. It also needs Internet access for the trial version. On the first run, PGGB will request firewall permission to enable parallel processing. PGGB is mostly harmless, we do not use or share your personal information nor do we use the idle CPU cycles to mine Ethereum.
Compared to previous versions of PGGB, PGGB Plus is more memory efficient. One could do a lot more with 16GB RAM than previously possible. This is because of the completely revamped memory handling and paging optimization implemented in PGGB Plus.
PGGB uses adaptive algorithms that do not compromise on the quality of reconstruction to fit in available RAM, the reconstruction quality at a given precision does not change, instead PGGB adapts the processing pipeline to fit in memory and optimizes paging to accommodate the data that does not fit in memory. This means that PGGB will trade some speed (i.e., runs slightly slower, to make sure the data being processed fits in memory).
What this means is, you could do a lot more with 16GB RAM and PGGB than previously possible. But there is still a limit to how much can be made it fit in RAM. At the minimum one needs enough RAM to hold the input data. So, this memory requirement depends on a few factors:
- Length of the track you are processing
- Output rate (which depends on your DAC and settings, if you are upsampling to PCM or DSD)
- Precision (64, 107, 128 or 256 bit)
- Input rate of the track (CD vs Hi-Res vs DSD etc). While there is a slight uptick in memory requirement for increasing PCM rates, for DSD, the memory requirement does not change with increased rate. It depends only on the output rate you choose and track length. In other words, a 10minute DSD 64 track would need the same amount of memory as DSD256 as long as you are choosing the same output sample rate and also bit precision.
Getting Started
Quick Start DSD Configuration (as easy as 1, 2, 3 ...)
1. Choose DSD Rate
We suggest starting with the highest DSD rate your DAC will allow and then work your way down to lower rates
to determine the sweet spot for your DAC and system (interms of quality vs processing speed). PGGB DSD supports
DSD rates up to 2048, offering a choice between single-stage and two-stage
processing for each
rate. Single-stage processing is more memory-intensive and takes longer, but it
achieves the highest reconstruction
accuracy. Conversely, two-stage processing involves an initial upsampling to at
least a 16fS rate (quickest processing
speed, excellent sound quality) up to the DSD rate (512fS, 1024fS etc., slowest
processing speed, best sound quality). This has no effect on the
final file size. Multiple options are available for two-stage processing.
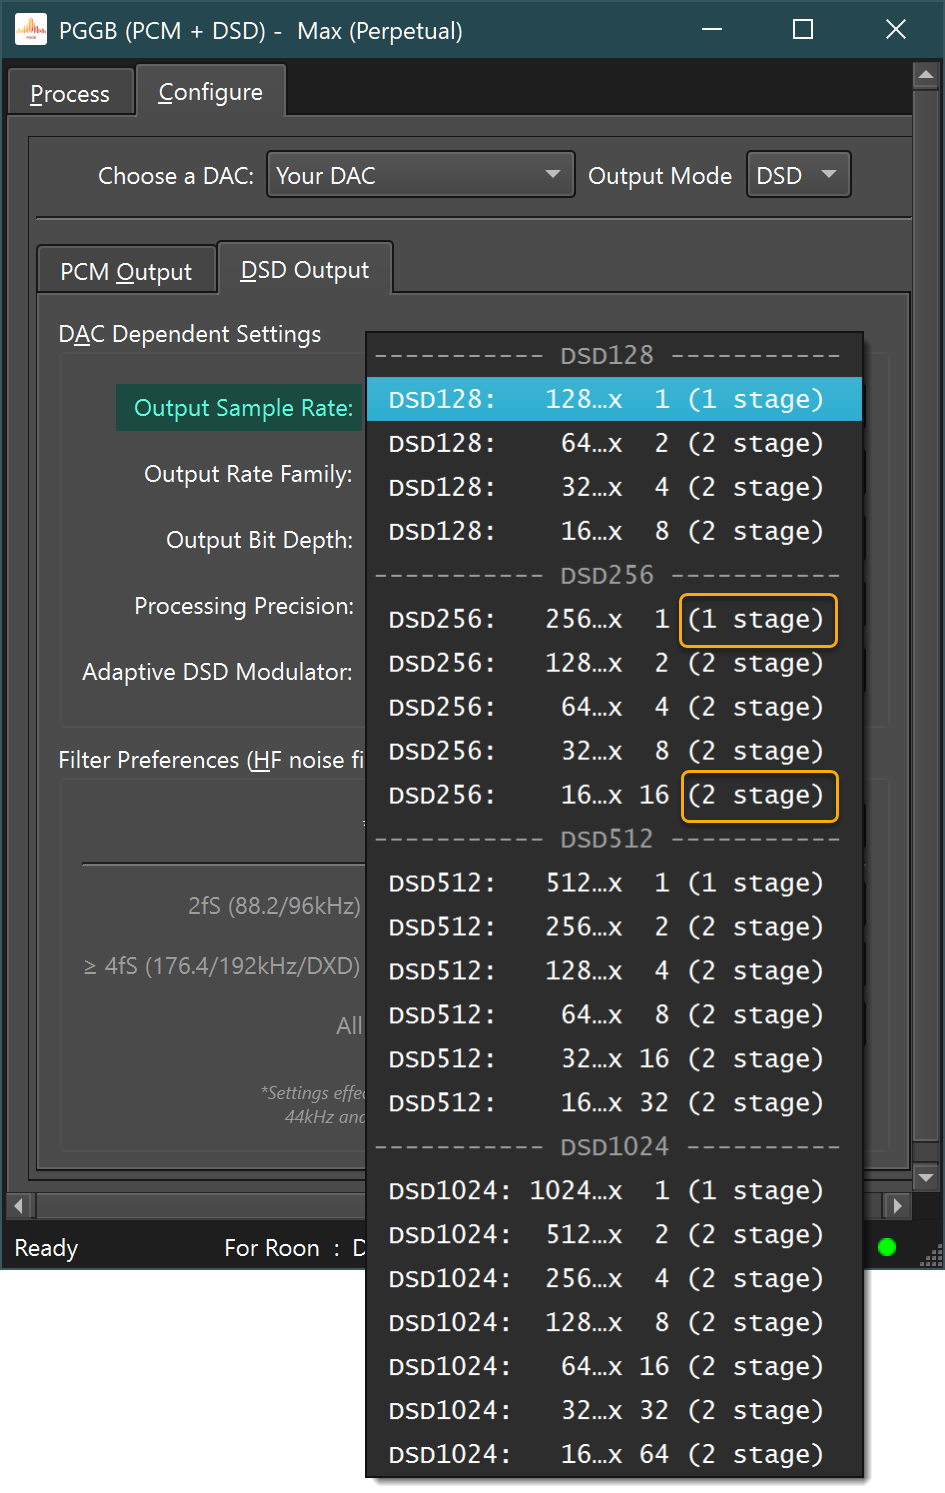
As a general guideline, if the speed of your system is satisfactory at a specific PCM rate, for example '16fS at 256-bit precision', and you wish to convert to DSD512 rates, choosing a two-stage DSD conversion with the first stage rate at double the PCM rate will yield a similar conversion speed 16 x 2 = 32 (i.e., 'DSD512: 32fS X 16')
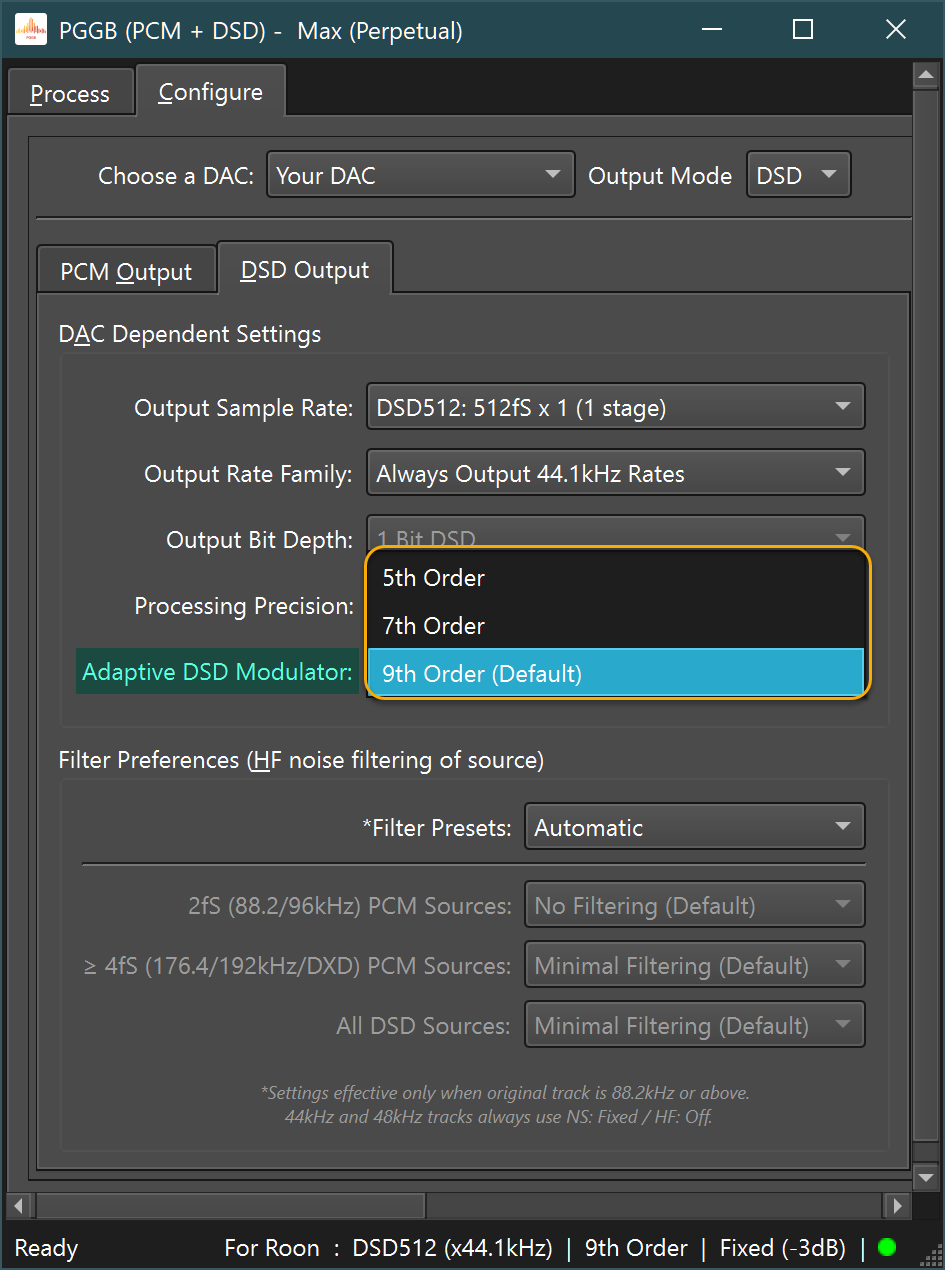
2. Choose DSD Modulator
There are three groups of modulators: Low Noise, Very Low Noise, and Ultra Low Noise. The default Very Low Noise modulator is a very good starting point. From there, you can move up to the Ultra Low Noise 25th order modulator, but please note that the 25th order modulator uses higher precision, hence it increases memory usage and is also slower. You can also move down from the default order to decide if you prefer them. The modulators are rate adaptive, i.e., they are optimized for a given rate to achieve the lowest quantization noise in the audible range while keeping the slope of the noise profile gentle. The Very Low Noise and Ultra Low Noise modulators use a new modulator structure and the order is also adaptive. The order shown in the drop-down menu is the highest order possible. You can find more about the modulators in the DSD Modulator Performance section.
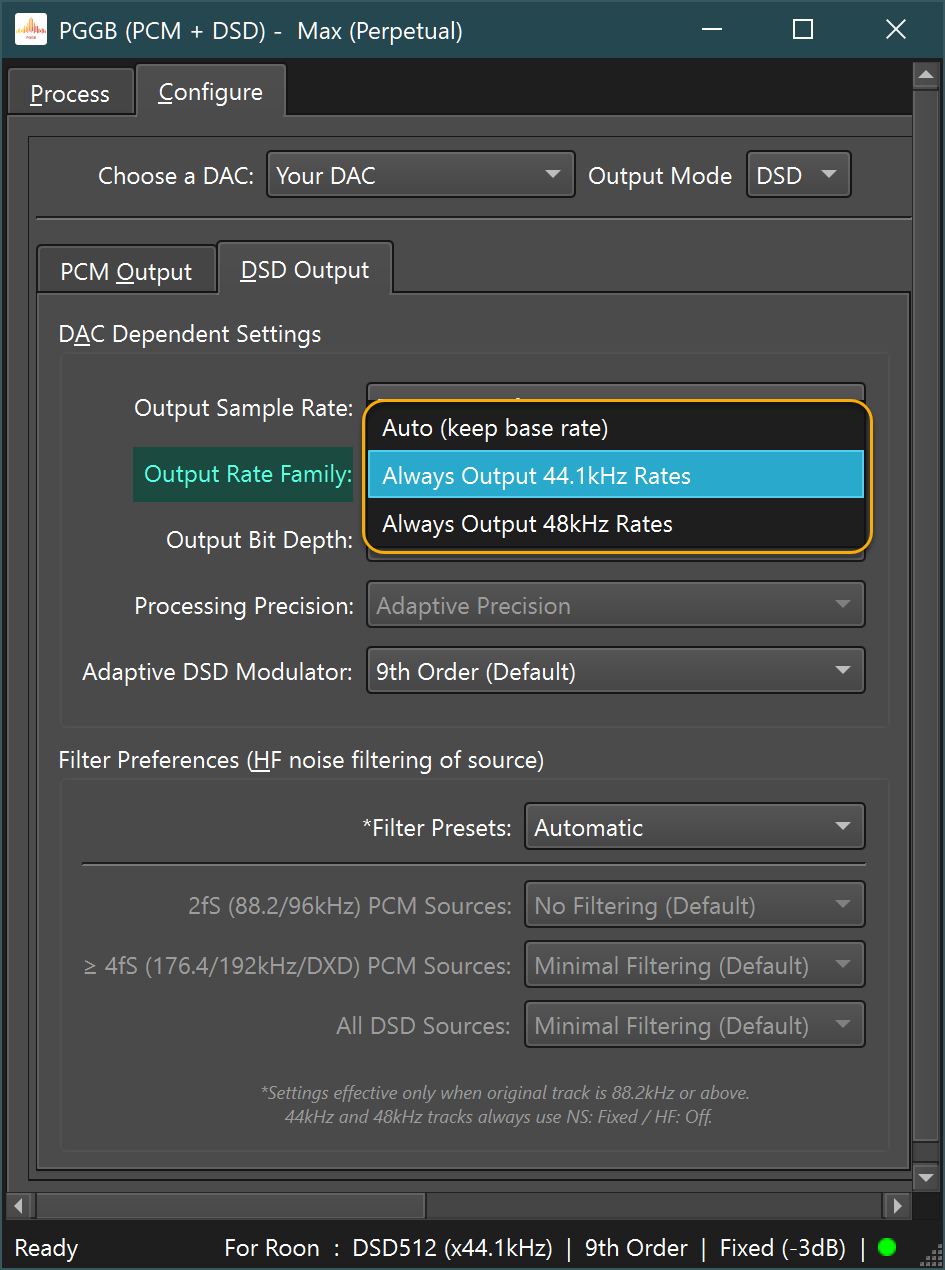
3. Choose DSD Rate Family
PGGB DSD supports inter-rate conversion, allowing you to convert between 44.1kHz and 48kHz base rate families. If both your DAC and Player support 48kHz DSD rates, you can choose 'Auto' for the output rate family. Else choose 'Always output 44.1kHz rates' (which is the default).
You are all set, other settings can be left in their default state. Press 'Process' to start processing!.
4. Choose page file (Mac only)
If you are on a Mac, there is now an option for Mac to allow creation of page files.
For DSD It is important that you select this option, then you can
browse to the folder where you want the page files. 512GB or more free space is
recommended for DSD.
This option provides you with more control over paging when you do not have enough
RAM and DSD conversion requires a lot of RAM. You can find more about this in the Page File (Mac) section.
Note: If you do not enable paging, then paging will not be
done! By default, if you hit the browse
button it should go to your HomeFolder/PGGB/cache
Between PGGB and Your DAC
Digital processing within PGGB has been done with the utmost care. When playing back PGGB remastered tracks, a bit perfect transmission to your DAC will yield the best results and when possible, your DAC must be configured to do the least processing.
Setting up your DAC:
- A direct connection (or the equivalent) to your DAC from the end point is ideal (i.e., not using any upsamplers). Use of re-clockers or regens that do not alter the bits are OK
- Set PGGB output rate to the maximum input PCM or DSD rate your DAC supports.
- In the case of PCM, set PGGB output bit depth to the native bit depth of your DAC (not the maximum allowed by the Audio driver). In the case of some R2R DACs, the optimal bit depth may depend on the sample rate.
- If your DAC has the option, set your DAC to NOS mode for PCM and pure DSD for DSD output.
Your playback software:
Any playback software you use should not do any processing of the PGGB remastered tracks. This includes volume control, dither, noise shaping, further upsampling, bit depth conversion (padding is OK). I.e., PGGB remastered tracks should be transmitted to your DAC bit for bit without any change for the best results.
A note about software volume control:
Software volume control may look innocuous, what possible harm could come from converting to 64 bit doubles and changing the level? PGGB’s noise shapers and modulators all but eliminates quantization noise in the audible range. Any sort of processing such as volume control leads to 64 bit conversion and then truncation back to your DAC’s bit depth (16, 24 or 32) in the case of PCM and remodulation in the case of DSD. This conversion adds quantization noise back into the track that PGGB worked hard to remove.
Sometimes your DAC does not provide volume control and/or you may prefer to use software volume control. You have couple of choices:
- For PCM:
- Best option: Set PGGB to Remaster output as 64 bit, the downside is large file size. Use software volume control and output at desired bit-depth. Enable Noise shaping or dither if your playback software supports it
- Alternate option: Enable noise shaping in PGGB and output in 32 bit format. Use software volume control and output at desired bit-depth. Enable Noise shaping or dither if your playback software supports it
- Another option (use with caution): This is a good option if you do not use the volume knob much and generally leave it at a fixed level (like say -3dB). Enable noise shaping in PGGB, and set the gain slider to the reduced gain (same as what you would set in your player such as HQP) and gargle-blast your tracks. During playback, disable noise shaping or dither in your playback back software but start with a reduced level (first set the volume to where you will normally set it in your player) and gradually bring it up to 0dB or max.
- For DSD:
- Best option (use with caution): This is a good option if you do not use the volume knob much and generally leave it at a fixed level (like say -3dB). Set gain slider to the reduced gain (same as what you would set in your player ) and gargle-blast your tracks. During playback, start with a reduced level (first set the volume to where you will normally set it in your player) and gradually bring it up to 0dB or max, then disable all processing or enable direct SDM depending on your player.
- Alternate option: Enable volume control in your player and choose the best modulator for the DSD rate that your player offers.
Features
PGGB-EQ
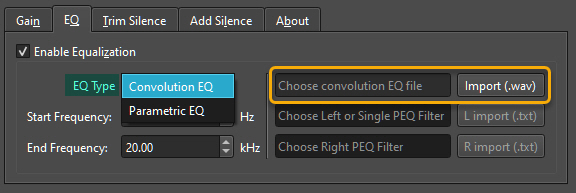
PGGB supports EQ. You can access EQ configuration through the 'EQ’ tab on the right side once ou are on Configure tab. The interface is quite simple. You can import convolution EQ filters (.wav) or you can import parametric EQ filters (.txt) directly.
Bring your own EQ
PGGB uses the concept of ‘Bring your own EQ’:
- DRC: If you are interested in Digital Room Correction (DRC), PGGB is not a substitute for measurement software. You would use your favorite measurement software to create the convolution filter. Alternately you can also enlist the services of someone who can help you with measurements and EQ. The filters need to be stereo in .wav format.
- Headphones: You have a few choices
- If you have your own headphone EQ filters, you can import them.
- You can use the Auto EQ project, choose your headphone, choose ‘EqualizerAPO ParametricEq’ as the EQ app, then download the .txt file for import int o PGGB EQ.
- Alternately you can use the Auto EQ project to find your headphone and import the 48kHz or 44.1kHz Minimum phase wav file.
- Download headphone EQs from the Auto EQ project above. This list will expand as we get more feedback and submissions.
Filter Type: Two ways to import and apply EQ
Applying EQ is a simple mathematical operation. However, the quality of your filters affects the quality of the resulting remastered track. Ideally, applying equalization should impart tonal changes only, with no degradation in other qualities like dynamics, transparency, depth, and resolution.
Convolution EQ: PGGB provides an option to import your EQ filter and
apply them during the remastering
process in a transparent fashion. When importing a single .wav file, PGGB does not resample your filters for
different
input rates, but instead creates
new filters from scratch from the imported filters and applies them in a way that
retains transparency. Use the 'Import (.wav, .zip)' button to browse to your stereo or mono convolution filter file
in .wav
format. If the convolution filter is mono, then the same EQ will be applied to both left and right channels. When
'Ln. Ph' is checked, PGGB will create linear phase filters from your imported EQ filter. If 'Ln. Ph' is unchecked, PGGB
will create minimum phase filters from your imported EQ filter.
As is Convolution EQ: Sometimes, it is desirable to use EQ filters as-is without any modification. PGGB v7
allows you to import convolution EQ filters and apply them directly without any modification (for example when time
domain correction or phase correction is desired). Use the 'Import (.wav, .zip)' button to browse to your .zip file
containing .wav files at all the desired sample rates.
Import Convolution EQ directly
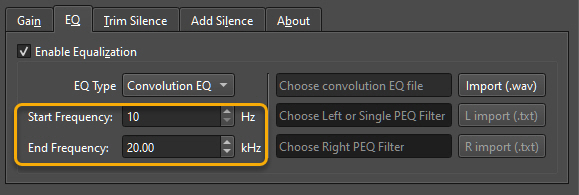
Select Frequency Range
This setting is applicable only if you choose to import convolution EQ filters as .wav and not for the as is import using .zip file.
Sometimes, you may prefer to apply EQ
only to a range of frequencies. You can choose the start and end frequency over
which you want EQ to be applied. In
most cases, you can leave this setting at the default values if you have already
created your EQ filters only for
the desired range of frequencies.
Import Parametric EQ Directly
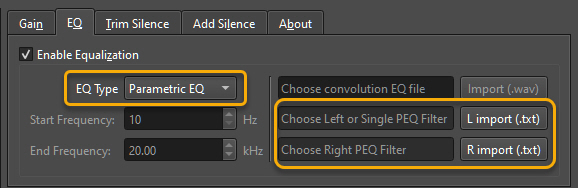
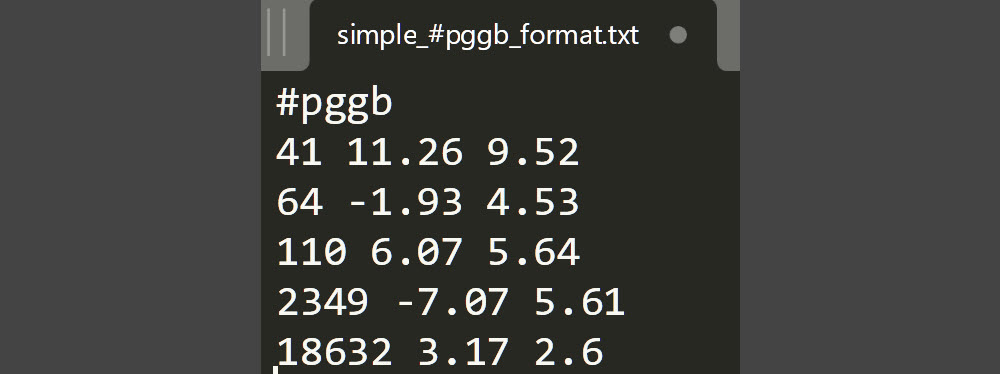
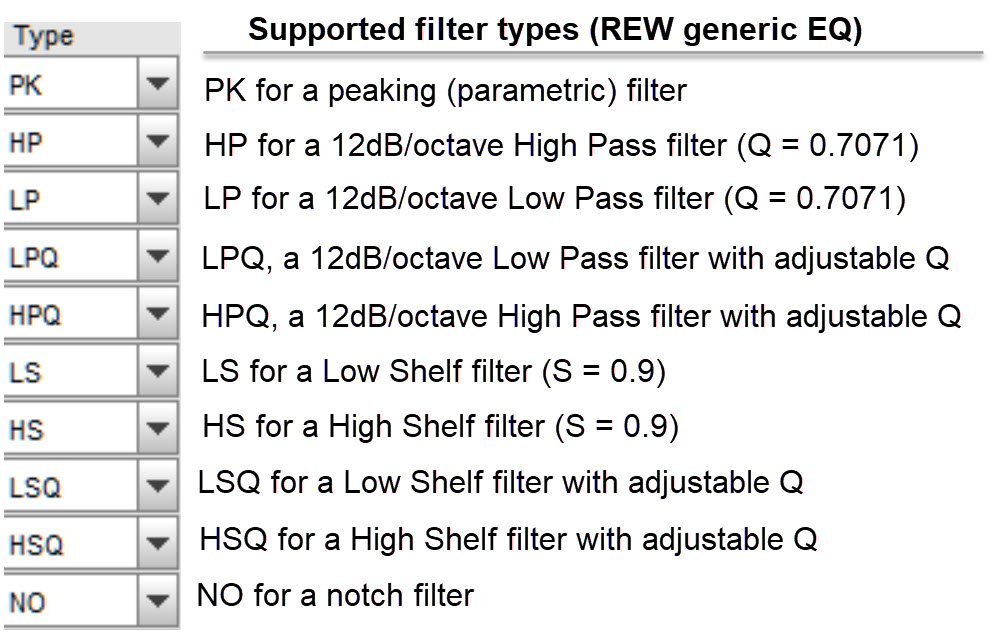
Once you have the exported .txt files, you can import them in PGGB EQ. If you wish to apply the same EQ for both the left and right channel, or want to import the left channel EQ, use ‘Choose Left or Single Filter (.txt)’ button to browse to the file. The Import button will now be enabled. If you wish to use a different EQ for the right channel, then use ‘Choose Right Filter (.txt)’ to browse to the right channel filter. You can then proceed to import the filters by pressing ‘Import Filters (s)’ button. The import of the parametric EQ filters will happen quickly (a few seconds). The supported filter types are listed below.
Please note: When exporting filters from autoeq.app and choosing 'Equalizer APO Parametric EQ', it will say LSC and HSC for Low Shelf and High Shelf filters, LSC and HSC, they are equivalent to LSQ and HSQ. In the next update we will make sure LSC is accepted too.
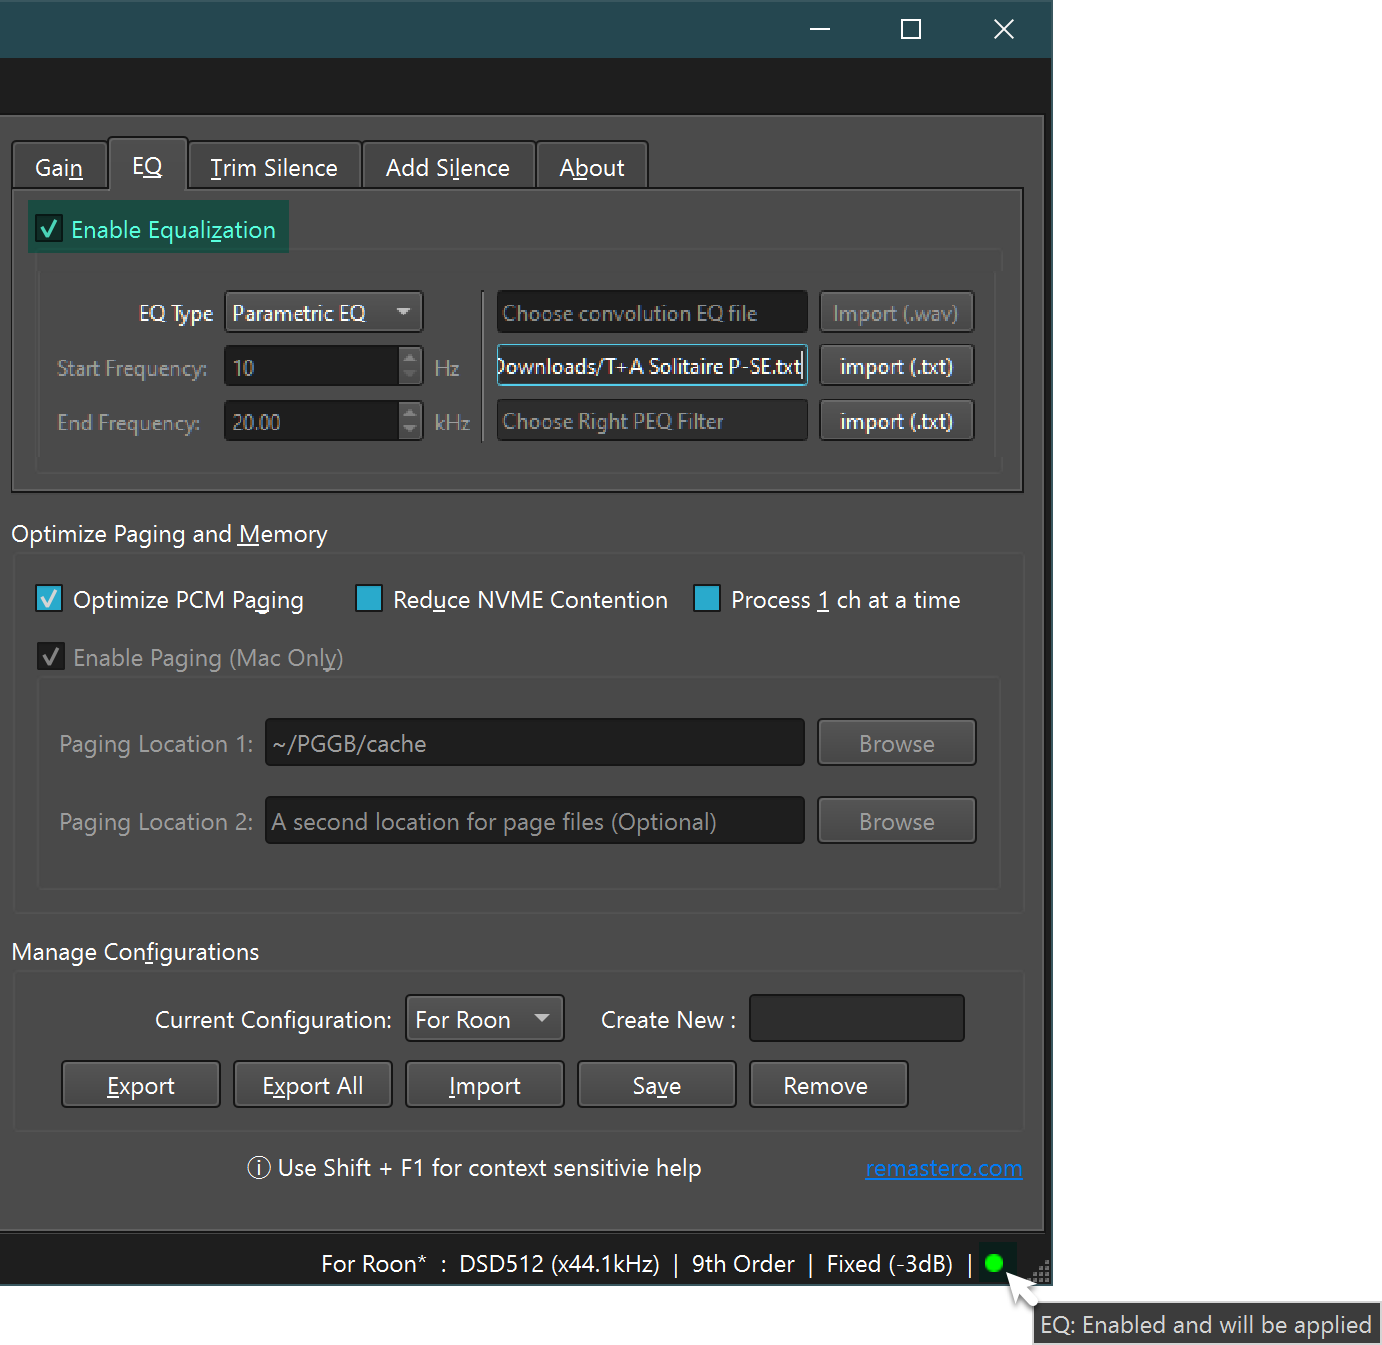
Enable or Disable EQ and Status
Once you import EQ filters, you have the option to turn EQ on or off using the 'Enable Equalization' check box. A status lamp shows current status of EQ . The status lamp is always available on all tabs on the bottom right corner. When the status light is green, it implies filters have been successfully imported and EQ is enabled. Red indicates that EQ is disabled, and no EQ will be applied. Purple indicates that EQ is enabled but the filters are not imported. The status light will also show a tooltip for possible EQ status indications.
Peak Normalize, Trim and Add Silence
If you are someone who thinks your tracks do not meet the required peak level, dynamic range DR, and acceptable silence at the beginning and end of a music track, this section is for you. That is why we have added the “Secondary Mastering” functionality, which allows you to bring all your tracks to a single loud peak level, a distinct beginning and end of the track, and set a uniform silence interval between tracks.
Peak normalization
Peak Normalize is one of the options for Applying Gain under the Gain tab. This functionality allows you to set the final volume of a track based on the peak level after performing oversampling and optionally EQ. The peak level of recordings can be different even within an album, not to mention across different artists. Peak normalization ensures similar volume of all audio recordings, set to a given value. Even if this is a set of albums from different artists and different DR ranges, then objectively the entire set of tracks will play at approximately the same RMS volume too. Additional peak normalization avoids secondary overloads that may occur when further processing happens in your DAC. The recommended value is "-3dBFS" or change it to an appropriate level if you are using PGGB for volume control instead of preamp.
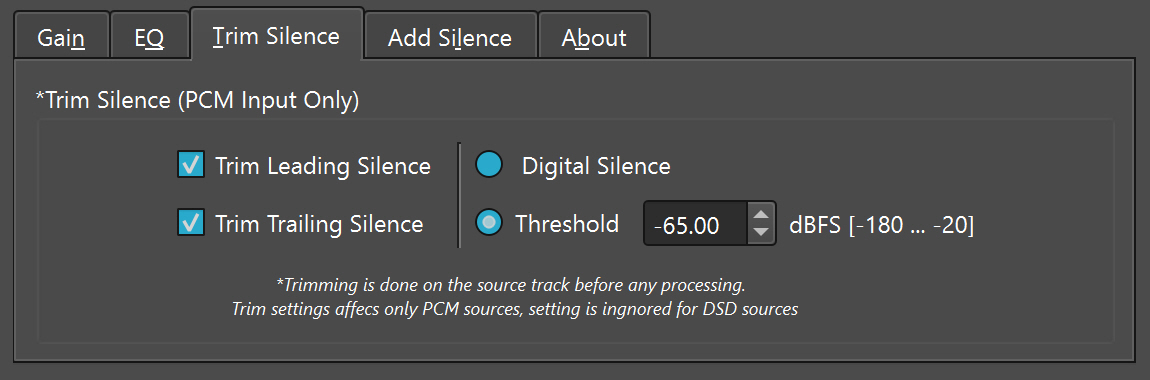
Trim silence (PCM Input Only)
This setting can found under 'Trim silence' tab. Sometimes due to sloppy mastering in recording studios, tracks often have some
unintended digital silence (blank samples) at
the beginning and end of the track, as well as very quiet background levels until
the music itself begin. Sometimes
the value of silence and background noise at the beginning of a track may occur for
a few seconds and not be the
same at the end of the track. During these periods, you hear digital silence or a
subtle background noise. If
necessary, you can completely trim digital silence, as well as background noise at
the beginning and end of the
track. This functionality will allow you to listen only to music, without gaps. The
recommended value is “Threshold -60/-70” dBFS.
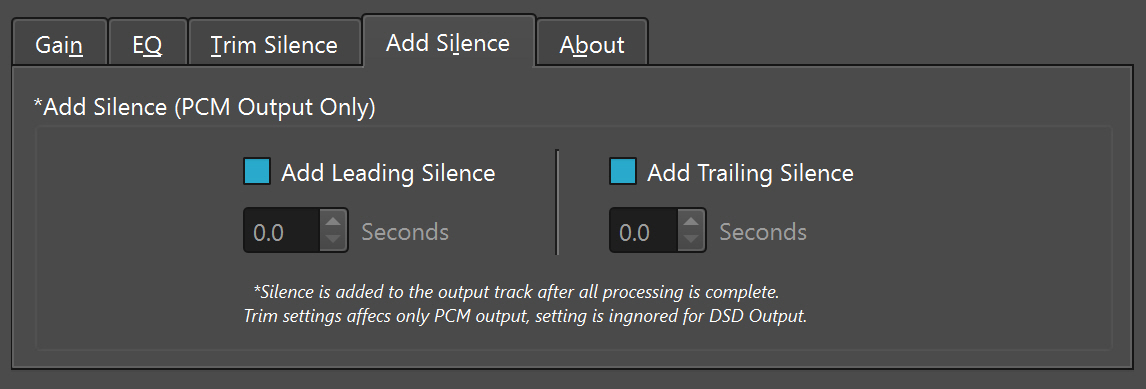
Add silence (PCM Output Only)
This setting can found under 'Add Silence' tab. After trimming digital silence and background noise, you may find your tracks play
one after
another without a pause (this may be preferable on gap-less albums or some long
classical movements, so please use your
judgment). To correct this situation, you can choose to add additional silence to
the beginning and
end of the track, but this time the digital silence period is fixed. This will allow
you to have a consistent and
noticeable pause between the tracks being played. The additional silences at the
start and tail of the track may also
allows you to avoid the beginning and end of the track being "swallowed" when played
on some players. The recommended
value is 1 second.
Combining Tracks
Longer tracks benefit from better reconstruction accuracy when remastered using PGGB. Depending on how tracks were indexed, it is possible that some albums (especially long classical works) may have been cut into multiple tracks even though they were a single long recording. In these cases, to take advantage of longer track lengths that would have been available had the tracks not been cut, PGGB allows you to treat contiguous groups of tracks as one. Please be aware that PGGB currently does not split the tracks back to the original track numbering after processing. For Combine to work, there are two requirements
- The sets of tracks being combined cannot have overlaps
- The tracks should have the track numbers in their metadata
Simple Combining of Tracks
To allow PGGB to combine tracks, you will need to create a text file named ‘combine.json’ in the album folder containing the tracks to be combined. Insert a single line in the combine.json containing a comma separated list of track number ranges within double quotes, enclosed in []. In the example below, tracks 1-6 will be combined into one track and tracks 7-16 into another. You need not list all tracks, just the ranges you want to combine.

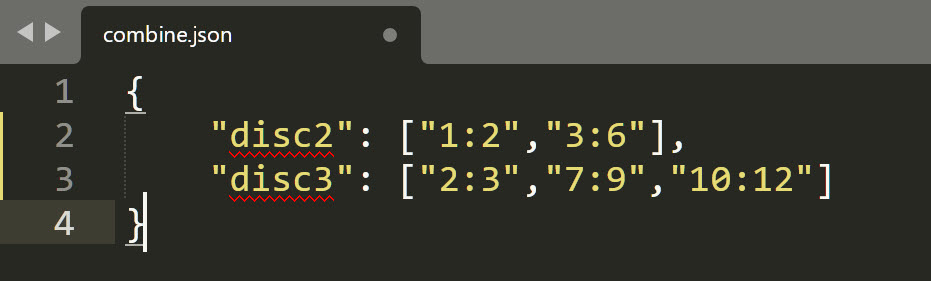
Combine Tracks in Multi-Disc Album
Some times the tracks in a single album folder are from multiple discs and you may want to combine tracks within each disc. In this case, you can create a text file named ‘combine.json’ in the album folder containing the tracks to be combined. But the format is slightly different. The format is shown below, here we are combining tracks from disc 2 and disc 3 but not from disc 1. An additional requirement is that the meta data of the tracks contains the disc number. If no disc number is found, PGGB will assume all of the tracks are from the same disc.
Load or Save Settings
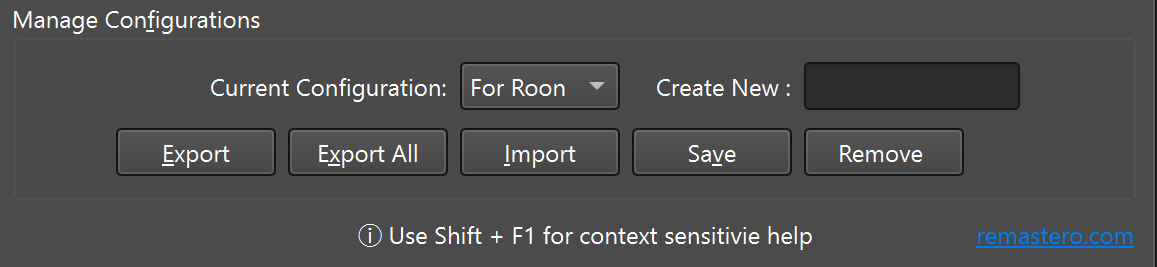
If you own multiple DACS or if you wish to process your library with different configurations, you can create multiple configurations. To create new configurations, enter the name of the configuration you wish to create and press Save. To overwrite the existing configuration, select the configuration from the drop-down, make the configuration changes and press Save. You can also remove existing configurations; just choose the configuration you wish to remove and press Remove. You can also export configurations to create a backup or to share with others. You can import configurations provided to you by others or from your own exported configurations.
Note: Default setting cannot be removed but can be overwritten.
Processing options
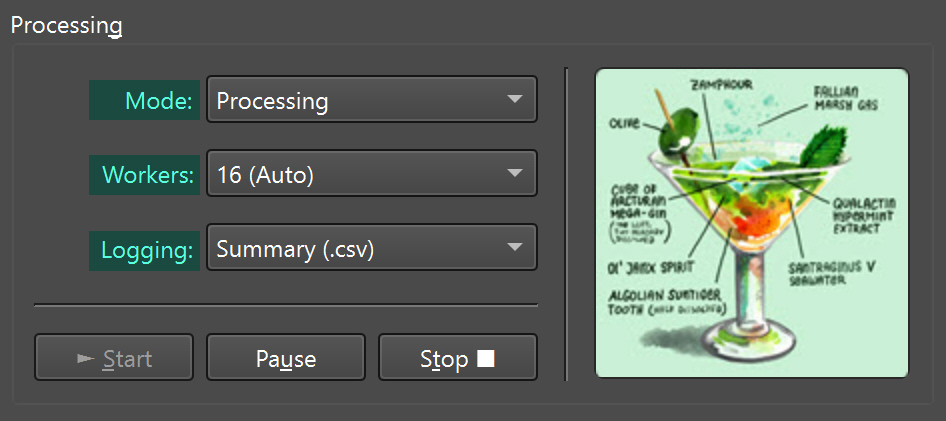
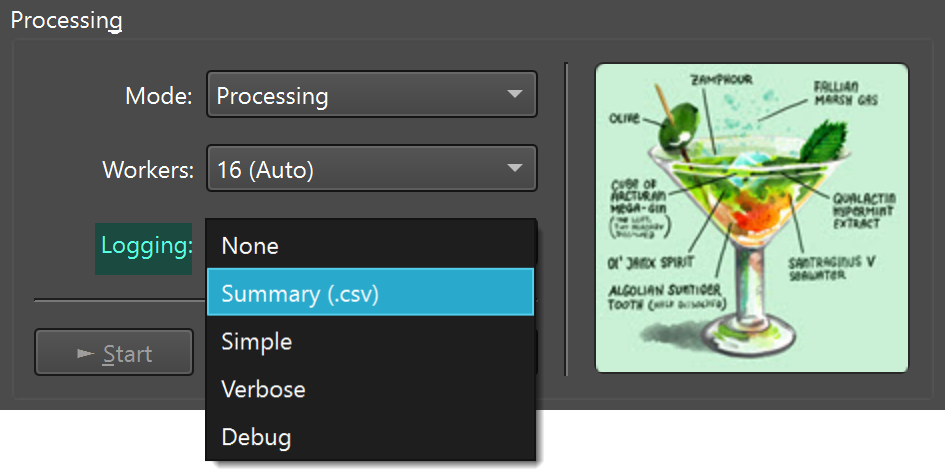
We have abandoned the hidden menu in favor of a more user-friendly interface. The Processing section allows you to Start/Pause/Stop the current processing. In addition to that, it provides three options:
- Mode: PGGB can run under two modes
- Processing: PGGB processes and upsamples files, this is the default mode.
- Analysis: PGGB does no processing but instead provides statistics on how the tracks will be processed. This is useful to find out if there are any problems with your tracks or if you have enough virtual memory set for all your tracks.
- Workers: PGGB defaults to the number of logical cores under 'Auto' . PGGB improves processing speeds by distributing the workload over multiple worker threads. It uses a heuristic based on the available RAM and logical cores to choose the optimal number of worker threads for each track. However, there are other factors (such as heat dissipation and fan noise) that PGGB is not aware. Here, you may use your judgment to cap the maximum number of worker threads. By default, this is the number of logical cores. If you set it to 1 there is no parallelism (not recommended).
- Logging: Choose the level of logging you prefer, with None being silent and Debug being very chatty. We recommend leaving it at Summary or Simple. Use Verbose or Debug if you run into issues and email us the logs.
Note: PGGB remembers all your current settings on the next start, except the processing mode. This is intentional as you may forget the processing mode was set to analysis.
Status
Status bar: The status bar displayed at the bottom of PGGB window is information rich. The right side of the status bar is dedicated to showing the current configuration you are using. The left side of the status bar is dedicated to showing the current activity. When you are processing tracks, the left side of the status bar shows information regarding the track you are processing and also CPU and memory information. Once the processing is done, it shows you how many tracks were successfully processed and also if any were skipped or failed to process.

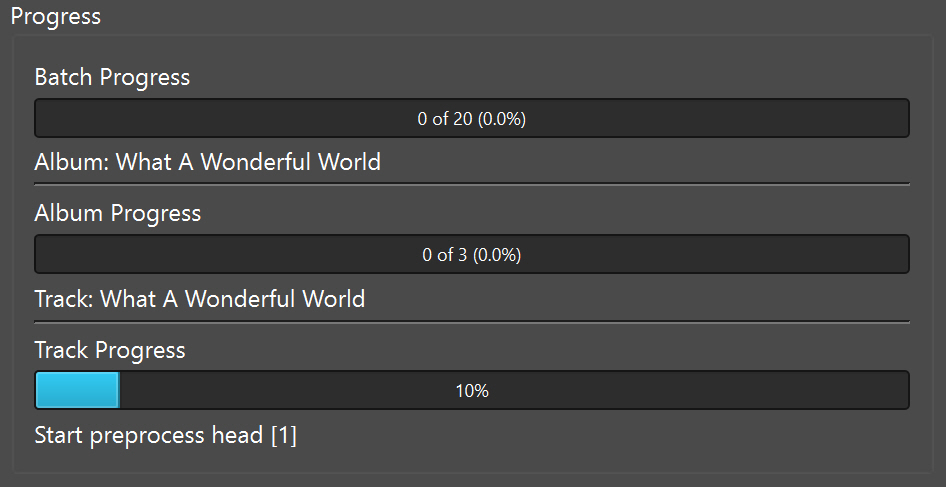
Progress bars: Progress bars on the right side of the 'Process' tab show Batch, Album and Track level progress including the current rack and album being processed.
Log files
Album level logs can be found in remastered output folders. But be sure to turn on logging under under the 'Processing' section of 'Process' tab.
We recommend setting the log level to Summary or Simple for most users. If you are having issues, you can set the log level to Verbose or Debug and send us the logs.
Advanced Configuration
Dac and System
PGGB is already tuned to provide optimal results with very little tweaking
needed. In
short it is in auto-pilot mode. Go to ‘Configure’ tab to change the settings.
Settings for the dropdowns on the left are determined by your DAC and your PC
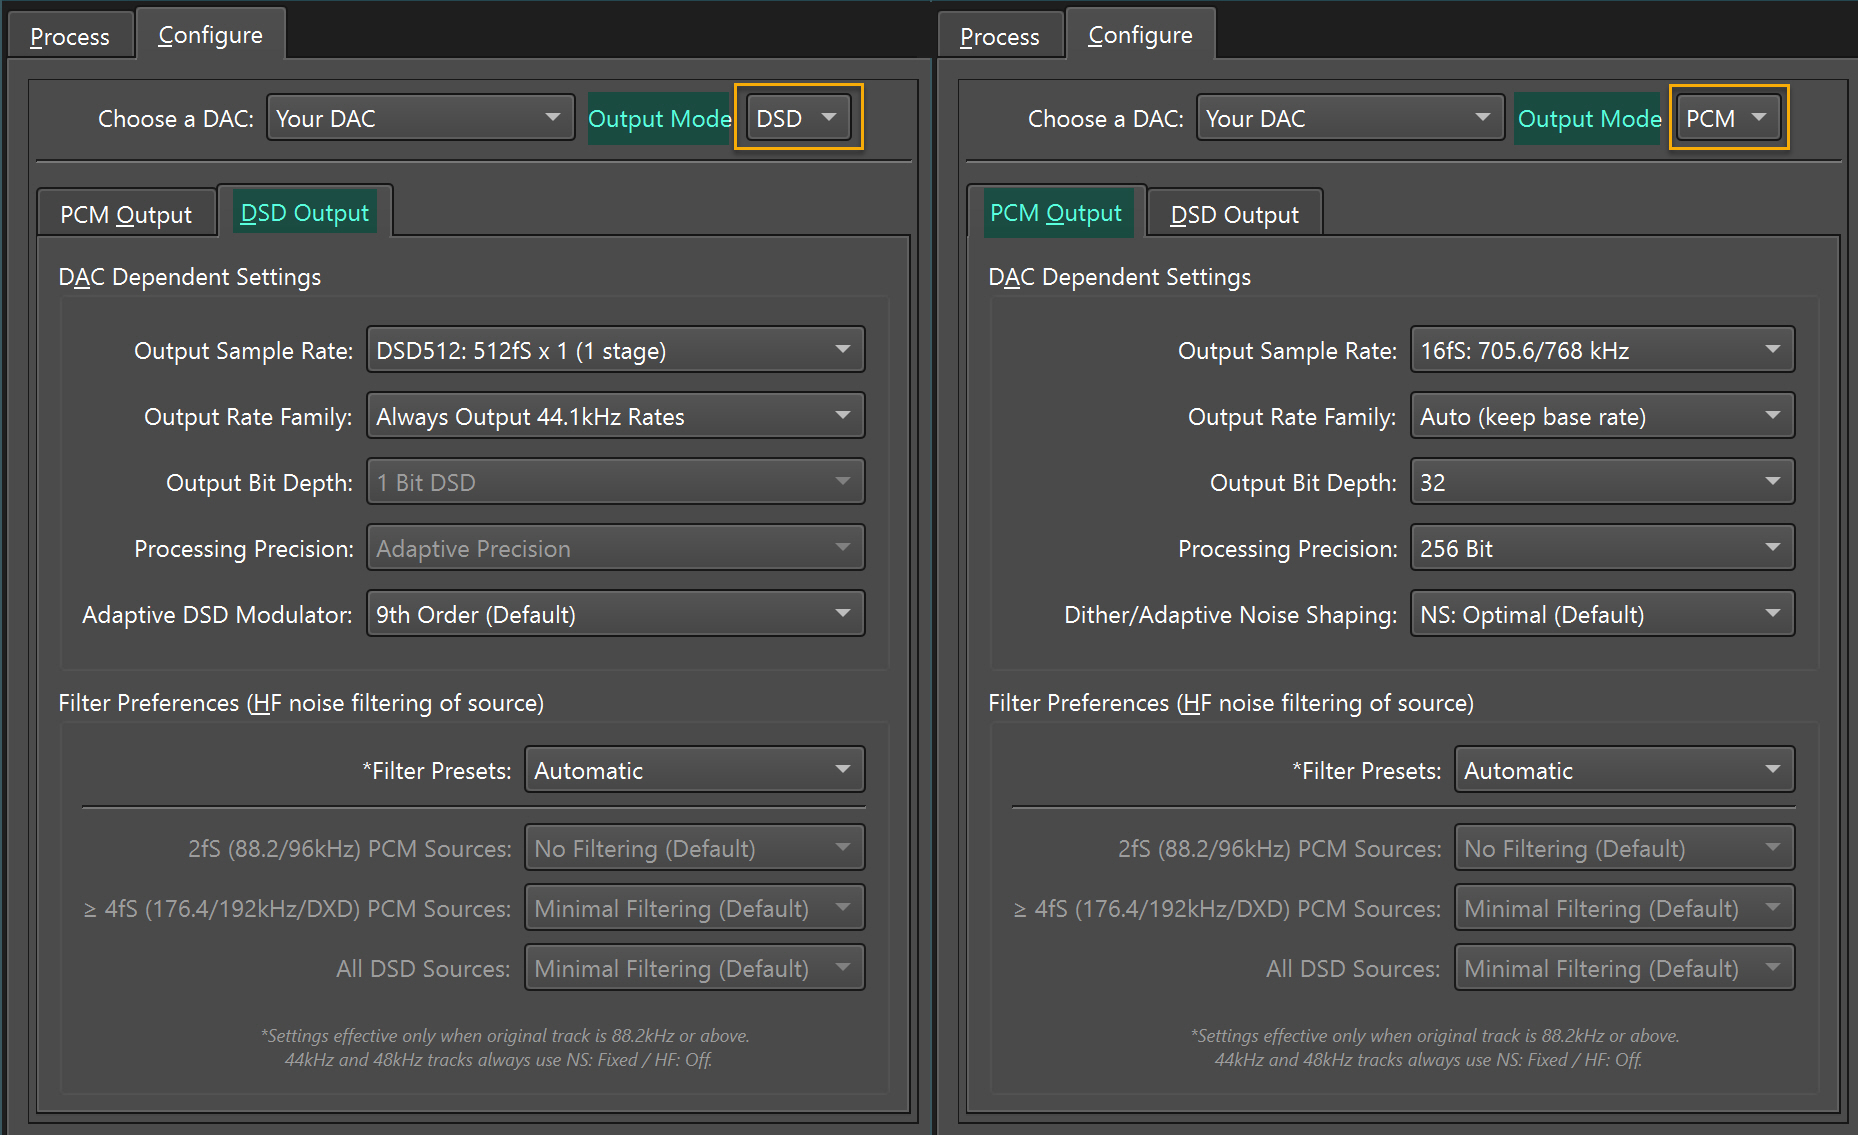
- Choose A DAC: Here you have the option of customizing the settings by choosing 'Your DAC' and configuring the rest of the settings or load one of our presets if it matches your DAC. If you load one of our DAC presets, our suggested settings are loaded. You may modify them, you can also restore them to the default settings using the reset button.
- Output Mode: Choose between DSD or PCM output, if you choose one of our DAC presets, it will automatically choose the best output mode for the DAC, but feel free to switch.
- PCM / DSD Output tabs: If you select PCM or DSD output tab under the DAC selection, it will automatically change the output mode.
- Output Sample Rate: Choose a sample-rate family that matches the maximum
output
rate supported by your DAC. You can choose between PCM or DSD output rates.
- PCM: Go to the PCM section of the dropdown and choose the highest PCM rate your DAC will accept
- DSD: Go to the highest DSD rate section your DAC will accept (DSD128,
DSD256, DSD512, DSD1024 or DSD2048), then choose
between single and two stage processing.
- Single stage processing: Single stage processing will be more memory intensive and take longer to process but will provide the best reconstruction accuracy.
- Two stage processing: Two stage processing will first upsample to 16fS rate or higher and then use a simpler algorithm to do the second stage processing to the final DSD rate. Two stage processing will be less memory intensive and faster, the higher the rate of the first stage, the better the reconstruction accuracy. There will be multiple options for two stage processing.
- Output Rate Family: Both DSD and PCM output rates support inter-rate conversion,
i.e., it will be possible to
convert between 44.1kHz and 48kHz base rate families.
- Auto: The output rate will be a multiple of the base sampling rate of the source track.
- Always output 44.1kHz rates: The output rate will always be a multiple of 44.1kHz, even if the source track has a base sampling rate of 48kHz. This is useful if your DAC or Player does not support 48kHz DSD rates such as Roon. It is rarely needed for PCM. It is also useful if the highest PCM or DSD rate supported by your DAC is a multiple of 44.1kHz rate. Please note, inter-rate conversion requires additional processing time but memory requirements do not change much.
- Always output 48kHz rates: The output will always be a multiple of 48kHz, even if the source track is has a base sampling rate of 44.1kHz. This is useful if your DAC always internally converts to a multiple of 48kHz rate or if your DAC performs best at the highest 48kHz rate for PCM or DSD. Please note, inter-rate conversion requires additional processing time but memory requirements do not change much.
- Output Bit Depth: Setting the output bit depth will depend on your DAC and if
you wish to process further.
- PCM direct to DAC: If your DAC supports 32 bits, then 32 bits is the best option. Bit depths of 12 through 32 are available to help you choose the right bit depth that is optimal for your DAC. For example, some R2R DACs may have a higher settling time for very high sample rates (1Mhz or more), in these cases, choosing lower bit depths may help.
- PCM for further processing: If you wish to do further processing (such as EQ or dither), then 64 bit doubles may be a good option too but do be aware, it will double the storage requirements. Alternately, choose 32bit output with noise shaping.
- DSD: Since DSD is a single bit stream, bit depth options are not available and that is normal.
- Noise shaping/Modulators: Noise shapers and modulators help attain high small
signal accuracy in the audible range by minimizing quantization
noise. Removal of quantization noise results in a very lifelike sound by
retaining higher precision in the audible range.
Depending on the output type (PCM or DSD), you can choose between noise
shapers or DSD modulators.
- Adaptive DSD Modulator: There are three sets of DSD modulators. Low Noise
modulators (9th, 7th and 5th order) that have a quantization noise in the
audible band between -200dB and -400dB. Very Low Noise modulators (13th and
19th order) that have a quantization noise in the audible band between
-400dB and -600dB. Ultra Low Noise modulators that have a quantization
noise in the audible band between -600dB and -800dB. The modulators are
rate adaptive, i.e., they are optimized for a given rate to achieve the
lowest quantization noise in the audible range while keeping the slope of
the noise profile gentle. The Very Low Noise and Ultra Low Noise modulators
use a new modulator structure and the order is also adaptive. The
order shown in the drop-down menu is the highest order possible.
Note: With higher order modulators (13th and higher), on rare occasions, you may hear an audible hiss due to ineffective filtering by the DAC or interaction with downstream components. If this happens, we recommend you choose a lower order modulator.
- Adaptive Noise shaping (PCM): PGGB employs Adaptive noise shaping
algorithms for PCM that are individually tailored
for the bit depth,
sample rate you have chosen, and noise filter settings.
- 'NS: Optimal’-- PGGB will choose the optimal noise shaping algorithm to remove quantization noise from the audible range if left in ‘Auto ’ (recommended).
- ‘NS: Alternate’ -- Is a slightly different flavor of the optimal noise shaper, with a different noise shaping profile. It results in a slightly different portrayal of transients and high frequencies (available only for 256 bit precision).
- ‘NS: Extended’ -- Reserve this for your 'problem' tracks that have high background noise or are from old analog transfers that otherwise sound harsh. Use this in combination with HF: Aggressive filter when available.
- ‘Dither only’ -- Choose if you want to bypass adaptive noise shaping and apply dither only (not recommended for 8fS or higher rates).
- Adaptive DSD Modulator: There are three sets of DSD modulators. Low Noise
modulators (9th, 7th and 5th order) that have a quantization noise in the
audible band between -200dB and -400dB. Very Low Noise modulators (13th and
19th order) that have a quantization noise in the audible band between
-400dB and -600dB. Ultra Low Noise modulators that have a quantization
noise in the audible band between -600dB and -800dB. The modulators are
rate adaptive, i.e., they are optimized for a given rate to achieve the
lowest quantization noise in the audible range while keeping the slope of
the noise profile gentle. The Very Low Noise and Ultra Low Noise modulators
use a new modulator structure and the order is also adaptive. The
order shown in the drop-down menu is the highest order possible.
- Precision: For DSD, the precision is adaptive based on the modulator and output
DSD rate, so the precision slider is
disabled. For PCM, you can choose the precision you want PGGB to use for all of
its processing and EQ. Normal (64 bit)
processing is the default, it is the fastest and least memory intensive. If
you desire even higher accuracy, you may
choose to do the processing at Chill 107 bit precision an Insane 128 bit precision, or a Ludicrous
256 bit precision. 107 bit and 128 bit precisions have very similar memory requirements but 107bit processing is about
2.2x faster than 128 bit processing with only a slight loss in accuracy. The higher precision
improves reconstruction accuracy and noise shaping performance, and leads to
better sound quality. It comes at the
cost of increased processing time and increased memory usage. Also refer system requirements
section for memory requirements.
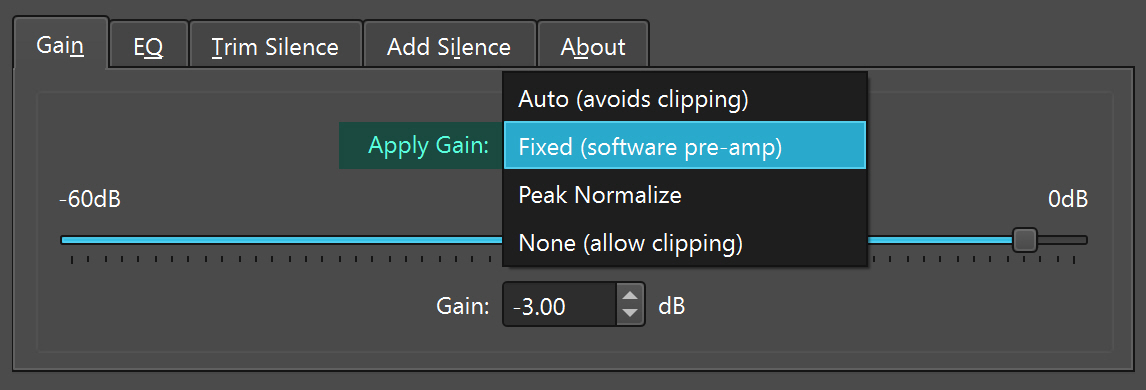
- Gain: The gain setting has now moved
to ‘Gain’ tab on the right side of the Configure tab. There are four choices for how you want to apply
gain. The default option is 'Auto (avoids clipping)'. If left at auto, no gain is applied
unless an
inter-sample-over is encountered (refer Inter-Sample-Overs
section). If you wish to use PGGB as a software pre-amp with a fixed gain for off-line volume control, choose 'Fixed
(software pre-amp)' and set the
set a negative gain, this
gain is applied to the tracks after all
processing is done. If you choose ‘Peak Normalize’, the peak of the track is
set
to a fixed negative gain after all
processing is done. If you do not want PGGB to alter the gain in any way, choose 'None (allow clipping)'. If you
wish to normalize the peak gain across all tracks in an album and if you have already analyzed the tracks you wish
to process using tools such as Foobar2000 to add ReplayGain, then choose 'ReplayGain: Album Peak'.
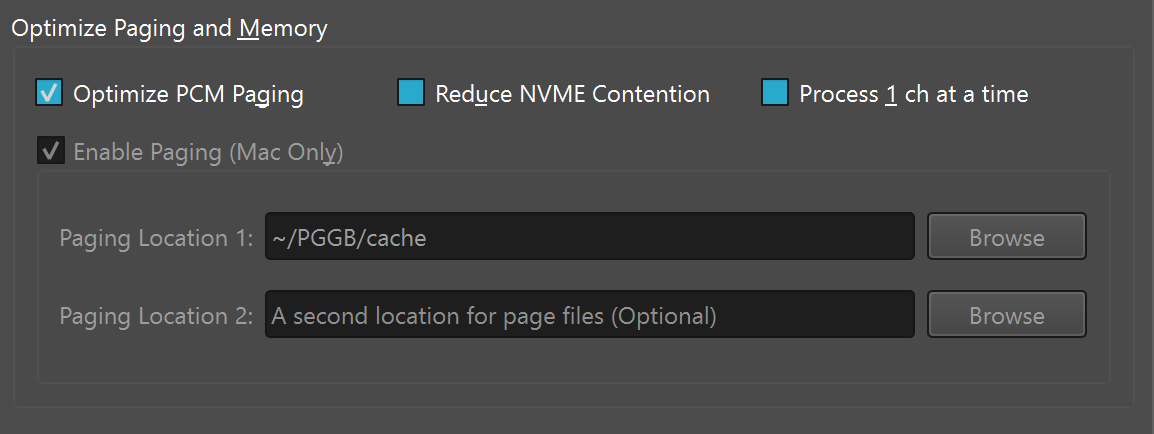
Memory Optimization:
This setting can be found on the right side of configure tab above Manage Configurations. For Macs, it is now possible to set page file location, you can choose up to two paging locations. Refer Page File (Mac) section for more information.
Optimize paging for PCM
If you check the 'Optimize paging for PCM', it will let you process longer tracks by optimizing paging without incurring much of a performance hit due to paging. If the processing won't fit fully in memory, then PGGB will process one channel at a time, to anticipate any possible clipping, PGGB reduces gain preemptively by 1dB. If you are concerned that the gain may change on a long movement that was split into tracks, we suggest setting a fixed negative gain of 1dB or more. In rare cases where high CPU usage causes thermal instability, there is also an option to force PGGB to process one channel at a time even when there is enough memory to process both left and right channels simultaneously.
Process in Blocks (>DSD256)
Enabling block processing for DSD output trades a subtle reduction in sound quality for the ability to process larger DSD tracks that wouldn't otherwise fit within available RAM. Without this option, PGGB produces the highest fidelity output it can.
Sound Quality Warning: There is no free lunch — only enable this if you actually need it for a track that wouldn't process otherwise. When you click the option, PGGB will ask "Continue with block processing enabled?" before applying it.If you do need to process a track in blocks, we recommend also trying a lower DSD rate without block processing. If you are using the 25th order modulator, try the 19th order modulator. Then compare and choose what you prefer.
When PGGB is processing a track by splitting it into blocks, a kangaroo (🦘) icon will appear in the status bar along with the number of 'hops' indicating the number of blocks the track is split into.
This option is conditionally enabled depending on available RAM and the modulator and DSD rate chosen, if at least a single block will fit in RAM for processing.
Reduce contention
Checking 'Reduce contention' allows PGGB to reduce NVME contention, especially when using a single NVME drive for paging, this reduces the NVME read/writes from saturating and improves speed.
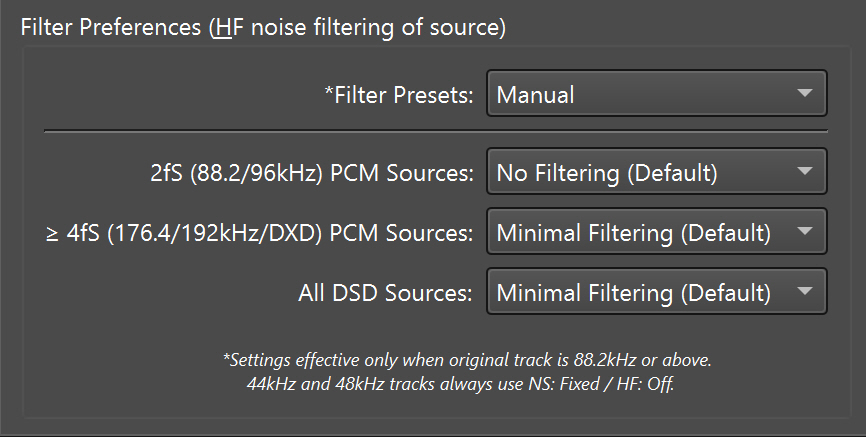
Filter Preferences
Below the DAC Dependent Settings, you can find Filter Preferences. Here you have two options: Automatic and Manual.
-
Automatic: We highly recommend leaving it on the ‘Automatic’ preset. The
‘Automatic’ preset will choose the optimal
High Frequency Noise Filter (HF Filter) settings for
each of your tracks. The relevant settings
are disabled as they are already chosen for you.
-
Manual: The ‘Manual’ preset gives you full control over the High Frequency (HF) Noise Filter
settings. There is no one-size-fits-all for these settings as the optimal
choices for HF Filter
choices depend on the music track; more specifically the sample rate of your
music track. This is the reason why the
settings are split into three categories based on Input Rate:
- 2fS PCM: 88.2kHz and 96kHz Hi-res tracks - these typically have music content till 40kHz but not significant noise beyond 40kHz.
- ≥ 4fS PCM: 176.4kHz, 192kHz, DXD (352.8kHz) and higher - these typically have music content till 40kHz but may also contain significant noise beyond 40kHz
- DSD: DSD64, DSD128, DSD256, DSD512 and DSD1024 – these have significant noise beyond 40kHz.
Noise Shapers
The choices for Noise Shaper type depends on chosen configuration in ‘Adaptive Noise Shaping’ settings:
- SDM: When the output rate is DSD, the noise shaper is SDM (Sigma Delta Modulator) that is optimized for the DSD rate.
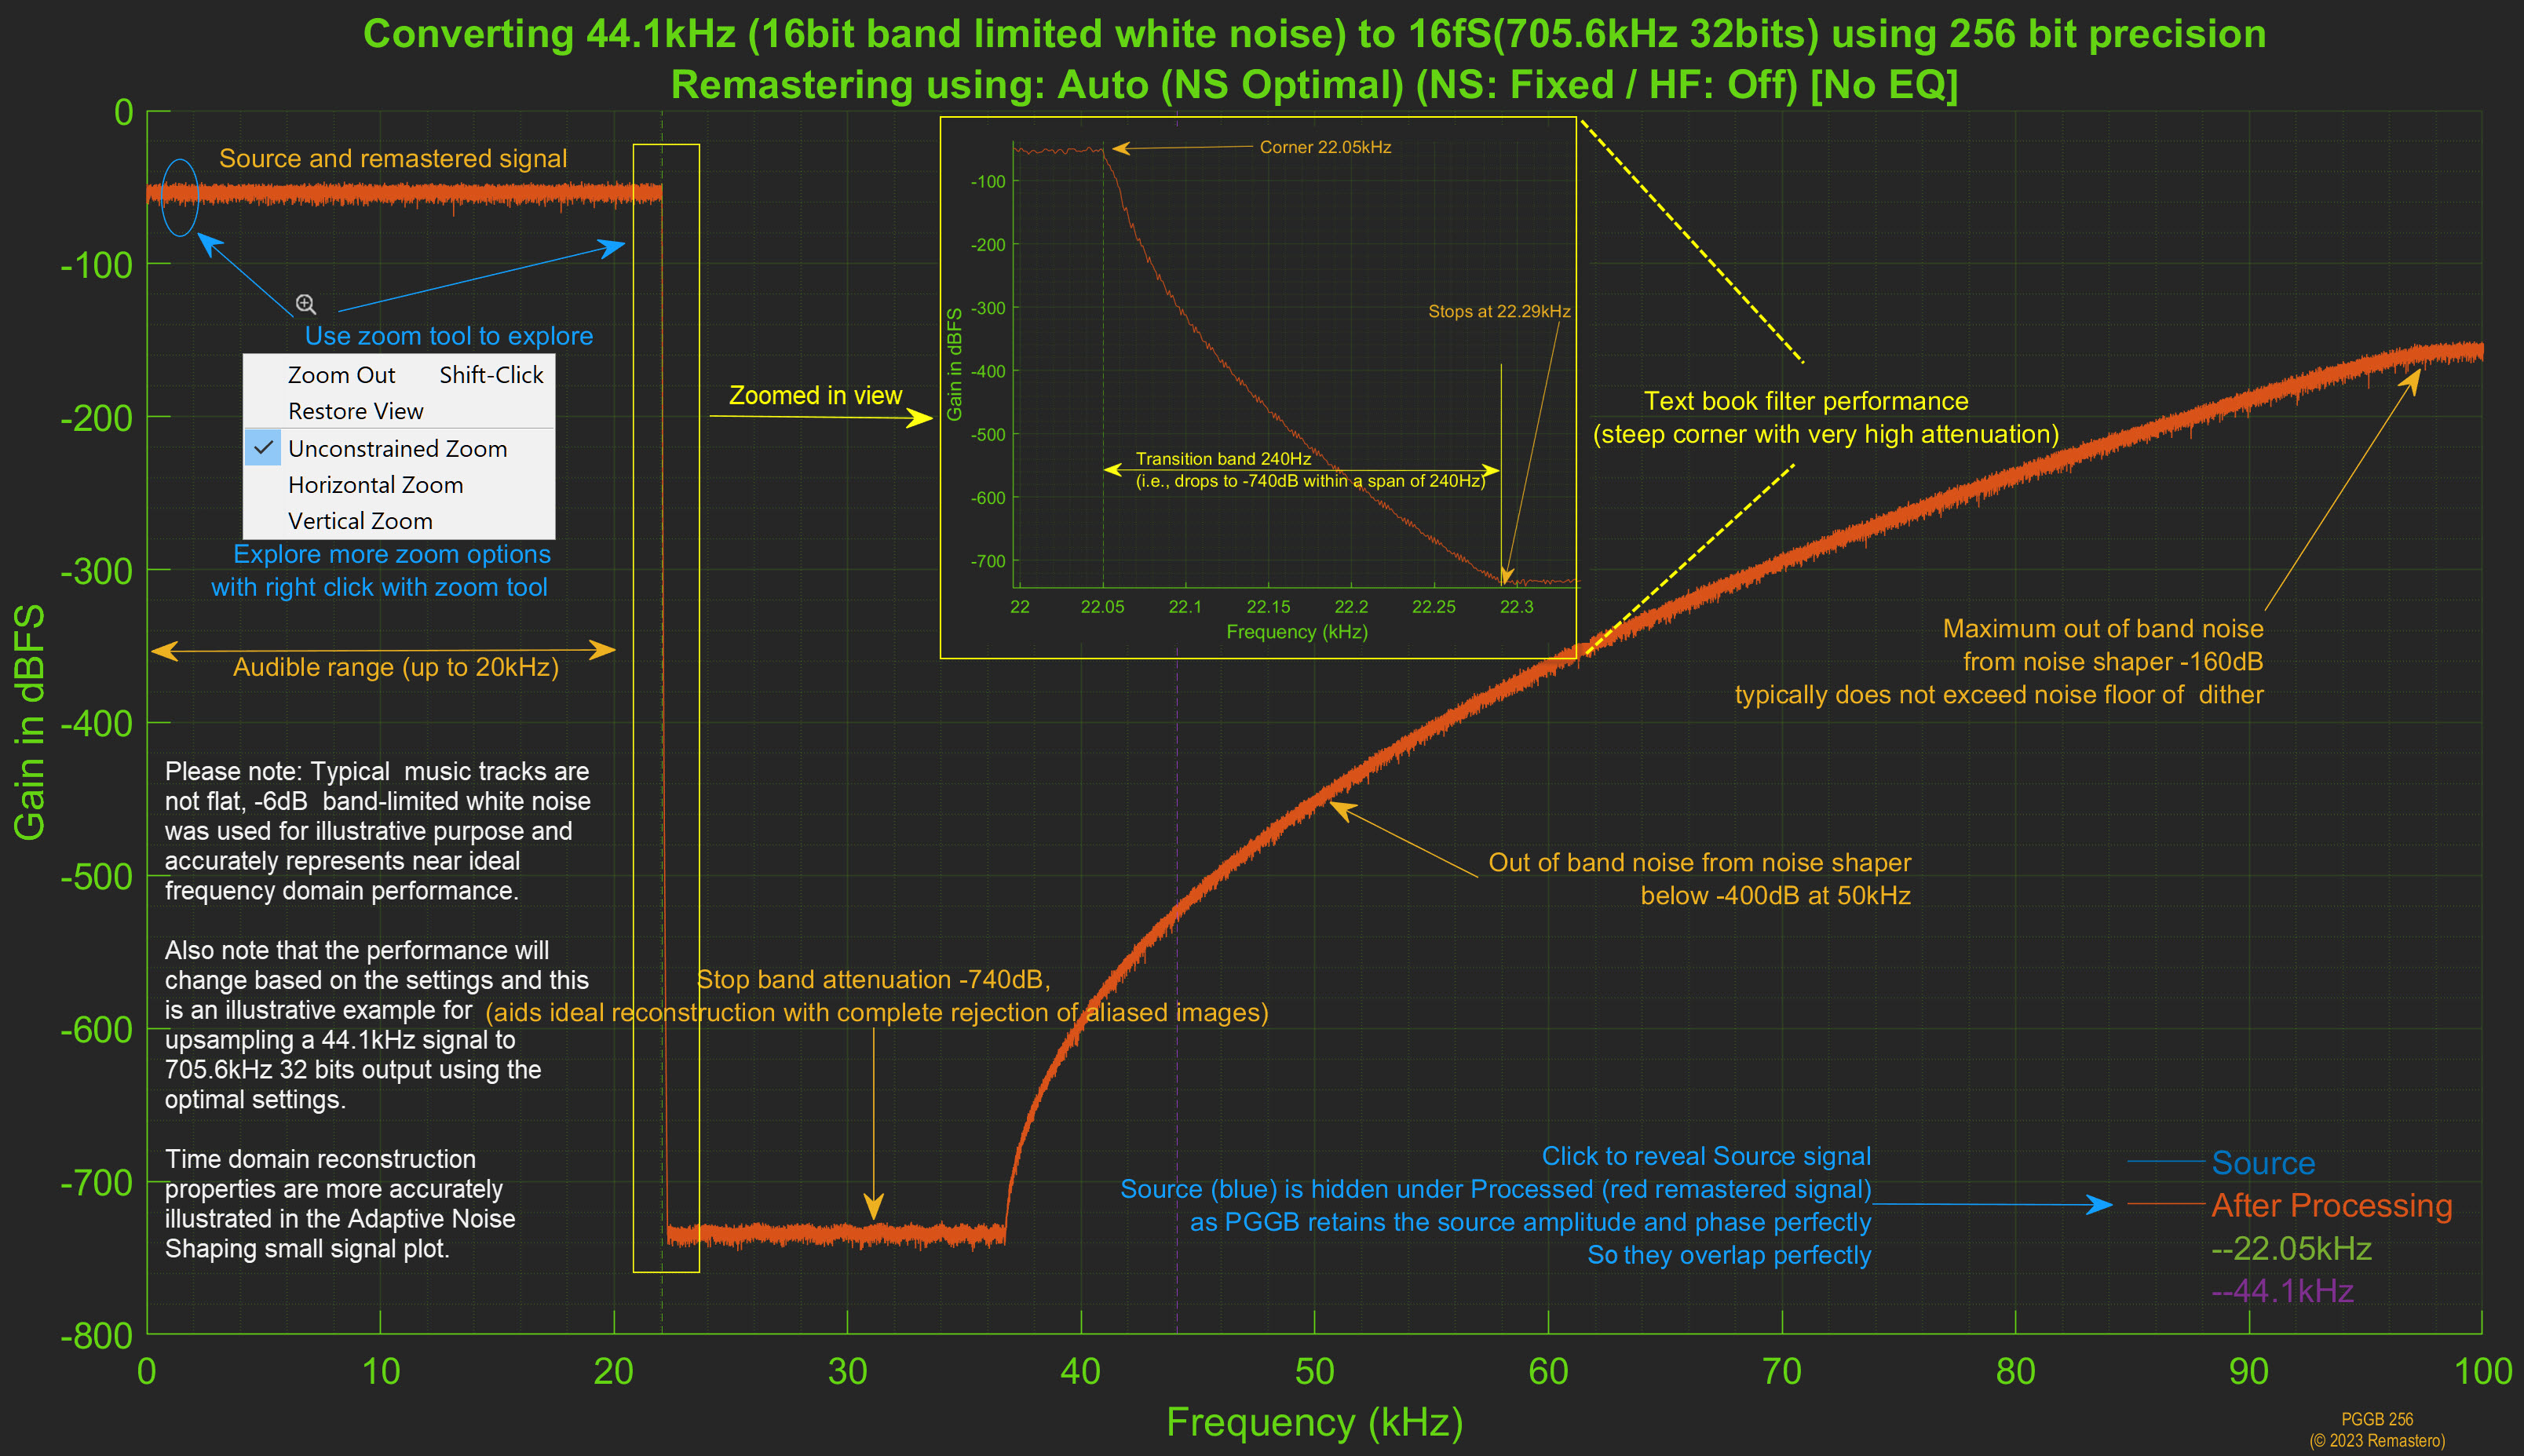
- Optimal: The noise shaper has been optimized for the audible range and very low noise floor extends at least to 40kHz (as low as -740dB for 256 bit precision) extends at least to 40kHz.
- Extended: Noise shaper minimizes quantization noise beyond the audible (Extended) range (as low as -540dB for 128 bit precision. -500dB for 107 bit precision and -360 for 64 bit precision). It has slightly higher noise in the audible range, but the noise floor remains low for an extended high frequency range. It has been described as sounding 'airy' during subjective listening tests.
- Dither (Set ‘Dither Only’ in Configuration): No noise shaping is done, only a Gaussian dither is applied, not recommended for output rates higher than 352.8kHz.
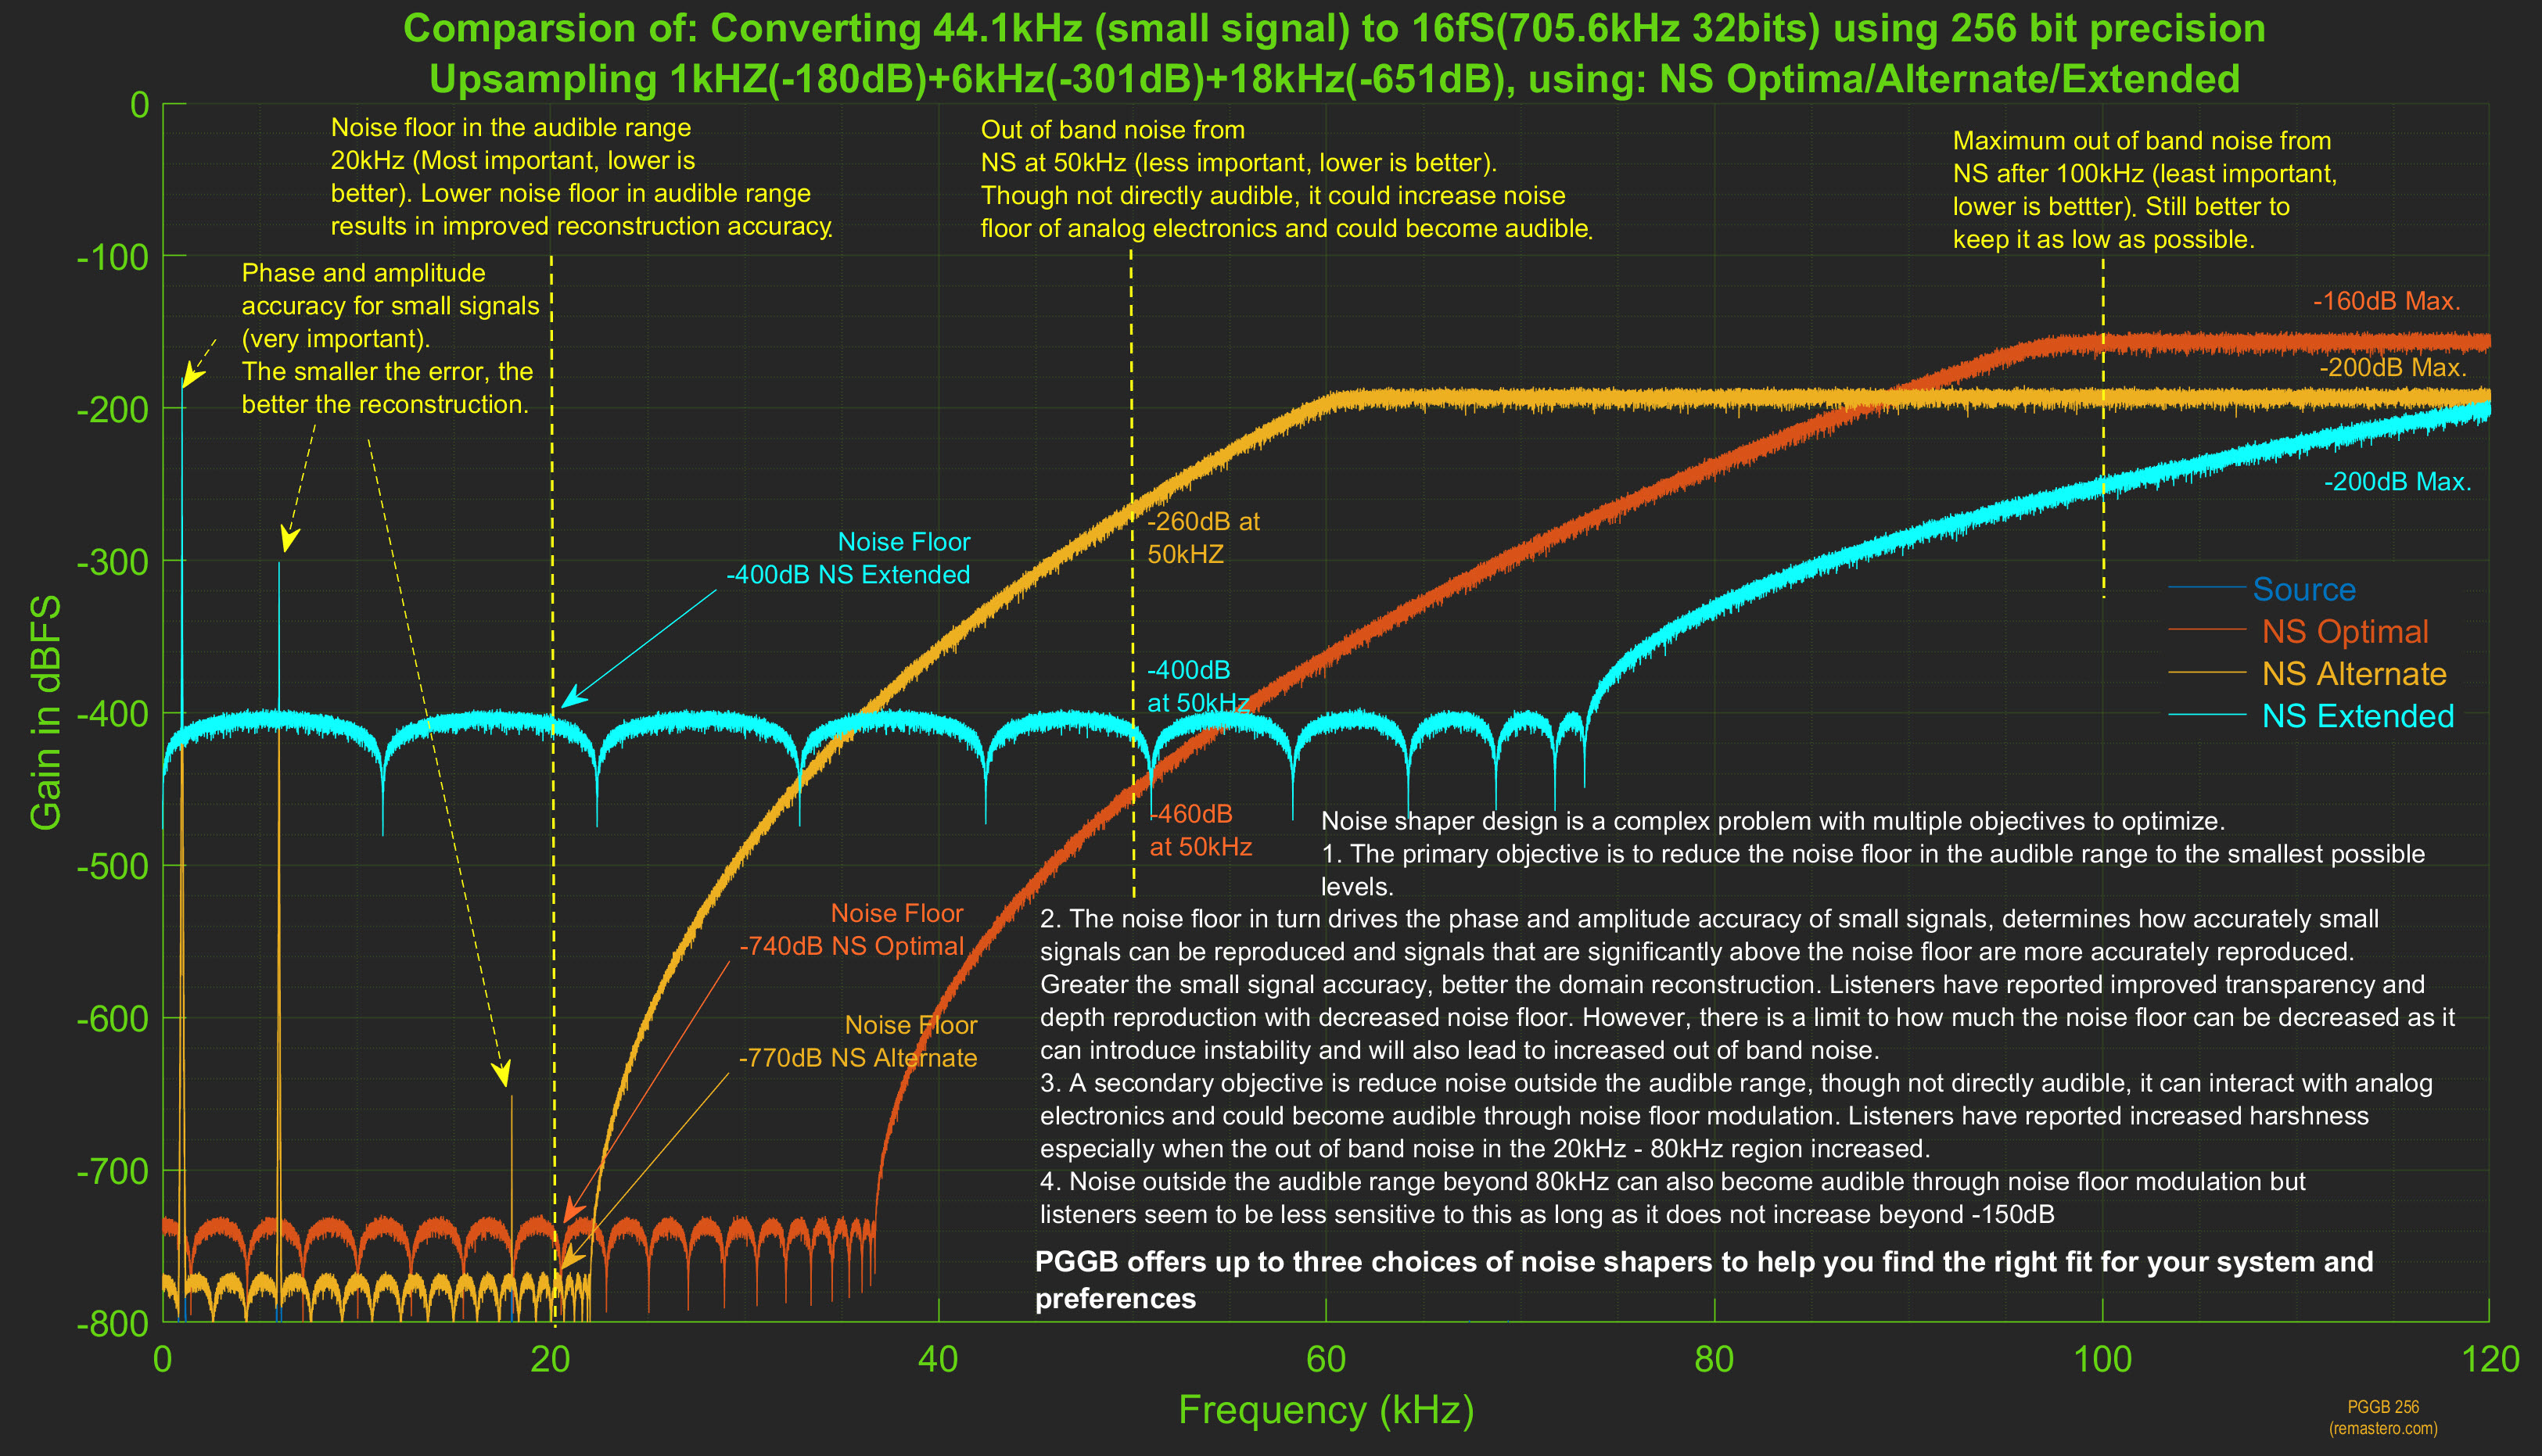
Here is an annotated example comparing the different noise shaper options (In PGGB v6 you can also access this plot by pressing the ‘?’ button on top of the noise shaper plot preview button).
HF Noise Filters
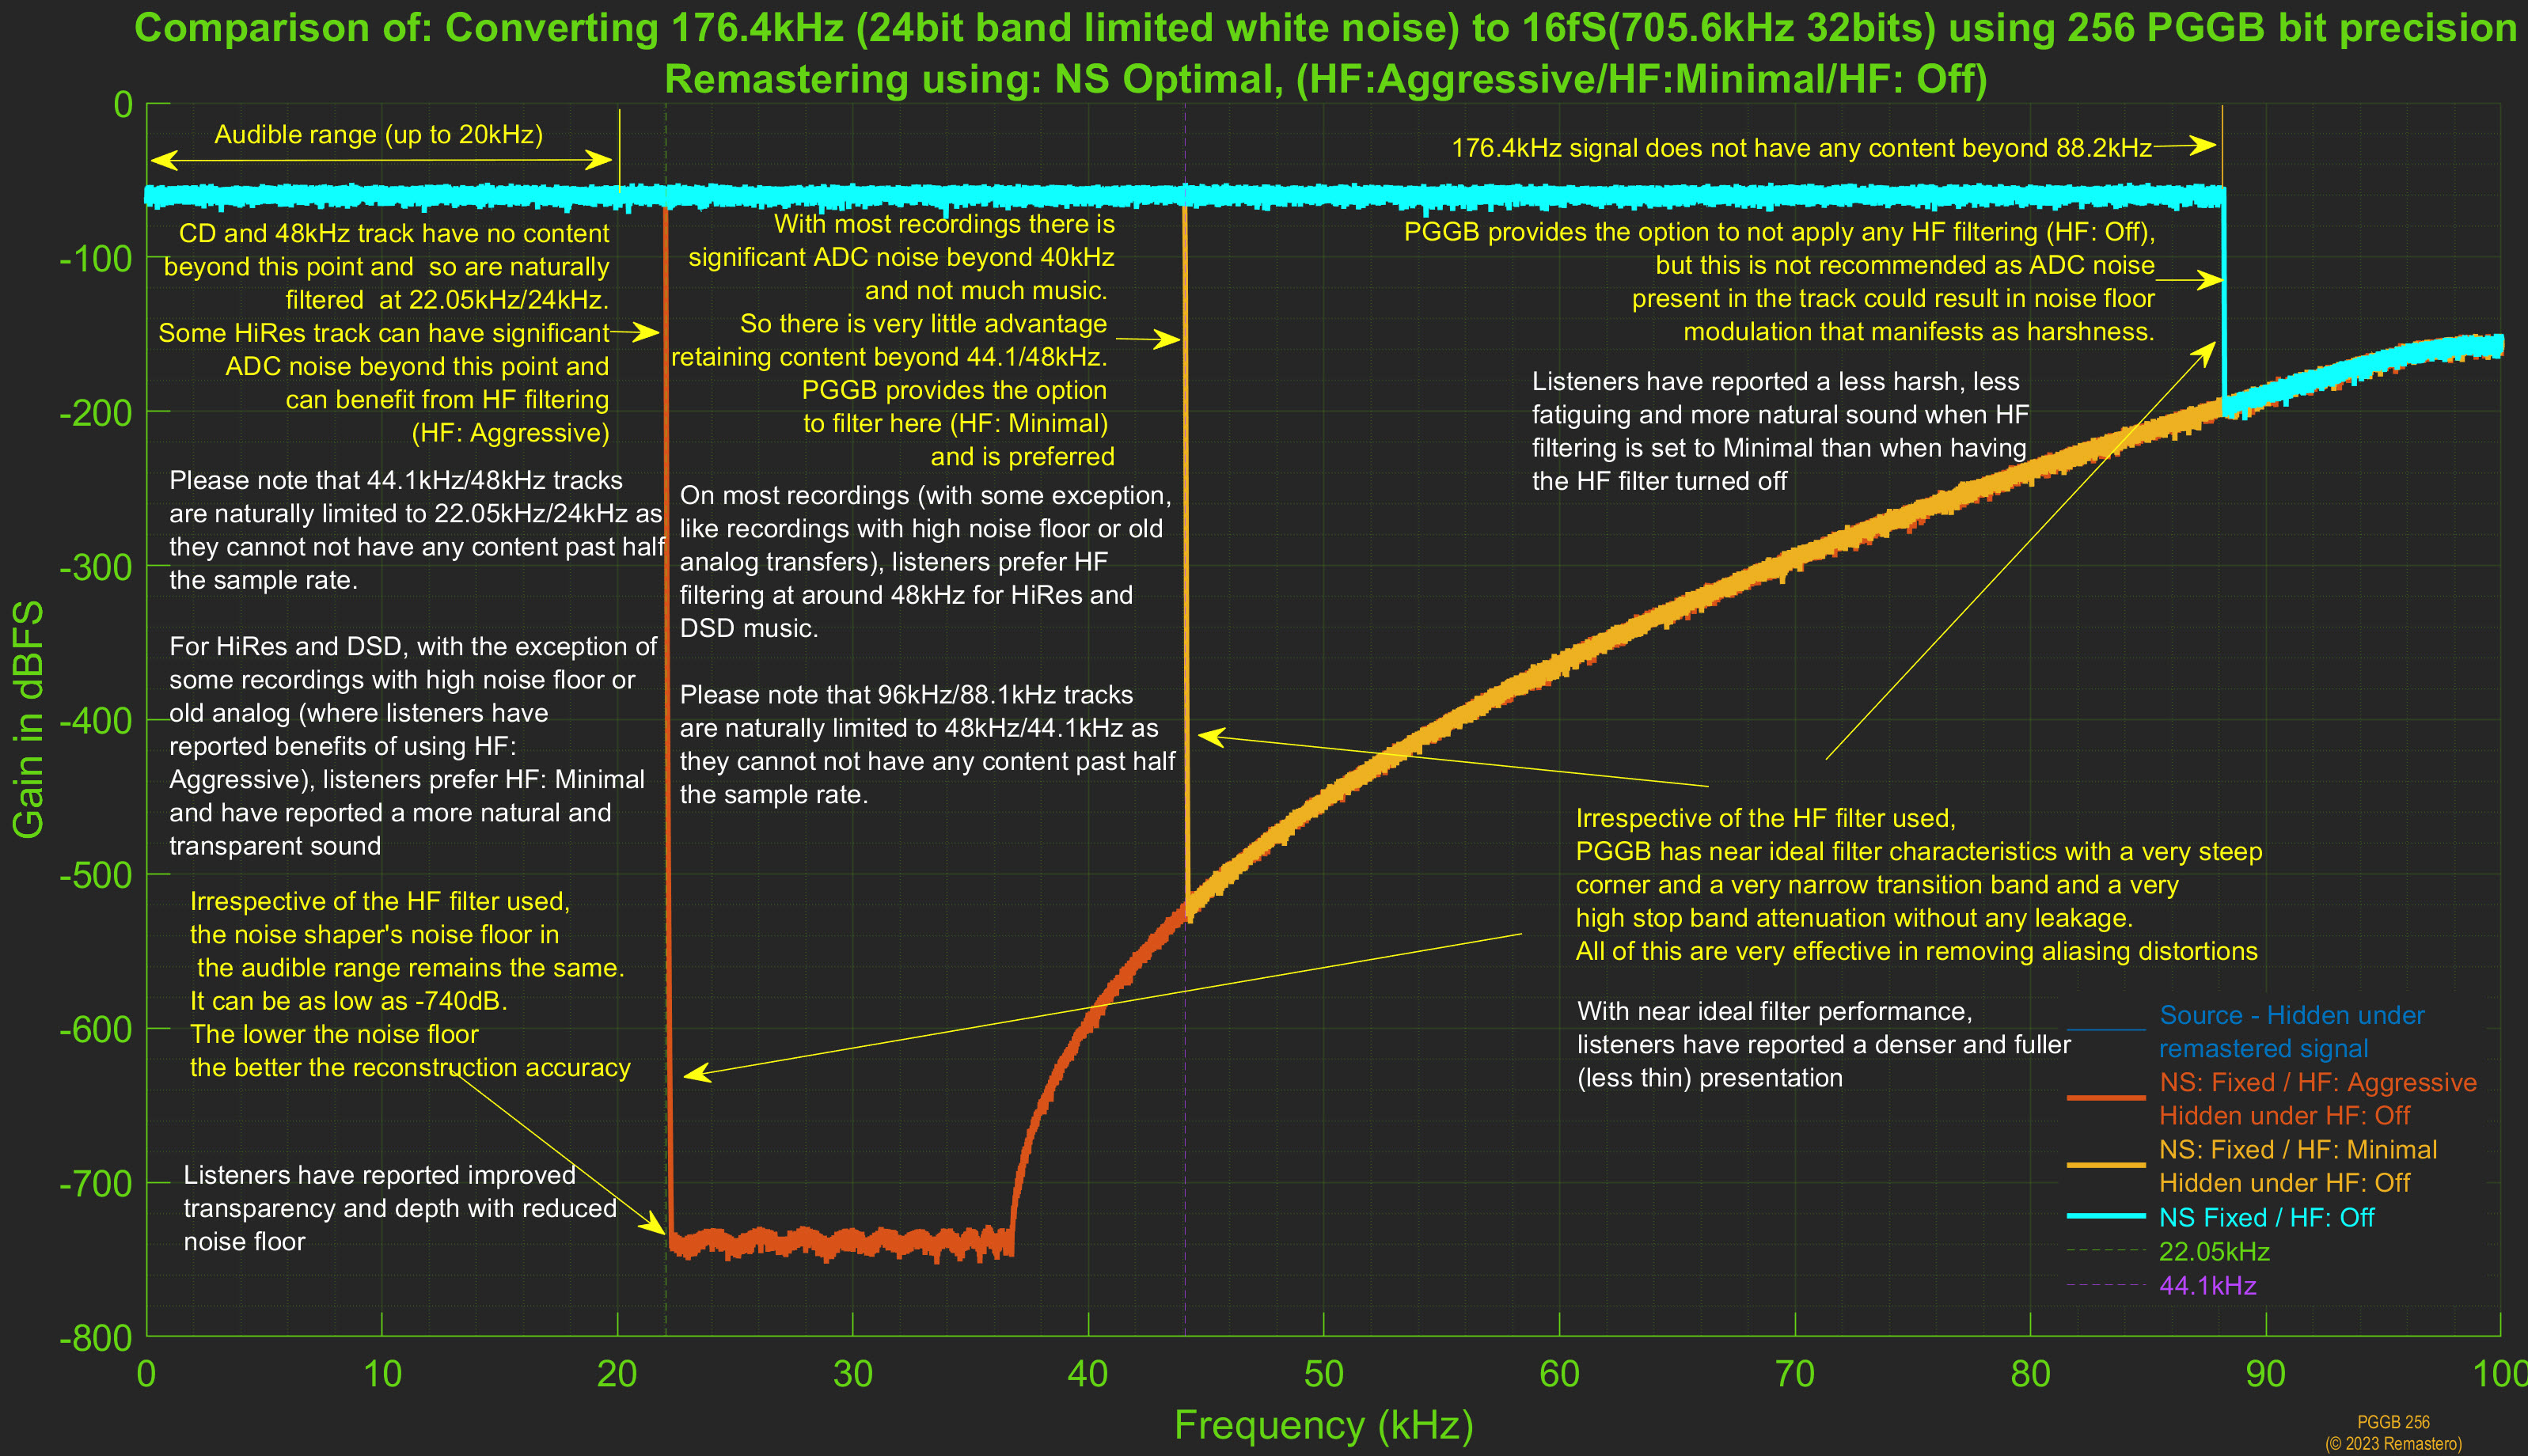
There are three choices for HF Filter, the HF Filtering process is designed to be transparent but effective in removing HF noise:
- Aggressive: Filters aggressively to remove noise beyond the audible range. The tradeoff here is real music beyond the audible range is also filtered in addition to any noise. It has been described as sounding 'smooth' during subjective listening tests.
- Minimal: Filters minimally to remove noise beyond the audible range. While it keeps most of the music beyond the audible range, not all noise is removed. It has been described as sounding 'lively' during subjective listening tests.
- Off: HF Filter is off, and no filtering is done to remove noise beyond the audible range. Leaving it off, especially for 4fS or higher rates can introduce harshness or fatigue. HF Filter is always on for DSD as DSD contains significant HF noise and can damage sensitive audio equipment.
It is common for higher sample rate material to have significant out of band quantization noise introduced by ADC (i.e., Analog to Digital Converters used during the original recording or digital transfer); this is especially true with DXD and DSD, but listening test and analysis show even material at 88.1kHz and above can benefit from noise filtering. Beyond the audible range, there reaches a point where it becomes increasingly hard to differentiate between quantization and other noise and the music signal. This can be recording dependent and makes it harder to choose the noise filter. The new noise filter used in PGGB tries to simplify and remove some of the guesswork. The Automatic setting will work best in most cases. This is all about balancing the signal-to-noise ratio at frequencies beyond the audible range. As more filtering is done (Aggressive setting), the sound is cleaner but may sound smoother or a little less open. With less filtering (Minimal setting), it will sound airy and lively but can come at the cost of added noise or harshness. These are still very subtle changes to help you fine tune to your system and preferences.
Here is an annotated example comparing the different HF Filtering options (In PGGB v6 you can also access this plot by pressing the ‘?’ button to the right of last plot preview button under preferences section of the configuration tab).
Folder Paths and Permissions
Please make sure you have Read permission to the input folder and read/write permission to the output and temp folders.
Memory & Performance
More on Memory and Speed (Why is PGGB so demanding?)
Speed and memory: the trade-offs
PGGB philosophy is to use all the information in the track to upsample to the final rate and do so at high precision. This comes at a cost, both memory and computation time. No shortcuts or cutting corners.
- Speed: To reduce computation time PGGB uses multi-core parallel processing and also hyper threading. So you directly benefit by having a CPU with multiple cores (almost linear relation with speed). You also benefit from having a high clock rate that is not thermally throttled, as the higher CPU clock also translates linearly to speed. I use a slightly over clocked AMD server that averages 4GHz with 24 cores (x2 hyper threaded). I use ALO cooling.
- Memory: Since PGGB uses all of the track, it needs to hold everything in memory till it is finally written to the output file, there re no shortcuts. We found any block processing (i.e., splitting and processing parts of a track) compromises SQ.
CPU requirements
The CPU requirement is simple enough. Something to note, the modulators and noise shapers cannot be made parallel beyond a point, so while the upsampling benefits from more cores, modulator and noise shaper speedup stops beyond say 24 cores and CPU speed helps more. The time for modulation or noise shaping is about 40 - 50% of the total time for processing the track.
Memory requirements (worked example)
The memory requirement is best explained working backwards from the output track.
Say you wish to upsample your
library to 512DSD, let us say an average track in your library is 6 minutes long. A
6 minute DSD512 track is about
2GB in size. But each sample occupies only a single bit in a DSD512 track. Before
they were written to the file,
PGGB had these also stored in memory that required 2GB or RAM.
The DSD modulator is responsible for converting PCM to DSD. It is easier to think of
DSD as 1-bit PCM but a very
high rate PCM. So, before it entered the DSD modulator, the 2GB DSD track was a PCM
track of the same 512fs rate
(512
DSD is 512 x CD rate). But PCM is not single bit, if we were doing computations with
say 32 bit PCM, before
conversion to DSD, the 2GB DSD would have needed 32 x 2 = 64GB of RAM as each bit in
DSD is now 32 PCM bits.
64bit floating point is the minimum a software upsampler should use, so at the
minimum the 2GB DSD track was 64bit
PCM at the same rate, which means it would have needed 128GB of memory! PGGB does
not do 64bit for DSD, it does
adaptive
precision and the precision used is typically 128bit. So the 2GB DSD512 was 2 x 128
= 256GB 128bit PCM before it
entered the modulator! That is how much memory you will need to just to hold the
high rate high precision PCM. But
as you may have guessed, it is simply not practical to expect 256GB of RAM just to
process 6 minutes of tracks to
DSD512. By the way, if you wanted to do DSD1024, then that doubles the size to
512GB.
How PGGB handles limited memory
The way PGGB gets around this pesky memory issue is:
- It processes one channel at a time: the fastest processing is achieved when the entire track fits in available RAM. 256GB would be needed, for example, to process a 6 minute track at DSD512 in a single stage. If that much is available, then PGGB will process the entire track with both channels (left and right) processed simultaneously. If not, PGGB will then switch to processing just one channel at a time. Virtual memory will be used if there isn’t enough memory to hold one channel.
- It uses virtual memory: Virtual memory is your RAM + page files (or swap space in Mac/linux). When a OS does not have enough RAM, it borrows some space from the disk and treats it as extended RAM. Different OS have different ways of doing this. Windows provides users full control, you can go to settings and set the virtual memory and choose more than one internal disk and also set min and max for each of the disks. Then Windows will auto-magically just use free space on the disk when it needs more memory and creates page files that grows. Since these drives are for use as extended RAM, fast NVME drives are the best and there is some advantage in using more than one to distribute the load (but not necessary). It need not be the OS drive and it needs to have free space. Going back to the 2GB DSD512 example, it is ideal to have 128 GB RAM so that a single channel of an average track just fits in RAM and that will work fast, but when there needs to be more (say you do a DSD1024) or you are processing 12 minute track, then you need the page file to stop PGGB from running out of memory. In Mac, there is zero control, but PGGB implements a way to allow paging similar to what Windows does.
- Intelligent paging: Paging helps PGGB keep chugging along without running out of memory, but frequent disk access can really slow down processing as disk access is orders of magnitude slower than RAM, if not done properly, CPU utilization will drop and most of the time will be spent just reading from and writing to disk, when more than 50% of the required memory is not in RAM. We have implemented algorithms where PGGB always has what it needs close by in RAM and what it has done with or what it will need in future is in page file. The OS does the rest. As a result of this optimization, even though the RAM is much less than total required memory, paging does not affect performance much.
Summary: three processing scenarios
In summary, when it comes to memory, more is better, but PGGB is designed to work with what you have. There are three scenarios as they relate to processing efficiency:
- Best: 2 channel mode - both channels are able to be processed simultaneously because there is enough RAM available to hold the entire track.
- Better: 1 channel mode - each channel is able to processed sequentially using only available RAM as there is enough RAM available to hold each channel.
- Good: 1 channel mode with virtual memory - PGGB borrows some space from the disk and combines it with available physical ram to increase the memory available to PGGB.
Virtual Memory (Windows only)
Recommended size
It is best to set the virtual memory (both the initial size and the maximum size) to the same value and equal. 128 GB or more is recommended for PCM and 512GB or more for DSD. To know exactly how much free space you need, you can refer to the Calculating Free Space You Need section. Choose the fastest internal drive for setting the virtual memory. Make sure the drive has free space greater than the virtual memory size you set. For all other dries set 'No paging file'. Restart your PC once you have set the virtual memory. After restart, check if the drive you set virtual memory for has a 'pagefile.sys' file with the size close to the virtual memory size.
Disable memory compression
On windows, disable memory compression. Open PowerShell as administrator and enter command
Disable-MMAgent -mc
so Windows does not trigger compression and inflation while PGGB is paging.
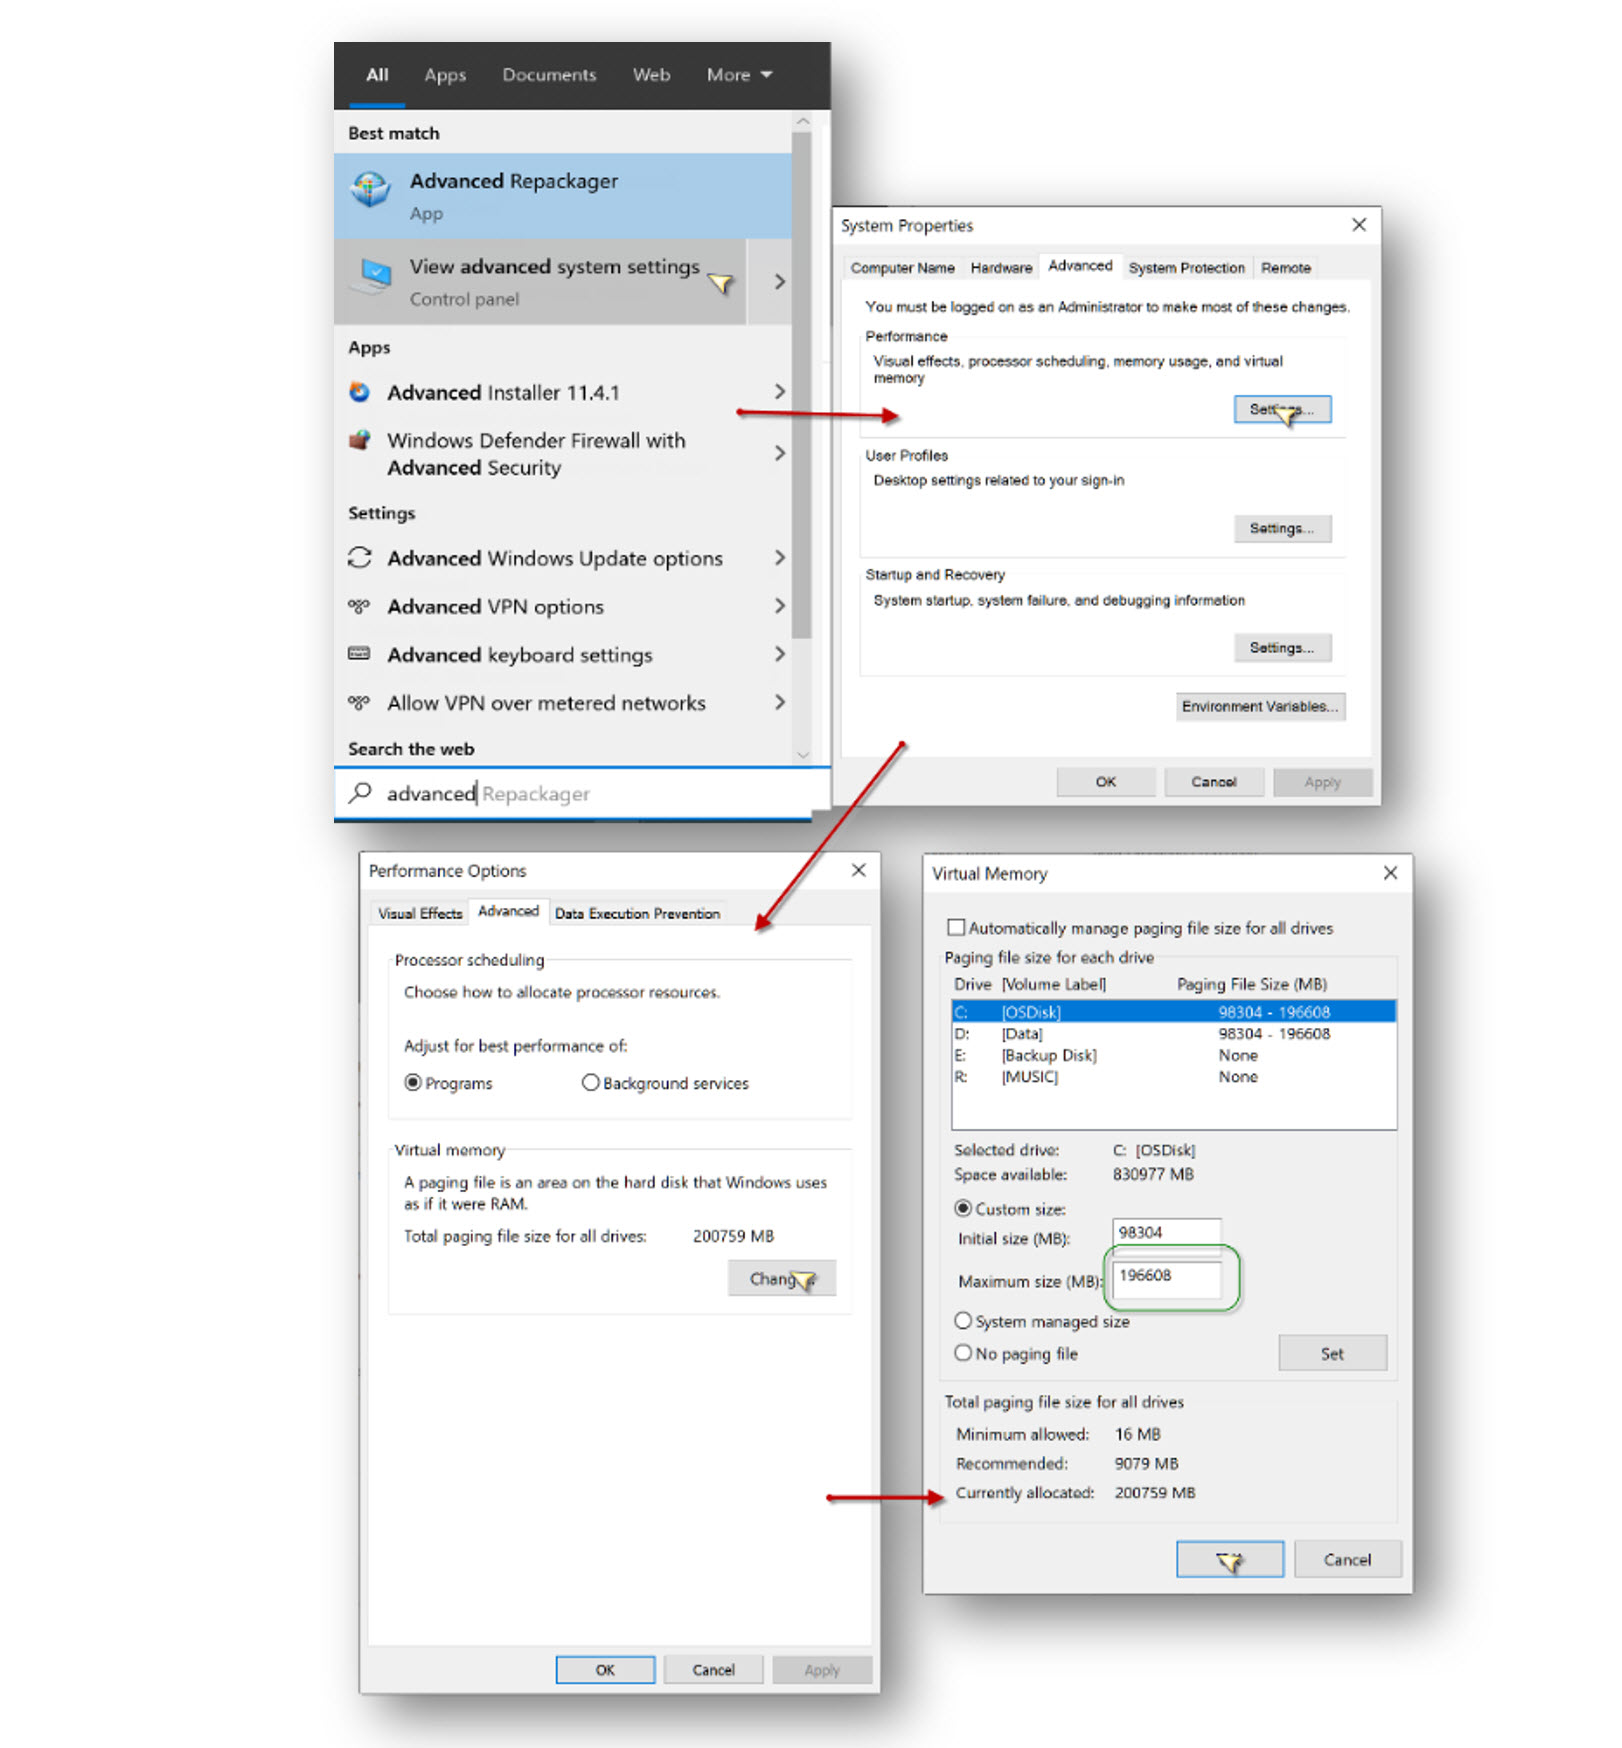
How to set virtual memory
To set virtual memory, use the system property command-let. Go to start menu and start typing ‘advanced’ and select "View Advanced System Settings." Then click Advanced-> Performance Settings. This will open the Performance Options dialog. Click on Advanced tab, then click the ‘Change’ button under ‘Virtual memory’. Finally, in the Virtual memory dialog, uncheck ‘automatically manage paging file’ and enter a value greater than 128000 under Maximum size in Mb. Virtual memory availability and drives are system dependent. Below is just one example.
Page File (Mac only)
Setup and recommended size
There is now an option for Mac to allow creation of page files, once this option checkbox is selected, you can browse to the folder where you want the page files. 128 GB or more free space is recommended for PCM and 512GB or more for DSD. To know exactly how much free space you need, you can refer to the Calculating Free Space You Need section. This option provides you with more control over paging when you do not have enough RAM. On a Mac, you are not limited to the internal drive, a fast NVME Thunderbolt external drive is also an option (or use Thunderbolt enclosures such as this or this). You can now choose up to two paging locations, it is important that both are on different drives and they are fast NVME drives. If you want to know more about why PGGB is so demanding, please refer to the section on memory and speed.
Optimize paging for PCM
If you check the 'Optimize paging for PCM', it will let you process longer tracks without hitting RAM limit. If the processing won't fit fully in memory, then PGGB will process one channel at a time, to anticipate any possible clipping, PGGB reduces gain preemptively by 1dB. If you are concerned that the gain may change on a long movement that was split into tracks, we suggest setting a fixed negative gain of 1dB or more. Checking 'Reduce contention' allows PGGB to reduce NVME contention and improves speed when paging.
Control when paging starts
You can control when paging starts by setting the swappiness value using 'swappiness.txt' file. The swappiness value is a number between 0 and 100 that tells PGGB when to start paging, as opposed to using RAM. Swappiness values of 0 or 1 will make PGGB to start paging immediately, while a swappiness value of 100 will make PGGB to try to use RAM as much as possible. The default swappiness value is 50, i.e., PGGB will start paging when the memory it needs exceeds 50% of RAM. You can change the swappiness value by creating a file named 'swappiness.txt' in the same folder as the first page file location. The file should contain a single number between 0 and 100. If the file is not present, the default value of 50 will be used. Set the value to 20 if you find PGGB stops processing even though you have enough RAM space for paging. You can use the sample file we have here . Smaller swappiness values will make PGGB to start paging sooner, reduce memory pressure and improve stability, but it will also slow down the processing because less RAM is used. Larger swappiness values will allow PGGB to use more RAM and less paging, it will be faster, but it may cause the OS to stop PGGB from completing the processing.
Note: By default, if you hit the browse button it should go to your HomeFolder/PGGB/cache
Calculating Free Space You Need for Paging/Virtual Memory
Please use the calculator below to find out the maximum free space you will need (for paging on Mac and virtual memory on Windows) to be able to remaster to PCM or DSD based on the upsampling factor.
Calculate Free Space Needed
Calculating Storage Space You Need For Your PGGB Albums
Use the calculator below to find out how much storage space you will need for your albums after converting them using PGGB.
PGGB Library Storage Space Calculator
Understanding PGGB
The PGGB Philosophy (Three Pronged Approach)
PGGB DSD and PGGB PCM resampling is built on the same principles:
- Algorithm: PGGB maximizes reconstruction accuracy by utilizing all information in the source track and upsampling to the required output rate. For PCM, the maximum output rate was up to 64fS. In the case of DSD, the maximum output rate can be 128fS, 256fS, 512fS, 1024fS, or 2048fS. Therefore, the upsampling algorithms remain the same for both PCM and DSD, but the output rate for DSD is significantly higher.
- Precision: PGGB maximizes reconstruction accuracy using high precision. PGGB PCM supports 64/107/128/256 bit precision as higher precision helps improve reconstruction accuracy in the audible range. The reconstruction accuracy in the audible range is only limited by bit depth and sample rate. For PCM, for bit depths higher than 16 bits and sample rates higher than 8fS, 256bit precision helps to deliver the highest reconstruction accuracy in the audible range. For DSD, things are not as straight forward. Since DSD has a bit depth of 1, the amount of information that can be retained in the audible range depends on the DSD rate and also the order of modulator. Higher order modulators help retain more information in the audible range by reducing the quantization noise aggressively; higher DSD rates also provide a larger bandwidth to push the quantization noise out. So, the choice of precision becomes a function of the output sample rate and also the modulator order. There is no point in using higher precision for reconstruction if that information cannot be retained. Which is why for DSD, PGGB DSD uses adaptive precision. We use precisions between 107 and 256 based on the DSD rate and modulator.
- Modulators and Noise Shapers: PGGB minimizing the quantization noise in audible range. In the case of PGGB PCM, PGGB uses noise shapers to keep the quantization noise in the audible range as low as possible. The noise floor is limited by the precision used for computing and also the quality of the noise shaper. For 64bit precision, the limit is about -320dB. If a noise shaper is capable of achieving a quantization noise floor that is lower than -320dB for the given bit depth and sample rate, then it makes to go for higher precision which is 128bit. The limit for noise floor for 128bit (quad precision) is about -690dB. If this noise floor can be breached, only then does 256bit computing makes sense. For PCM, the noise shapers PGGB uses can achieve a quantization noise floor as low as -750dB in the audible range, which is why PGGB provides the option of 256bit precision. For PGGB DSD, for all rates, the -320dB limit for 64bit computing is easily breached, which justifies the use of a minimum of 107bit precision. For DSD512 or higher rates with higher order modulators, the quantization noise in the audible band can be -750dB or lower, which is why we use precisions as high as 256 bits. The PGGB DSD modulator precision and order are both adaptive.
There is a *cheesy* cake analogy we like:
- Algorithm: Determines the quality of the cake by evaluating the reconstruction algorithms and predicting intermediate samples.
- Precision: Represents the fine/preciseness in reconstructing. It's like the icing on the cake; if the cake is bad, a good icing does no good!
- Noise shaping/Modulators: Decides how much of the icing (precision) you get to keep.
Additionally, since not all DACs/Players support 48k DSD rates, an inter-rate conversion option has been added. This allows conversion of a 48kHz/96kHz/192kHz source track to DSD rates that are multiples of 44.1kHz. This conversion is done transparently, PCM conversions will also benefit from this, especially for DACs capped at a maximum 44.1kHz rate.
PGGB and DSD
Though PGGB started as a PCM only remastering tool, we knew all along that the same principles can be applied to upsampling to DSD too. The higher DSD rates (typically DSD128 or more) allow for higher reconstruction accuracy than PCM as it allows us to add even more intermediate samples at a higher accuracy than the DAC can in comparison to PCM. DSD also passes through some DACs with less processing than PCM and in the case of DACs that support pure DSD, they pass untouched all the way till analog conversion. Which is why we have been working on DSD upsampling algorithms for a while now.
Then why did PGGB not include DSD upsampling from the beginning?
There are multiple reasons for this:
- Need for efficient upsampling algorithms: While the highest PCM rates DACs accepts are limited to 16 or 32 times the base sampling rate (768kHz or 1.536MHz), DSD rates can be 32 to 64 times higher than the highest PCM rates a DAC can accept. Scaling PGGB algorithms to take the same no compromise approach and extending it to DSD rates was challenging both in terms of processing time and memory requirements.
- Very high quantization noise associated with single bit DSD: PGGB aims to achieve a very high time domain reconstruction accuracy and also small signal accuracy in the audible range. This is important for transient reproduction and conveying depth and realism. While with PGGB we have achieved this with PCM upsampling, designing DSD modulators that could deliver the same level of small signal accuracy and keep the quantization noise in the audible range below -300dB required significant research.
With optimization of reconstruction algorithms to scale to DSD rates, and after developing high precision modulators that are capable of maintaining a very high small signal amplitude and phase accuracy, we finally felt comfortable releasing PGGB that is capable of DSD upsampling.
NS performance
Here is an annotated example of noise shaper performance
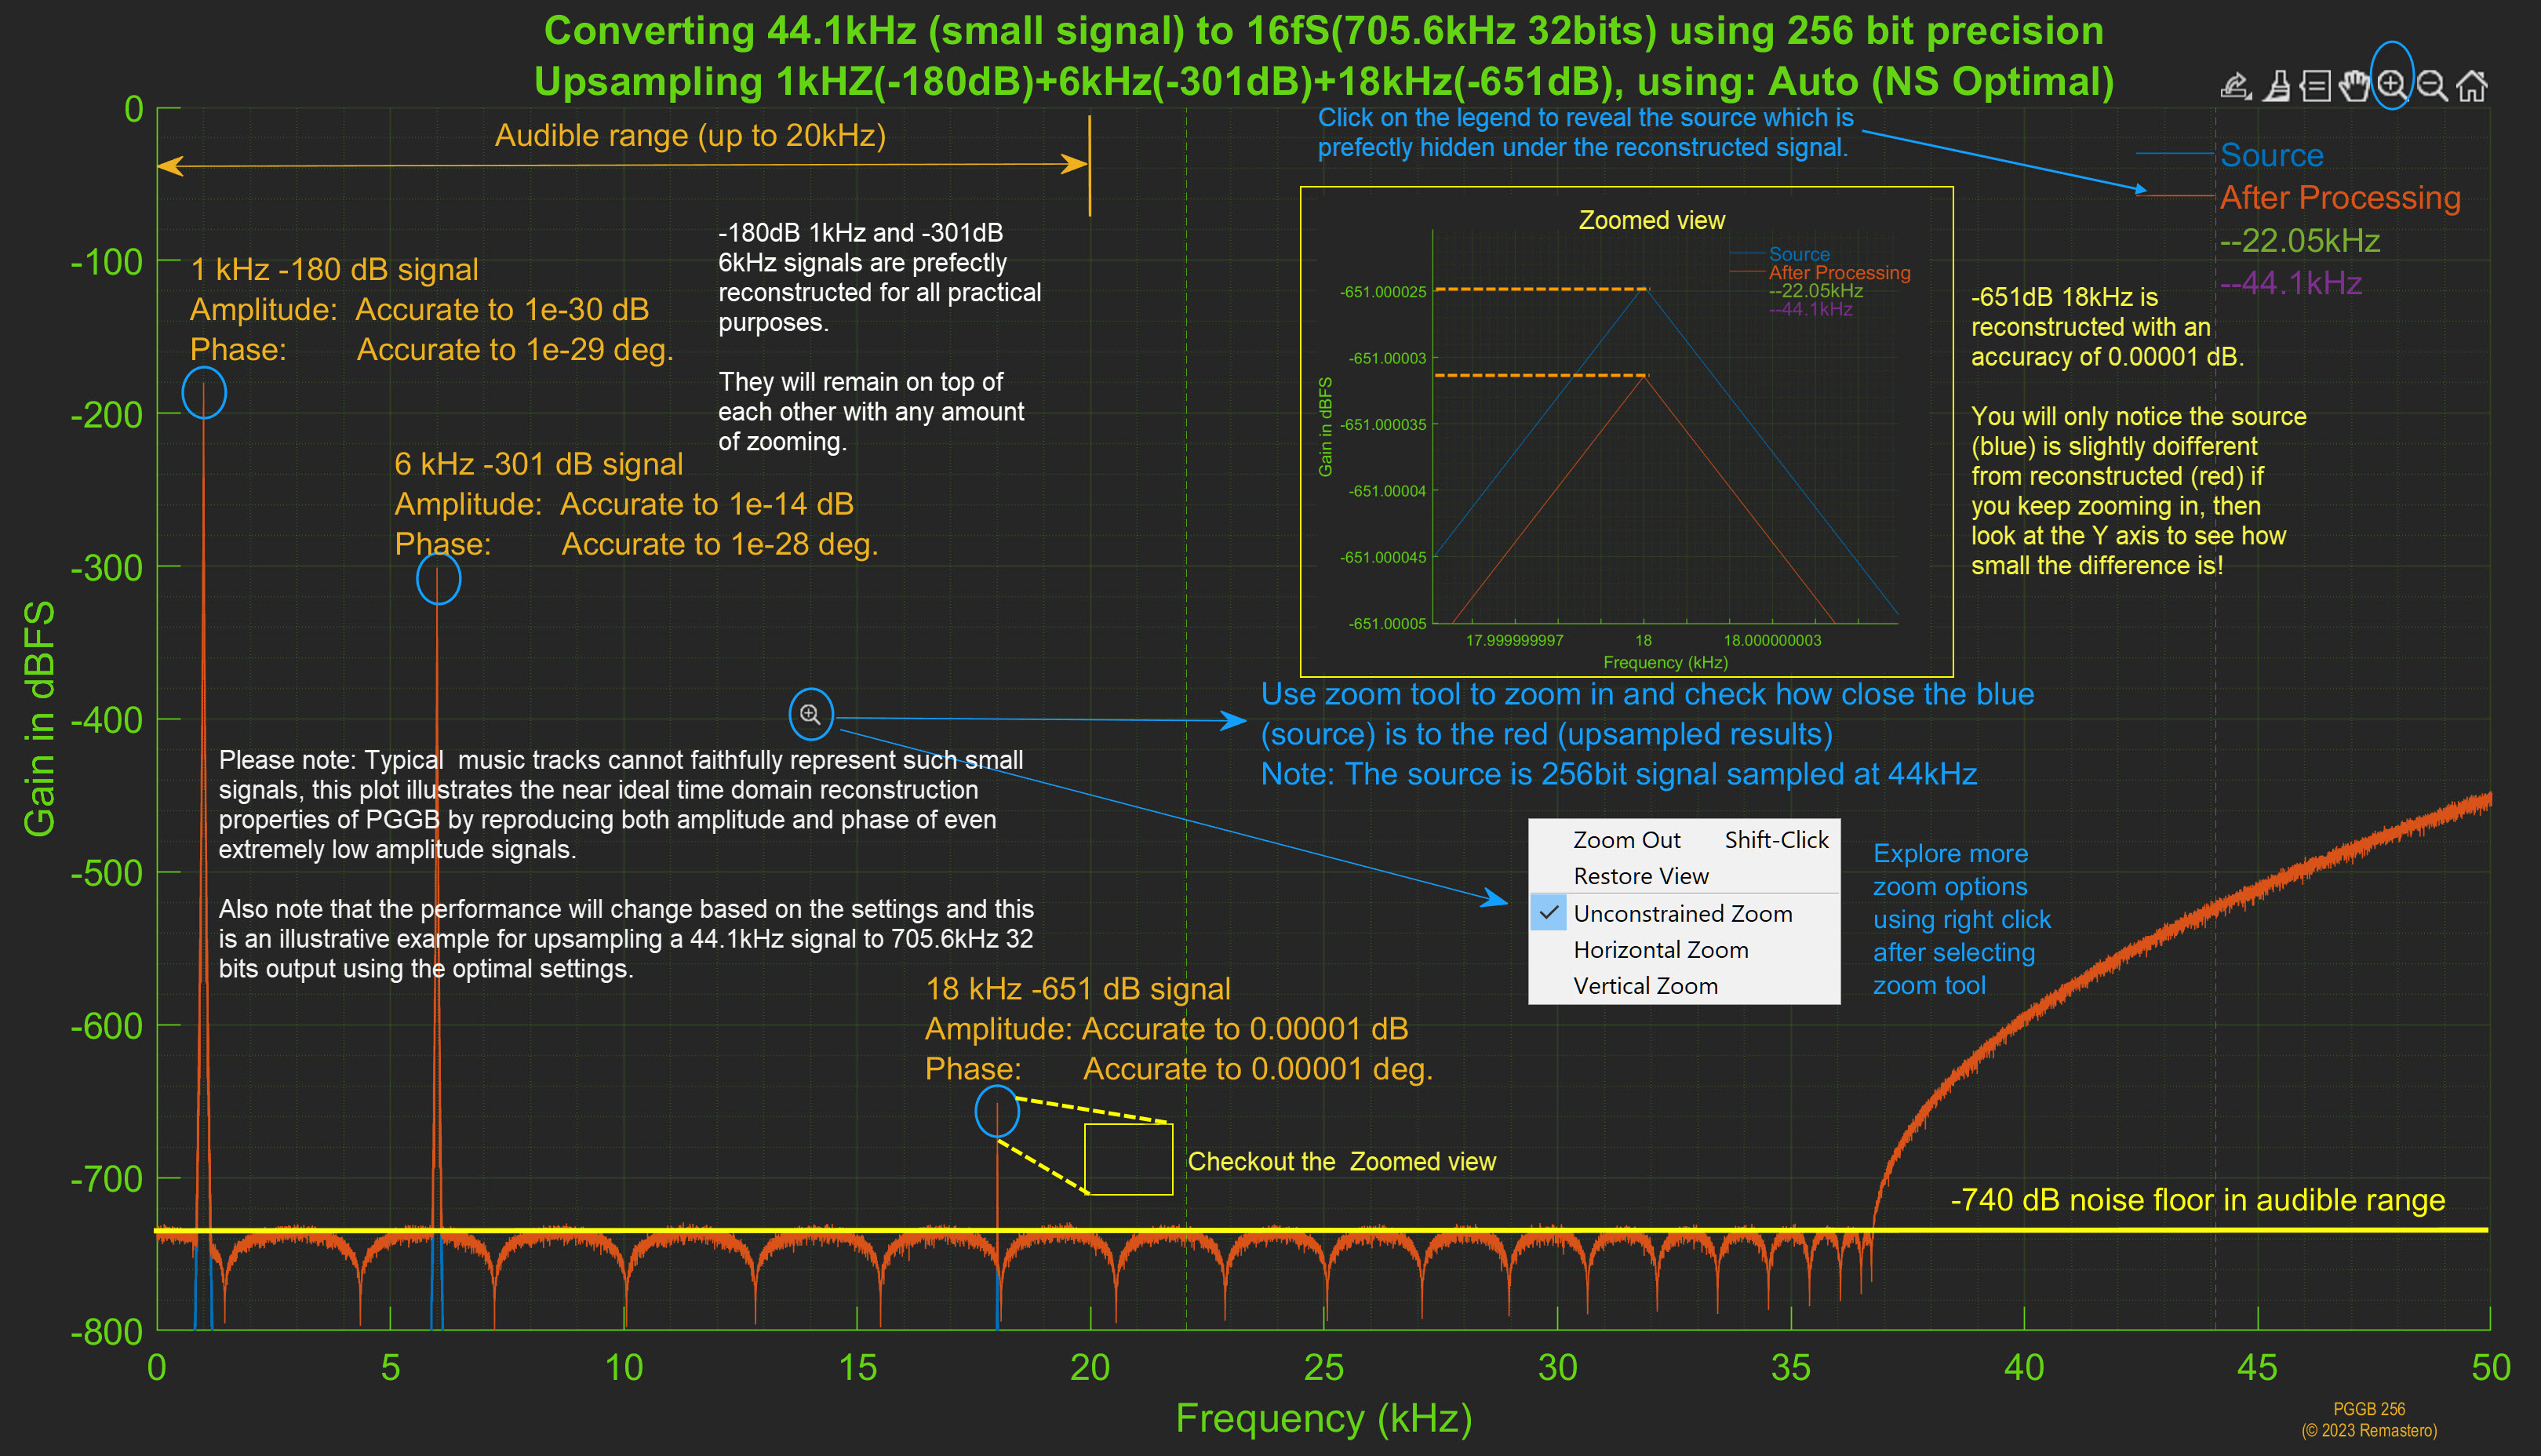
Upsampling Performance
Here is an annotated example of upsampling performance of 1fS CD rate test signal
NS options
Here is an annotated example comparing the different noise shaper options
DSD Modulator Performance
PGGB V8 provides three groups of DSD modulators across all supported rates (DSD64 through DSD2048):
- Low Noise (5th, 7th, 9th order): quantization noise in the audible band between −150dB and −465dB
- Very Low Noise (13th, 19th order): quantization noise in the audible band between −160dB and −620dB
- Ultra Low Noise (25th order): quantization noise in the audible band between −150dB and −800dB
The 19th order modulator is not available for DSD64. All other modulators are available for all rates. The modulators are rate adaptive, i.e., optimized for a given rate to achieve the lowest quantization noise in the audible range while keeping the slope of the noise profile gentle. The Very Low Noise and Ultra Low Noise modulators use a new modulator structure and the order is also adaptive. The order shown is the highest order possible.
To help you compare, we present the modulator performance in two forms: 1. By DSD rate: all modulators available for a given rate, and 2. By modulator order: how a given order performs across different rates.
Summary: Noise Floor by Rate and Modulator Order (dBFS)
| DSD Rate | 5th | 7th | 9th | 13th | 19th | 25th |
|---|---|---|---|---|---|---|
| DSD64 | −220 to −150 | −275 to −170 | −320 to −175 | −410 to −160 | — | −395 to −150 |
| DSD128 | −240 to −200 | −290 to −210 | −340 to −240 | −490 to −260 | −580 to −280 | −650 to −290 |
| DSD256 | −270 to −225 | −310 to −270 | −355 to −290 | −510 to −360 | −600 to −400 | −665 to −450 |
| DSD512 | −275 | −340 | −390 | −525 | −620 | −750 |
| DSD1024 | −290 | −360 | −425 | −560 | −620 | −755 |
| DSD2048 | −300 | −370 | −465 | −560 | −620 | −800 |
Values represent quantization noise floor in the audible band (dBFS). Where a range is shown, the lower value is the noise floor at lower frequencies and the upper value is near 20kHz.
DSD Modulator Performance by DSD Rate
Below we describe the small signal performance for all DSD modulators available for a given DSD rate. Higher order modulators have lower noise floor in the audible range compared to lower order modulators for the same rate, but take slightly longer to process and have a steeper slope. It is recommended to start with the default Very Low Noise modulator and adjust from there.
Modulators for DSD64
DSD64 is new in V8. Five modulator orders are available: 5th, 7th, 9th, 13th, and 25th (19th order is not available for DSD64). At this lowest DSD rate, the noise floor range is wider. Lower frequencies benefit more from higher order modulators while the noise floor near 20kHz is limited by the rate itself.
| Order | Group | Noise Floor (dBFS) |
|---|---|---|
| 5th | Low Noise | −220 to −150 |
| 7th | Low Noise | −275 to −170 |
| 9th | Low Noise | −320 to −175 |
| 13th | Very Low Noise | −410 to −160 |
| 25th | Ultra Low Noise | −395 to −150 |
Figures will be updated soon.
Modulators for DSD128
All six modulator orders are available for DSD128. The noise floor improves significantly with each step up in order, with the 25th order Ultra Low Noise modulator achieving −650dB at lower frequencies.
| Order | Group | Noise Floor (dBFS) |
|---|---|---|
| 5th | Low Noise | −240 to −200 |
| 7th | Low Noise | −290 to −210 |
| 9th | Low Noise | −340 to −240 |
| 13th | Very Low Noise | −490 to −260 |
| 19th | Very Low Noise | −580 to −280 |
| 25th | Ultra Low Noise | −650 to −290 |
Figures will be updated soon.
Modulators for DSD256
All six modulator orders are available for DSD256. The higher rate allows more aggressive noise shaping, and the 25th order modulator achieves −665dB at lower frequencies.
| Order | Group | Noise Floor (dBFS) |
|---|---|---|
| 5th | Low Noise | −270 to −225 |
| 7th | Low Noise | −310 to −270 |
| 9th | Low Noise | −355 to −290 |
| 13th | Very Low Noise | −510 to −360 |
| 19th | Very Low Noise | −600 to −400 |
| 25th | Ultra Low Noise | −665 to −450 |
Figures will be updated soon.
Modulators for DSD512
All six modulator orders are available for DSD512. At DSD512 and above, the noise floor becomes uniform across the audible band (lower and upper values converge). The 25th order Ultra Low Noise modulator achieves a remarkable −750dB noise floor.
| Order | Group | Noise Floor (dBFS) |
|---|---|---|
| 5th | Low Noise | −275 |
| 7th | Low Noise | −340 |
| 9th | Low Noise | −390 |
| 13th | Very Low Noise | −525 |
| 19th | Very Low Noise | −620 |
| 25th | Ultra Low Noise | −750 |
Figures will be updated soon.
Modulators for DSD1024
All six modulator orders are available for DSD1024. The noise floor continues to improve, with the 25th order modulator achieving −755dB.
| Order | Group | Noise Floor (dBFS) |
|---|---|---|
| 5th | Low Noise | −290 |
| 7th | Low Noise | −360 |
| 9th | Low Noise | −425 |
| 13th | Very Low Noise | −560 |
| 19th | Very Low Noise | −620 |
| 25th | Ultra Low Noise | −755 |
Figures will be updated soon.
Modulators for DSD2048
All six modulator orders are available for DSD2048. This is the highest DSD rate supported by PGGB and offers the best noise floor performance. The 25th order Ultra Low Noise modulator achieves −800dB, the lowest quantization noise PGGB can deliver.
| Order | Group | Noise Floor (dBFS) |
|---|---|---|
| 5th | Low Noise | −300 |
| 7th | Low Noise | −370 |
| 9th | Low Noise | −465 |
| 13th | Very Low Noise | −560 |
| 19th | Very Low Noise | −620 |
| 25th | Ultra Low Noise | −800 |
Figures will be updated soon.
DSD Modulator Performance by Order
Below we describe the small signal performance for each modulator order across different DSD rates. For the same order, higher DSD rates allow more aggressive noise shaping. As a result, the quantization noise in the audible range generally decreases with each doubling of the DSD rate.
While choosing the highest DSD rate your DAC allows may seem the obvious choice for the best reconstruction accuracy and lowest quantization noise, the tradeoff is longer processing times and possibly increased phase noise or distortion (which are DAC specific). We recommend that you try the highest DSD rate your DAC supports and then also try the next lower rate to decide what works best for your DAC and listening preferences.
5th Order Modulators (Low Noise)
5th order modulators are available for all DSD rates. They are the least aggressive and have the gentlest slope, making them the fastest to process. The gentle slope means the DAC's HF filters need to work less hard removing HF noise, especially suitable when the DAC lacks good filtering of ultrasonics and downstream components are sensitive to ultrasonic noise. The tradeoff is they are not as effective at removing quantization noise from the audible range compared to higher order modulators.
| DSD Rate | Noise Floor (dBFS) |
|---|---|
| DSD64 | −220 to −150 |
| DSD128 | −240 to −200 |
| DSD256 | −270 to −225 |
| DSD512 | −275 |
| DSD1024 | −290 |
| DSD2048 | −300 |
Figures will be updated soon.
7th Order Modulators (Low Noise)
7th order modulators are available for all DSD rates. They offer a good balance between noise floor performance and processing speed. They are better at removing quantization noise from the audible range than 5th order modulators without being as demanding as higher orders.
| DSD Rate | Noise Floor (dBFS) |
|---|---|
| DSD64 | −275 to −170 |
| DSD128 | −290 to −210 |
| DSD256 | −310 to −270 |
| DSD512 | −340 |
| DSD1024 | −360 |
| DSD2048 | −370 |
Figures will be updated soon.
9th Order Modulators (Low Noise)
9th order modulators are available for all DSD rates in V8. They provide the best noise shaping performance within the Low Noise group. At DSD512 and above, the 9th order modulator can easily resolve signals well below −301dB in the audible range.
| DSD Rate | Noise Floor (dBFS) |
|---|---|
| DSD64 | −320 to −175 |
| DSD128 | −340 to −240 |
| DSD256 | −355 to −290 |
| DSD512 | −390 |
| DSD1024 | −425 |
| DSD2048 | −465 |
Figures will be updated soon.
13th Order Modulators (Very Low Noise)
13th order modulators are available for all DSD rates and are part of the new Very Low Noise group introduced in V8. They use a new modulator structure with adaptive order. The noise floor improvement over 9th order is substantial, particularly at higher DSD rates.
| DSD Rate | Noise Floor (dBFS) |
|---|---|
| DSD64 | −410 to −160 |
| DSD128 | −490 to −260 |
| DSD256 | −510 to −360 |
| DSD512 | −525 |
| DSD1024 | −560 |
| DSD2048 | −560 |
Figures will be updated soon.
19th Order Modulators (Very Low Noise)
19th order modulators are available for DSD128 through DSD2048 (not available for DSD64). They represent the top of the Very Low Noise group, achieving noise floors as low as −620dB at DSD512 and above.
| DSD Rate | Noise Floor (dBFS) |
|---|---|
| DSD64 | Not available |
| DSD128 | −580 to −280 |
| DSD256 | −600 to −400 |
| DSD512 | −620 |
| DSD1024 | −620 |
| DSD2048 | −620 |
Figures will be updated soon.
25th Order Modulators (Ultra Low Noise)
The 25th order modulator is the flagship of the Ultra Low Noise group, new in V8. It uses higher precision (256-bit) and a new modulator structure with adaptive order. It delivers the lowest quantization noise PGGB can achieve, as low as −800dB at DSD2048. The tradeoff is increased memory usage and slower processing compared to lower order modulators.
| DSD Rate | Noise Floor (dBFS) |
|---|---|
| DSD64 | −395 to −150 |
| DSD128 | −650 to −290 |
| DSD256 | −665 to −450 |
| DSD512 | −750 |
| DSD1024 | −755 |
| DSD2048 | −800 |
Figures will be updated soon.
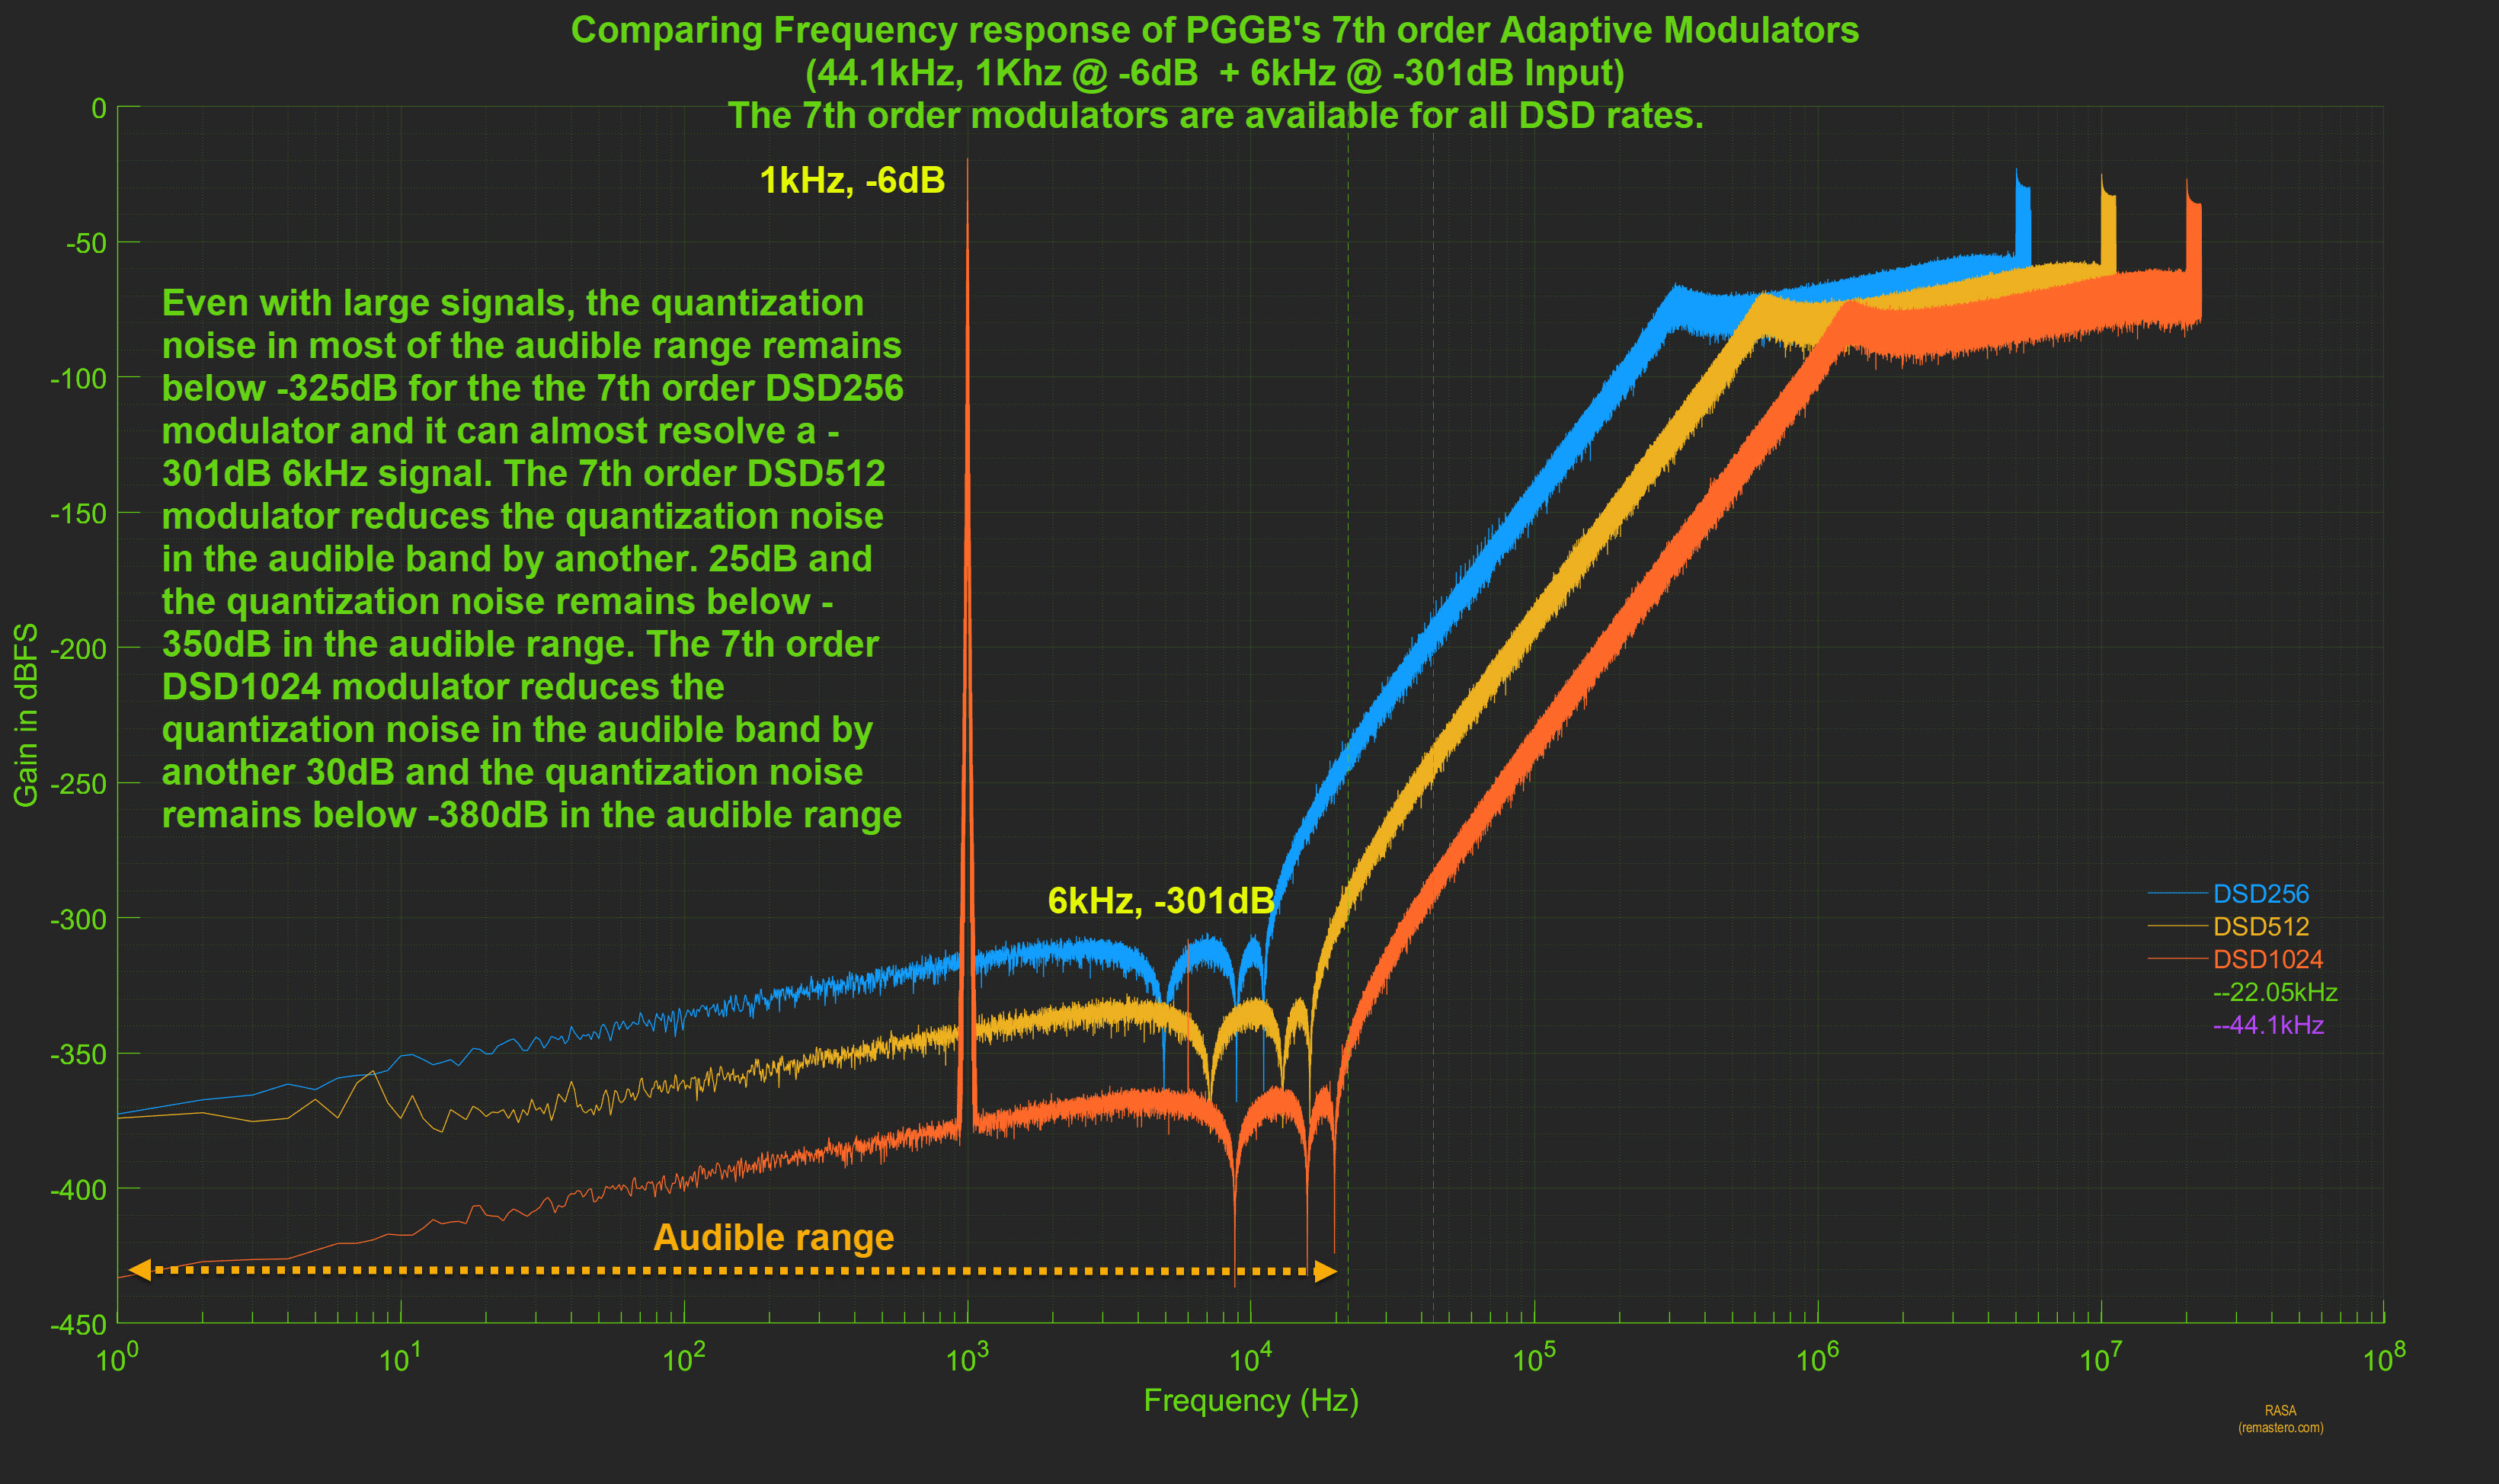
Large signal stability
While our focus is on designing noise shapers and modulators with small signal accuracy in mind, we take stability seriously. We make sure all our modulators, including the Very Low Noise and Ultra Low Noise groups, offer the same level of performance with signals near full scale. Below is an example of our 7th order modulator with a 1kHz signal at -6dB. You will see our modulator performance remains similar to what they are with small signals here.
Plot Preview HF Filter Options
Here is an annotated example comparing the different HF Filtering options (you can also access this plot by pressing the ‘?’ button to the right of last plot preview button under preferences section of the configuration tab).
Inter-Sample-Overs
During reconstruction of the music signal after upsampling, the new samples can have values greater than 1.0, which are generally referred to as inter-sample-overs. Inter-sample overs will cause clipping and can be unpleasant. When gain is set to Auto as shown above, PGGB detects inter-sample overs and applies just enough attenuation to avoid clipping.
Licensing
Licensing
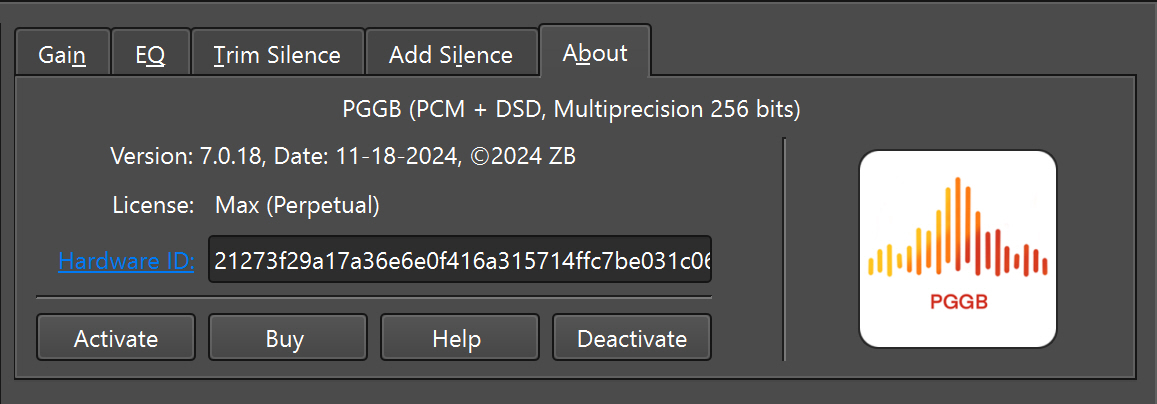
PGGB requires a license and the license is tied to your Hardware ID. You will need to provide your name, email address, Hardware ID and mention if it is Mac or Windows to request a PGGB license. Install PGGB first (follow these instructions). Once you have installed successfully, your PC/Mac Hardware ID will be displayed if you go to 'Configure' Tab-> ‘About’ tab of PGGB. Click on the 'Hardware ID' link, it will copy the Hardware ID to the clipboard, paste it in the email to us. Use this Hardware ID to request a license. We will email you a license file.
When you install PGGB for the first time and it does not find a valid license, it will run in trial mode for the first 30 days, then convert to Lite. Once you have obtained a license file, use the 'Activate' button to browse to the license file. Once the license is installed, it displays the duration and type of the license (either perpetual or with a time limit). Hardware-id is tied to the PC/Mac you run it on. The license is non-transferable to anyone other than you. When your Hardware-id changes, you may request for a new license. If you need to move PGGB to a different PC or Mac, you will need to first deactivate your current license, provide us with the deactivation code, then need to request a new license. PGGB is not for commercial use unless you have purchased a commercial license. There are three levels of license:
|
Limited Trial
Free
|
Lite
Free
|
Plus
$350
|
Pro
$650
|
Max
$1050
|
|
|---|---|---|---|---|---|
| PCM up to 107-bit | Unlimited | Unlimited | Unlimited | Unlimited | Unlimited |
| PCM 128-bit | 2 tracks | Unlimited | Unlimited | Unlimited | |
| PCM 256-bit | 2 tracks | 2 tracks | Unlimited | Unlimited | |
| DSD64–DSD256 | 2 tracks | Unlimited | Unlimited | Unlimited | |
| DSD512–DSD2048 | 2 tracks | 2 tracks | 2 tracks | Unlimited | |
| EQ filters (PGGB-EQ) | |||||
| Installs | PC/Mac | PC/Mac | 1 PC/Mac | 1 PC/Mac | 1 PC/Mac |
| License validity | 30 days | Perpetual | Perpetual | Perpetual | Perpetual |
| Support | Forum/Email | Forum | Forum/Email | Forum/Email | Forum/Email |
| Free upgrades | — | — | 1 year* | 1 year* | 1 year* |
| Commercial use | |||||
| Download | Automatic | Buy $350 | Buy $650 | Buy $1050 |
* If no major updates within first year, free upgrade until next major version.
So long and thanks for all the fish
.·´¯·.´¯·.¸.ZB.´¯·.¸¸.·´¯·.¸><(((º>