Overview
PGGB 256 is an offline PCM remastering tool for upsampling or downsampling audio files, with algorithms optimized to maximize reconstruction accuracy to near theoretical limits*. PGGB can apply EQ filters in a transparent fashion. PGGB also transfers all the common metadata tags to the converted files. PGGB saves the converted files in .wav format by default, or in .wv (WavPack) or .flac (FLAC) format if the user chooses. Image and cover information within the metadata are transferred when possible. All PCM rates including DXD are supported. PGGB will convert DSD to PCM too with an optimal choice of filters.
Starting with 'The Reference Edition' PGGB 256 now provides you with tools to analyze its objective performances.
*PGGB 256 use a proprietary method different from conventional approaches. PGGB 256 is non apodizing and it does not use windowed sinc functions either, or long filters either. The best way to look at the current approach used by PGGB is that it considers the track as a whole. If no HF filters are enabled (which is the default for CD and 2fS rates), PGGB keeps all of the original samples intact, then creates intermediate samples all at once by time shifting all of the original samples. Our method approaches the theoretical limit of reconstruction accuracy possible for a track of given length and sample rate. This is more accurate than using pure Whittaker-Shannon coefficients with windowing. As the sample rate increases, and the track length increases, our method approaches the mathematical equivalence of using pure sinc based interpolation. The higher the reconstruction accuracy, the more transparent the sound. What this means to you is better depth and layering, improved resolution, a cleaner leading edge, and more accurate timbre.
The ‘256’ in PGGB 256 stands for ‘up to 256 bits of precision’. PGGB implements high precision computing for the entire processing that includes resampling, noise shaping and EQ. This allows you to optionally choose higher precision computing including quad precision 128 bit (Insane) and octuple precision 256 bits (Ludicrous). Higher precision results in better sound quality due to improved reconstruction accuracy and noise shaping performance.
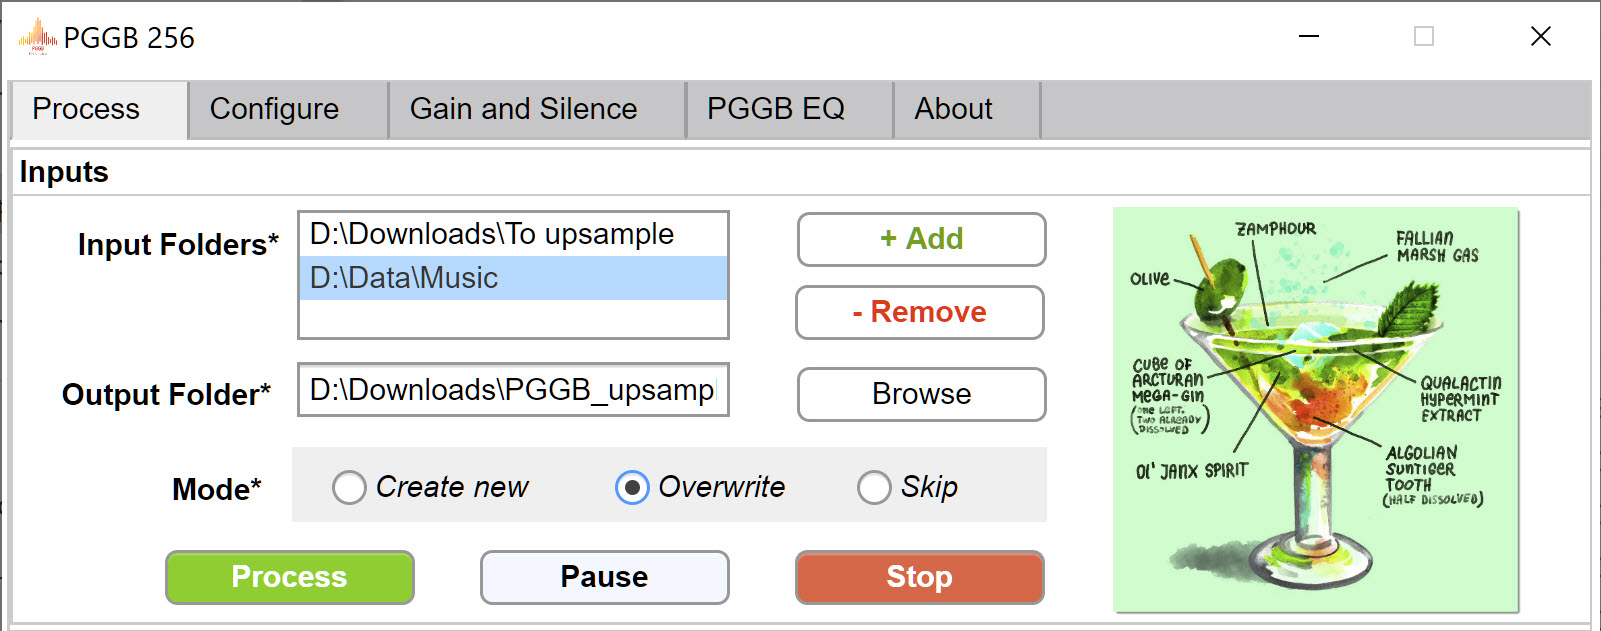
PGGB will process all files in the input folder and all folders in the input folders recursively. For example, if you have a music folder 'C:\Music' and the folder contains albums organized in multiple folders like C:\Music\Album-1, C:\Music\Album-2. It will process any music file with extensions (.wav, .flac ,aif, .aiif, .m4a, .dsf) in both C:\Music and also the Album-1 and Album-2 folders. The upsampled files will be found in output folder and they will be organized in the same way in sub-folders. PGGB also copies jpg, png and pdf files to the destination folders.
It is very simple to use. Once you have chosen the input and output folders (both are required), press ‘Process’ to start processing. Use Pause to pause processing and ‘Stop’ to stop processing. Stop and Pause may take a few seconds to a few minutes depending on what PGGB is processing. Once the processing has started, you may also add new folders inside the input folder. PGGB will discover them and will process them too after it has completed the current set of folders. Processing can be done in three modes. Selecting ‘Create New’ will create a new album folder if the album already exists in the output folder. ‘Skip’ will skip previously processed tracks if they are present in the output folder and ‘Overwrite’ will overwrite the existing tracks. You may add multiple input folders using the ‘Add’ button, you may also remove an input folder by selecting it and pressing ‘Remove’.
Advanced: If PGGB finds 'pggb_to_process.txt' in the input folder, it will process the list of folders in the text file (recursively), in addition to any folders in the input folder. By default, it will create a folder with the name of the parent folder. If it finds ‘FQN’ in the first line of the text file, it will replicate the full folder structure (Excluding the drive letter) in the output folder.
On Windows, The very first time PGGB runs it may request permission for firewall. Please accept the request as PGGB needs it to manage parallel threads and in the case of a trial license, it needs to connect to a time server.
Configuration
Dac and System
PGGB is already tuned to provide optimal results with very little tweaking needed. In short it is in auto-pilot mode. Go to ‘configure’ tab to change the settings.
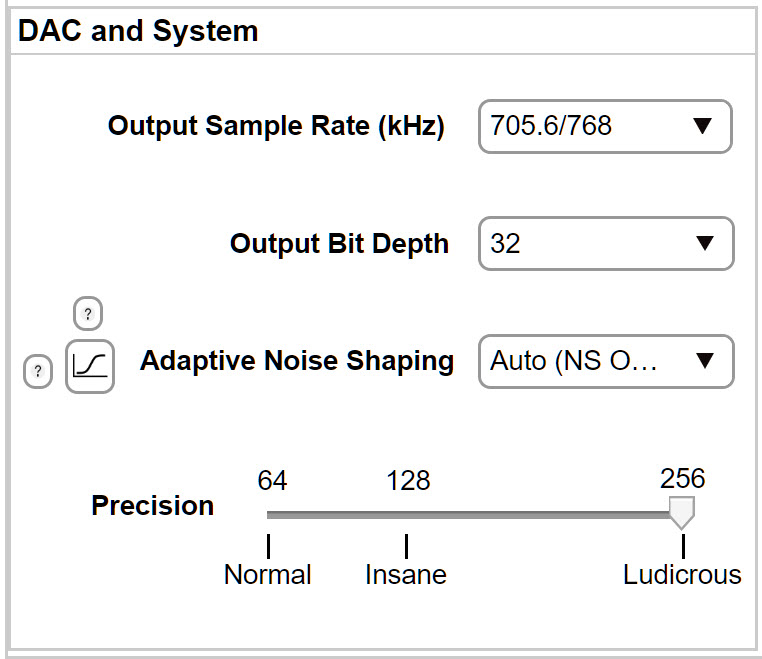
Settings for the dropdowns on the left are determined by your DAC and your PC
- Output Sample Rate: Choose a sample-rate family that matches the maximum output rate supported by your DAC.
- Output Bit Depth: If your DAC supports 32 bits, then 32 bits is the best option. If you wish to do further processing (such as EQ or dither), then 64 bit doubles may be a good option too but do be aware, it will double the storage requirements. Bit depths of 12 through 32 are available to help you choose the right bit depth that is optimal for your DAC. For example, some R2R DACs may have a higher settling time for very high sample rates (1Mhz or more), in these cases, choosing lower bit depths may help.
- Noise shaping helps attain high small signal accuracy in the audible range. The algorithm is based on the bit depth,
sample rate you have chosen, and noise filter settings. The noise shaping is very effective in removing quantization
noise. Removal of quantization noise results in a very lifelike sound.
- NS: Optimal’-- PGGB will choose the optimal noise shaping algorithm to remove quantization noise from the audible range if left in ‘Auto ’ (recommended).
- ‘NS: Alternate’ -- Is a slightly different flavor of the optimal noise shaper, with a different noise shaping profile. It results in a slightly different portrayal of transients and high frequencies (available only for 256 bit precision).
- ‘NS: Extended’ -- Reserve this for your 'problem' tracks that have high background noise or are from old analog transfers that otherwise sound harsh. Use this in combination with HF: Aggressive filter when available.
- ‘Dither only’ -- Choose if you want to bypass adaptive noise shaping and apply dither only (not recommended).
- Precision: You can now choose the precision you want PGGB to use for all of its processing and EQ. Normal (64 bit) processing is the default, it is the fastest and least memory intensive. If you desire even higher accuracy, you may choose to do the processing at an Insane 128 bit precision, or a Ludicrous 256 bit precision. The higher precision improves reconstruction accuracy and noise shaping performance, and leads to better sound quality. It comes at the cost of increased processing time and increased memory usage. Also refer system requirements section for memory requirements.
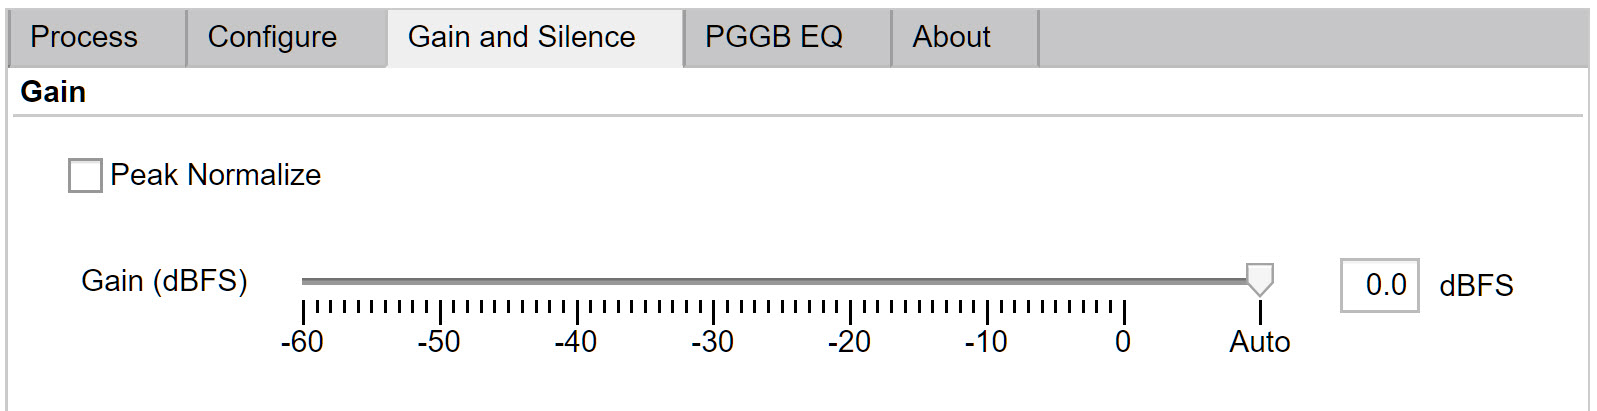
- Gain (dB): If you wish to use PGGB for off-line volume control, you may set the gain. The gain setting has now moved
to ‘Gain and Silence’ tab. If you set a negative gain, the negative gain is applied to the tracks after all
processing is done. If you choose ‘Peak Normalize’, the peak of the track is set to a fixed negative gain after all
processing is done. If left at auto, no gain is applied unless an inter-sample-over is encountered (refer Inter-Sample-Overs section).
Preferences (Filter Presets)
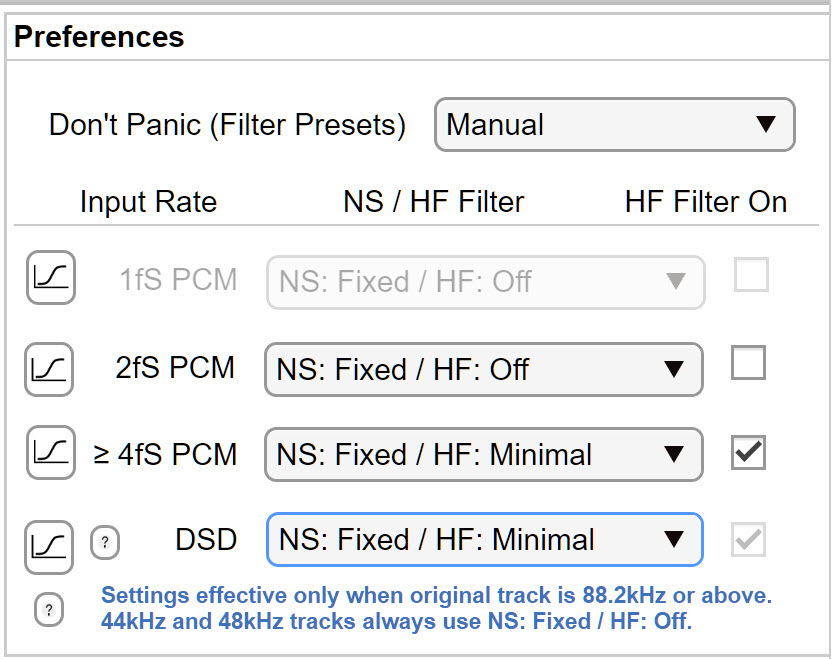
Settings on the right can be chosen based on your preferences.
-
Automatic: We highly recommend leaving it on the ‘Automatic’ preset. The
‘Automatic’ preset will choose the optimal
Noise Shaping (NS) and High Frequency Noise Filter (HF Filter) settings for
each of your tracks. The relavent settings
are disabled as they are already chosen for you.

-
Manual: The ‘Manual’ preset gives you full control over Noise Shaper (NS)
and High Frequency (HF) Noise Filter
settings. There is no one-size-fits-all for these settings as the optimal
choices for both Noise Shaping and HF Filter
choices depend on the music track; more specifically the sample rate of your
music track. This is the reason why the
settings are split into three categories based on Input Rate:
- 2fS PCM: 88.2kHz and 96kHz Hi-res tracks - these typically have music content till 40kHz but not significant noise beyond 40kHz.
- ≥ 4fS PCM: 176.4kHz, 192kHz, DXD (352.8kHz) and higher - these typically have music content till 40kHz but may also contain significant noise beyond 40kHz
- DSD: DSD64, DSD128, DSD256, DSD512 and DSD 1024 – these have significant noise beyond 40kHz.
Filter Options
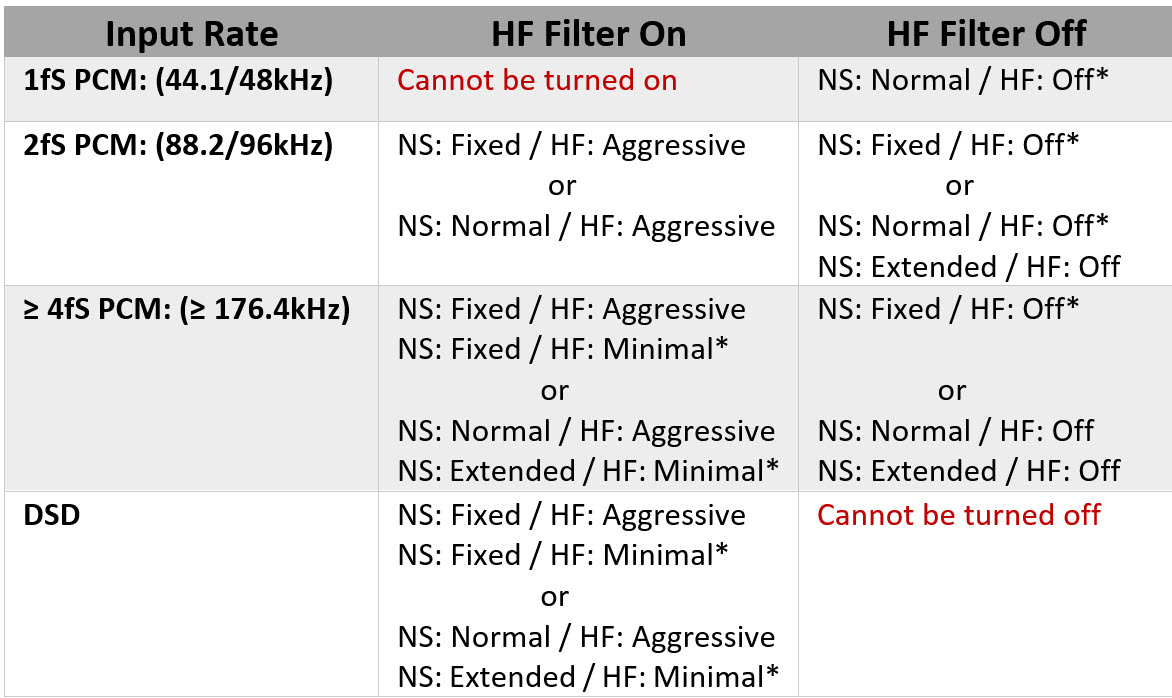
NS / HF Filter: This drop-down lets you choose Noise shaper (NS) and High Frequency Noise Filter (HF Filter) for each of the ‘Input Rate’ type. The HF Filter can be turned on or off using the ‘HF Filter On’ check box. The Noise Shaper is off if ‘Dither Only’ is chosen in the Configuration for Adaptive Noise Shaping.
Note1: HF Filter is always on for DSD to avoid damaging sensitive audio equipment. HF Filter is always off for 44.1kHz or 48kHz tracks because they do not contain HF noise beyond 22kHz or 24kHz.
Note2: Noise Shaper and HF Filter work in tandem. The valid combinations are listed in the table below and * indicates the recommended setting.
Noise Shapers
The choices for Noise Shaper type depends on chosen configuration in ‘Adaptive Noise Shaping’ settings:
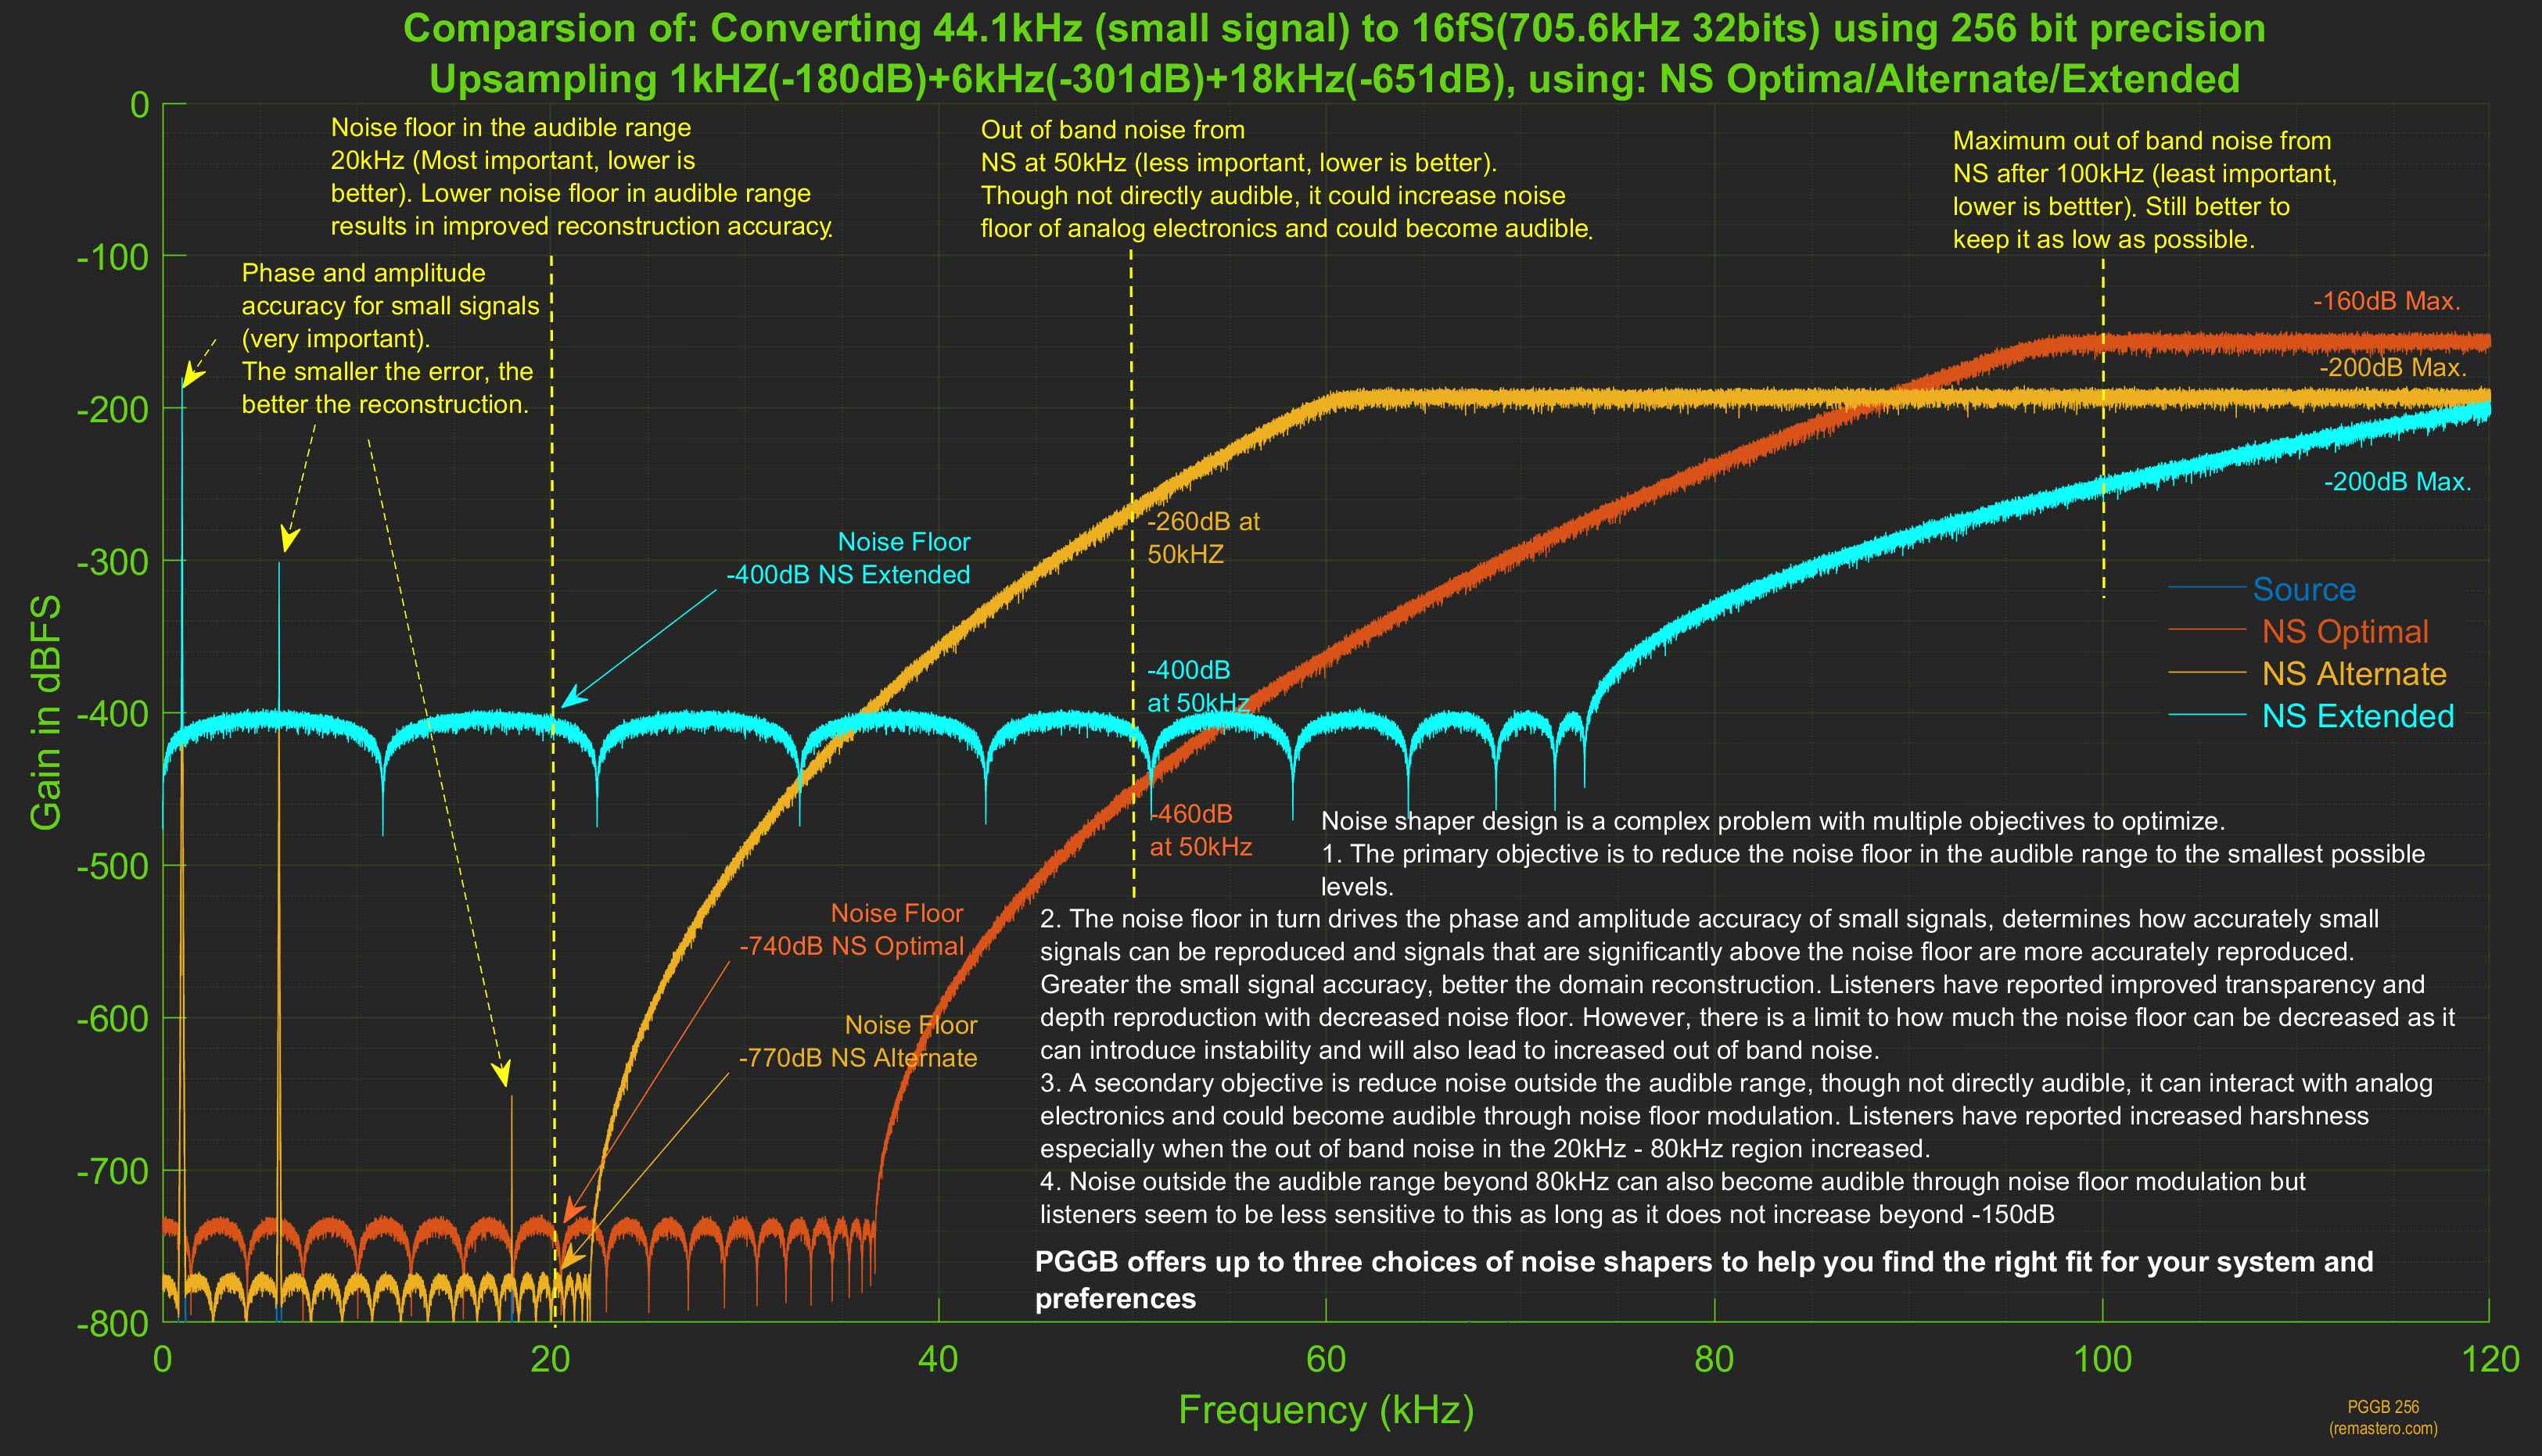
- Fixed: The noise shaper has been optimized for the audible range and very low noise floor extends at least to 40kHz (as low as -740dB for 256 bit precision) extends at least to 40kHz.
- Normal: Noise shaper minimizes quantization noise in the audible (Normal) range (as low as -540dB for 128 bit precision and -360 for 64 bit precision). Results in the least noise in the audible range. It has been described as sounding 'clean' during subjective listening tests.
- Extended: Noise shaper minimizes quantization noise beyond the audible (Extended) range (as low as -540dB for 128 bit precision and -360 for 64 bit precision). It has slightly higher noise in the audible range, but the noise floor remains low for an extended high frequency range. It has been described as sounding 'airy' during subjective listening tests.
- Dither (Set ‘Dither Only’ in Configuration): No noise shaping is done, only a Gaussian dither is applied, not recommended for output rates higher than 352.8kHz.
Here is an annotated example comparing the different noise shaper options (you can also access this plot by pressing the ‘?’ button on top of the noise shaper plot preview button).
HF Noise Filters
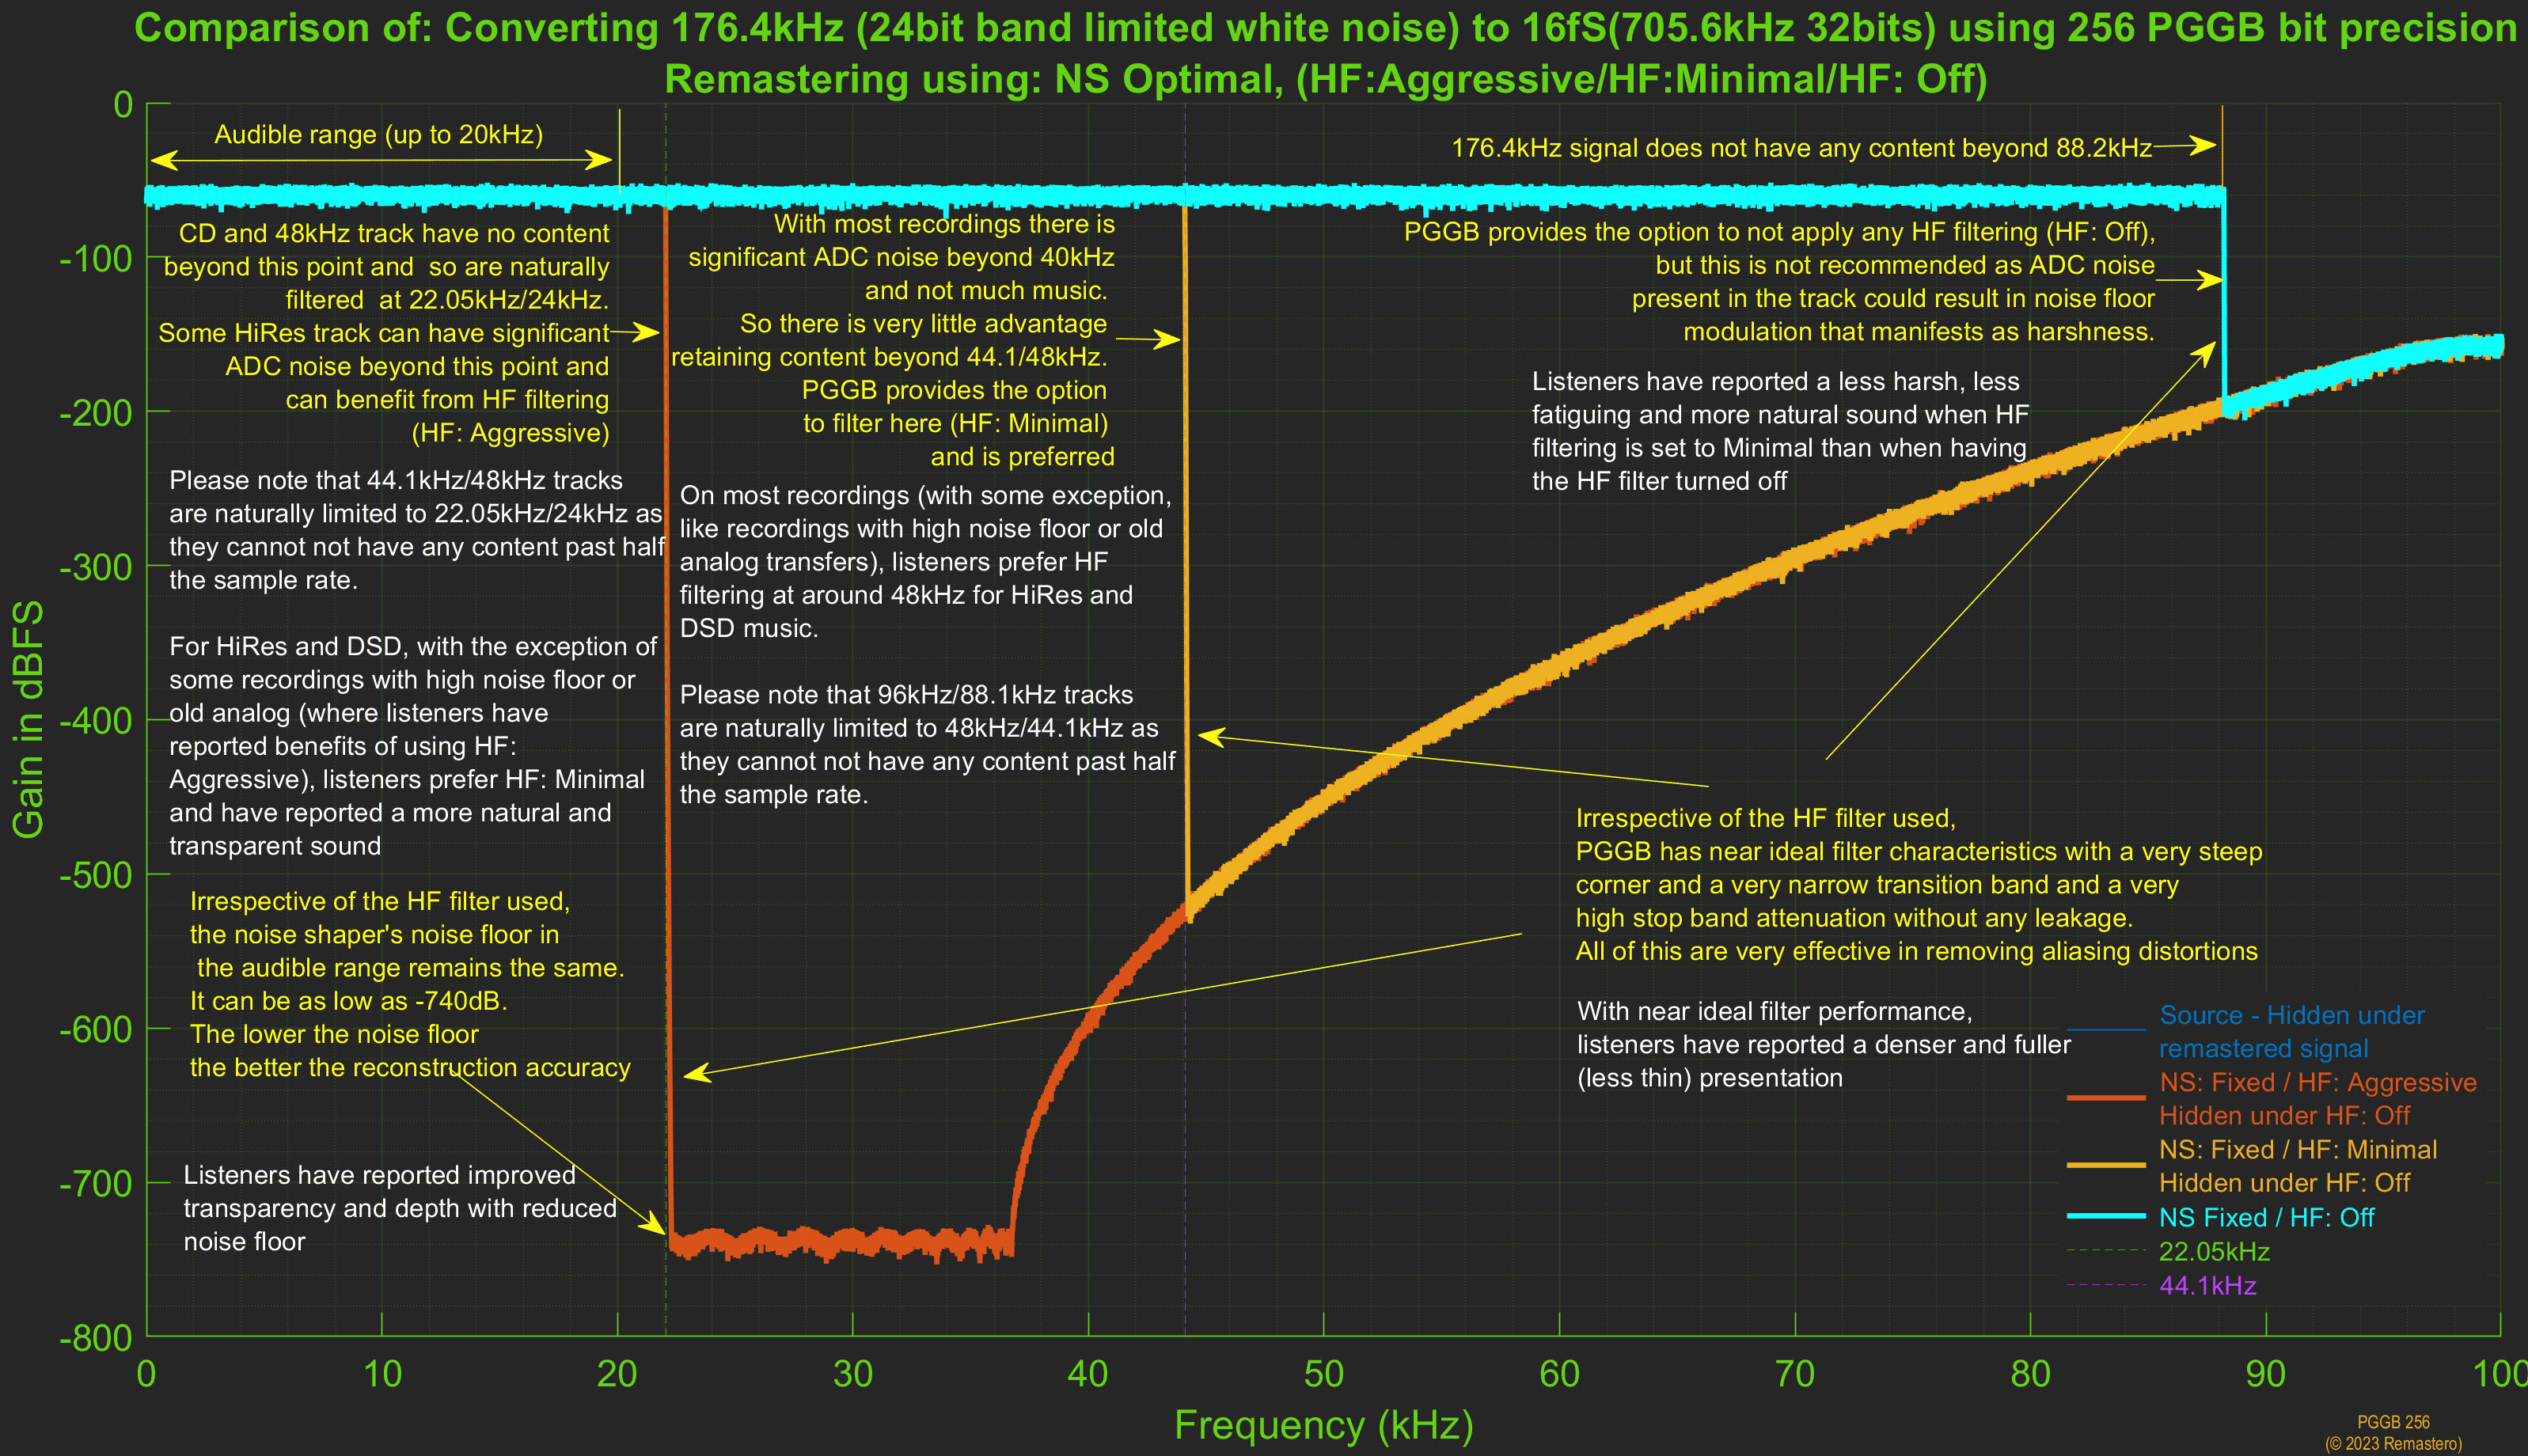
There are three choices for HF Filter, the HF Filtering process is designed to be transparent but effective in removing HF noise:
- Aggressive: Filters aggressively to remove noise beyond the audible range. The tradeoff here is real music beyond the audible range is also filtered in addition to any noise. It has been described as sounding 'smooth' during subjective listening tests.
- Minimal: Filters minimally to remove noise beyond the audible range. While it keeps most of the music beyond the audible range, not all noise is removed. It has been described as sounding 'lively' during subjective listening tests.
- Off (Uncheck ‘HF Filter On’): HF Filter is off, and no filtering is done to remove noise beyond the audible range. Leaving it off, especially for 4fS or higher rates can introduce harshness or fatigue. HF Filter is always on for DSD as DSD contains significant HF noise and can damage sensitive audio equipment.
It is common for higher sample rate material to have significant out of band quantization noise introduced by ADC (i.e., Analog to Digital Converters used during the original recording or digital transfer); this is especially true with DXD and DSD, but listening test and analysis show even material at 88.1kHz and above can benefit from noise filtering. Beyond the audible range, there reaches a point where it becomes increasingly hard to differentiate between quantization and other noise and the music signal. This can be recording dependent and makes it harder to choose the noise filter. The new noise filter used in PGGB tries to simplify and remove some of the guesswork. The Automatic setting will work best in most cases. This is all about balancing the signal-to-noise ratio at frequencies beyond the audible range. As more filtering is done (Aggressive setting), the sound is cleaner but may sound smoother or a little less open. With less filtering (Minimal setting), it will sound airy and lively but can come at the cost of added noise or harshness. These are still very subtle changes to help you fine tune to your system and preferences.
Here is an annotated example comparing the different HF Filtering options (you can also access this plot by pressing the ‘?’ button to the right of last plot preview button under preferences section of the configuration tab).
Plot Preview Objective Metrics
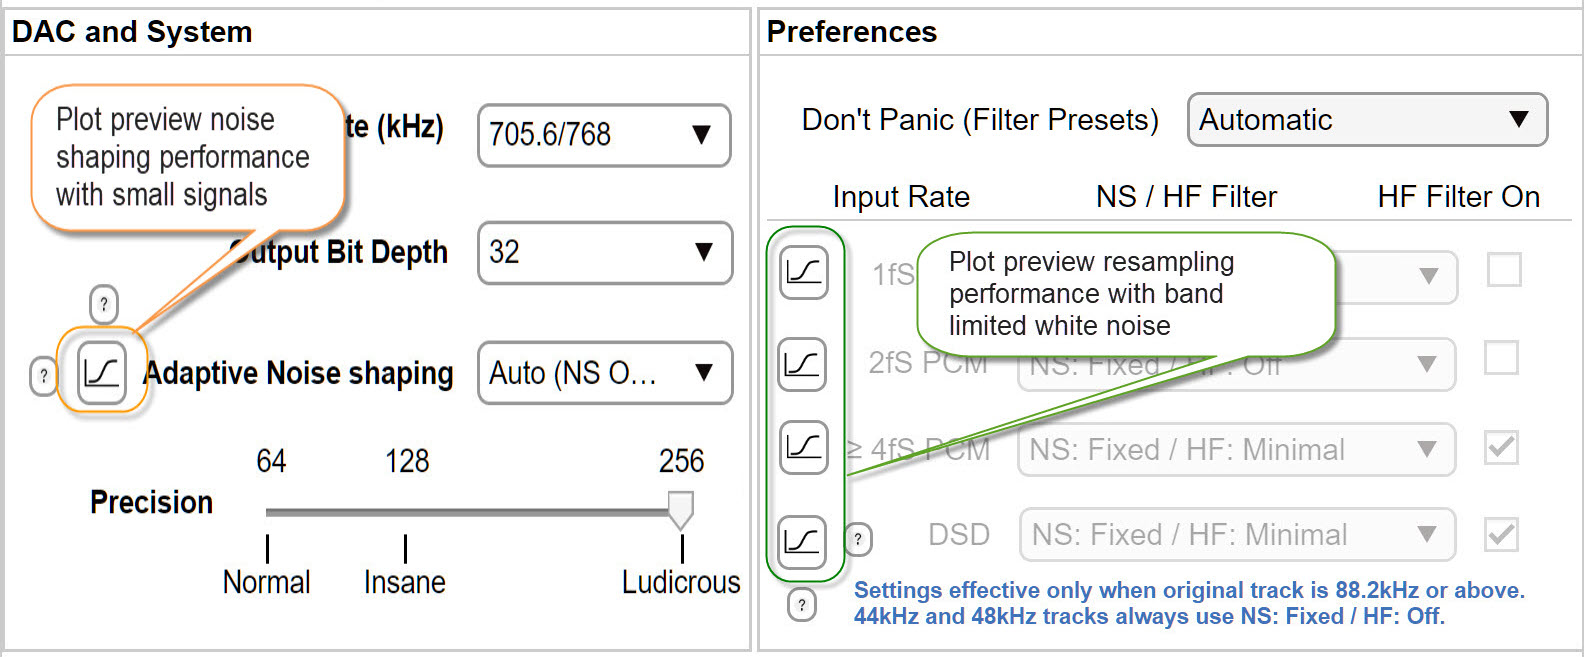
For those who are interested, PGGB now allows you to plot both Noise shaping performance and Remastering performance (upsampling, downs sampling or conversion of DSD to PCM), so you need not take our word for it and check the performance metrics yourself.
Click on the plot button next to ‘Adaptive Noise Shaping’ (highlighted in orange) to preview how the noise shaper performs with small signals for your current settings (precision, output sample rate, bit depth and the choice of the noise shaper). Click on any of the plot buttons in the ‘Preferences’ section (highlighted in green) to preview the remastering performance in frequency domain for your current settings and 1fS, 2fS,4fS or DSD 64 input test signal (band limited white noise).
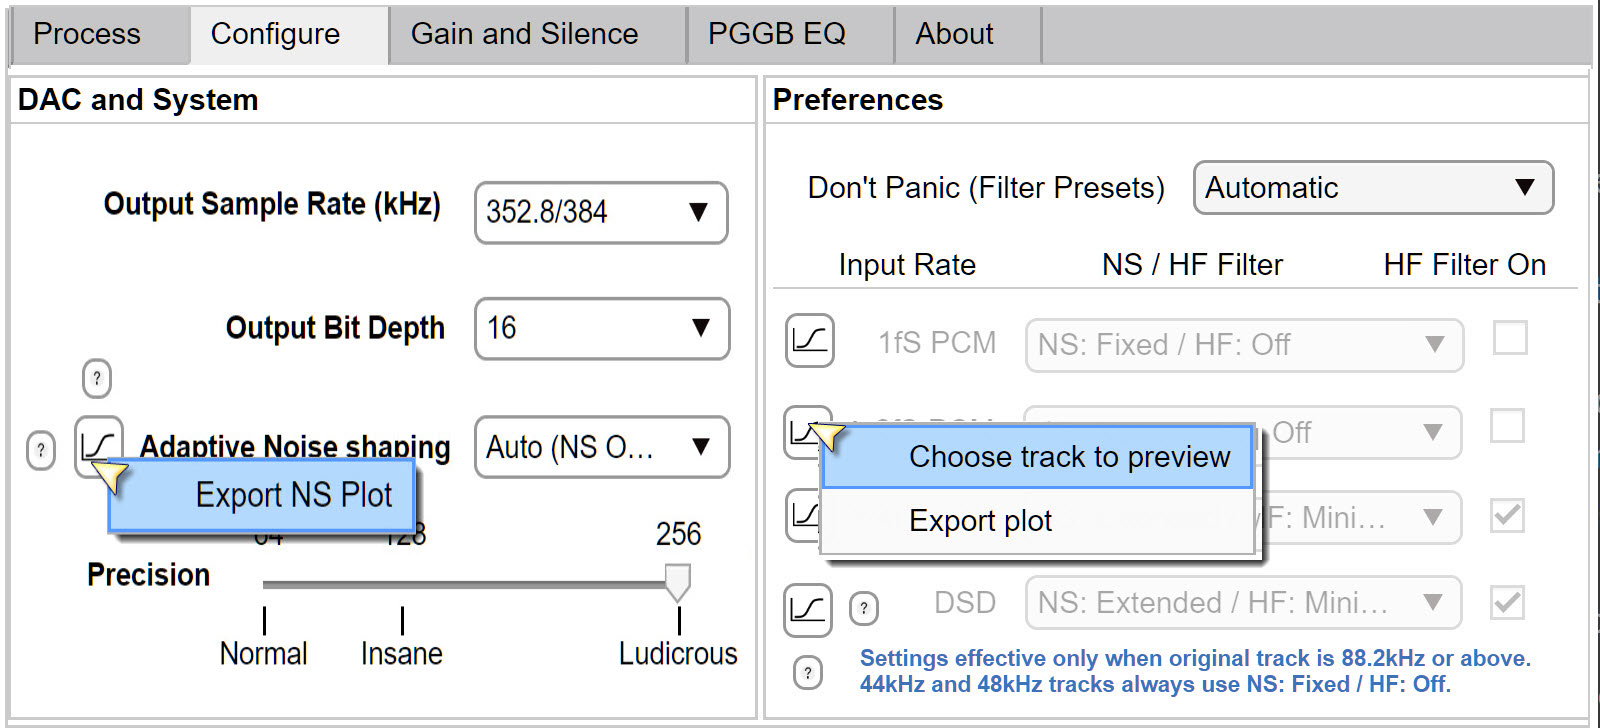
Right click on the plot preview button to see more options. You can export plot and save them as images. If you right click any of the plot preview buttons under the preferences section, you can also chose any of your tracks and preview how frequency spectrum of your track will look after remastering using your current settings (only the first 5 seconds are analyzed).
Here is an annotated example of the plot preview of noise shaper performance (you can also access this plot by pressing the ‘?’ button to the left of the noise shaper plot preview button.
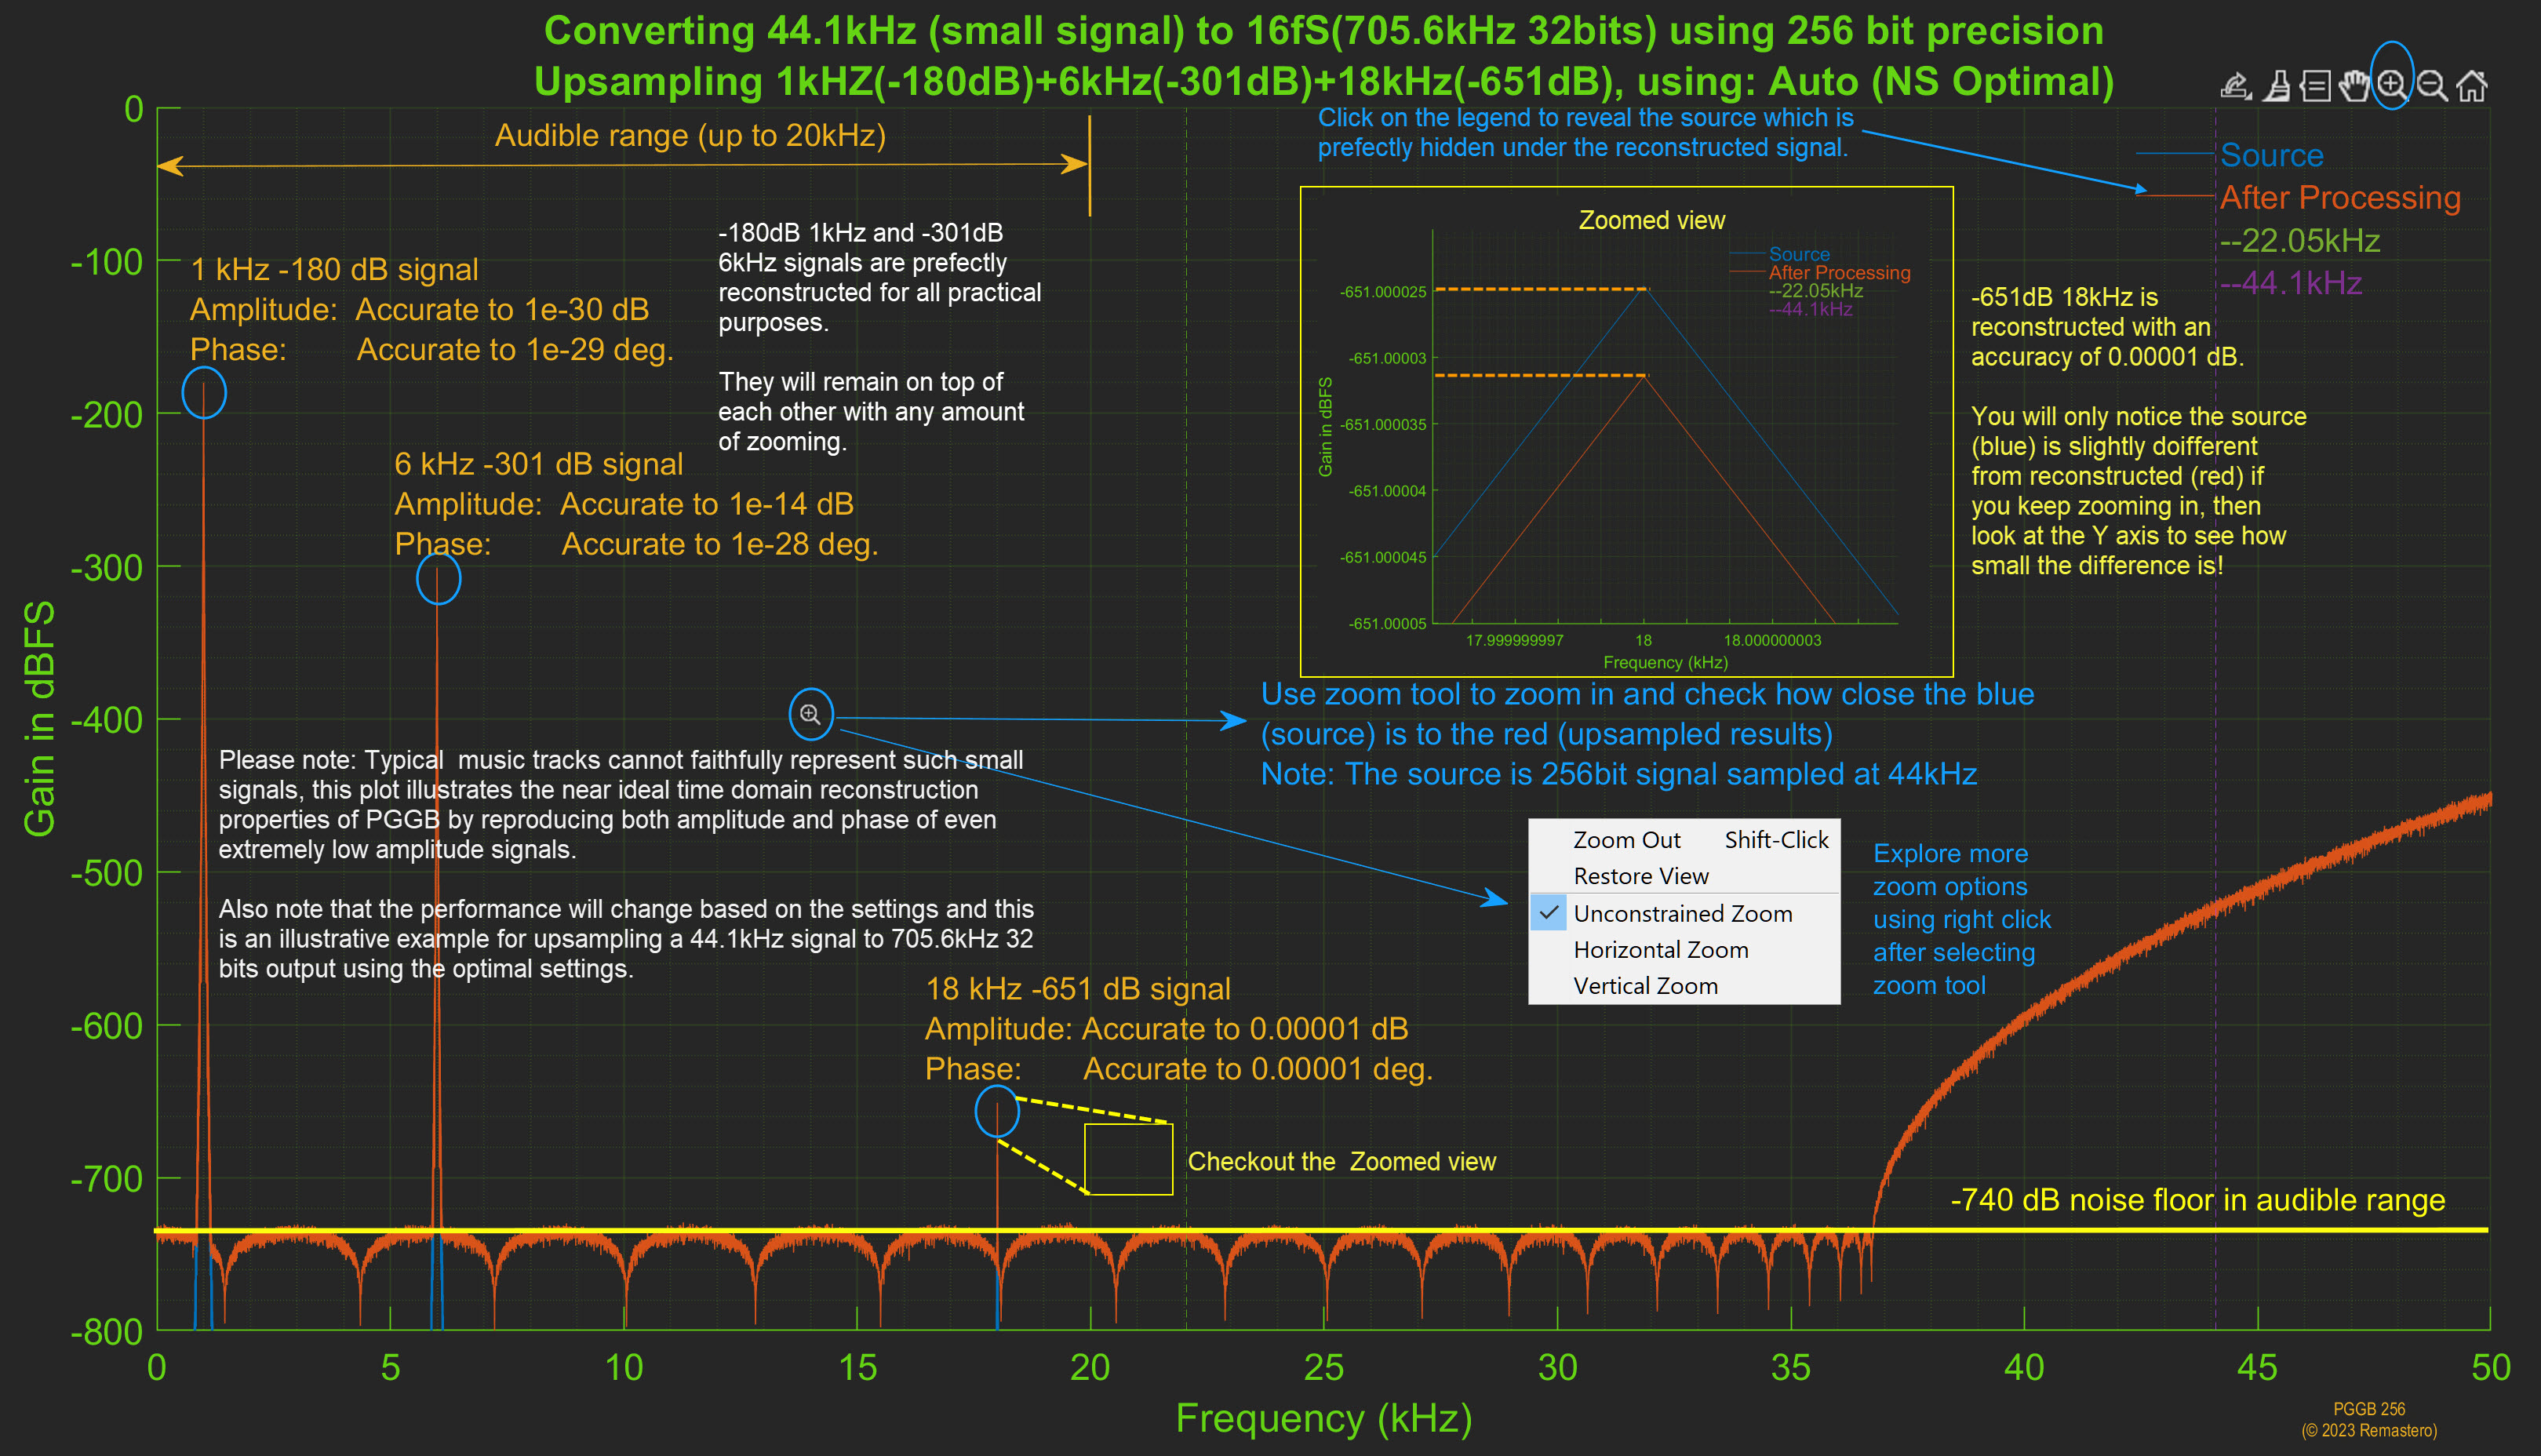
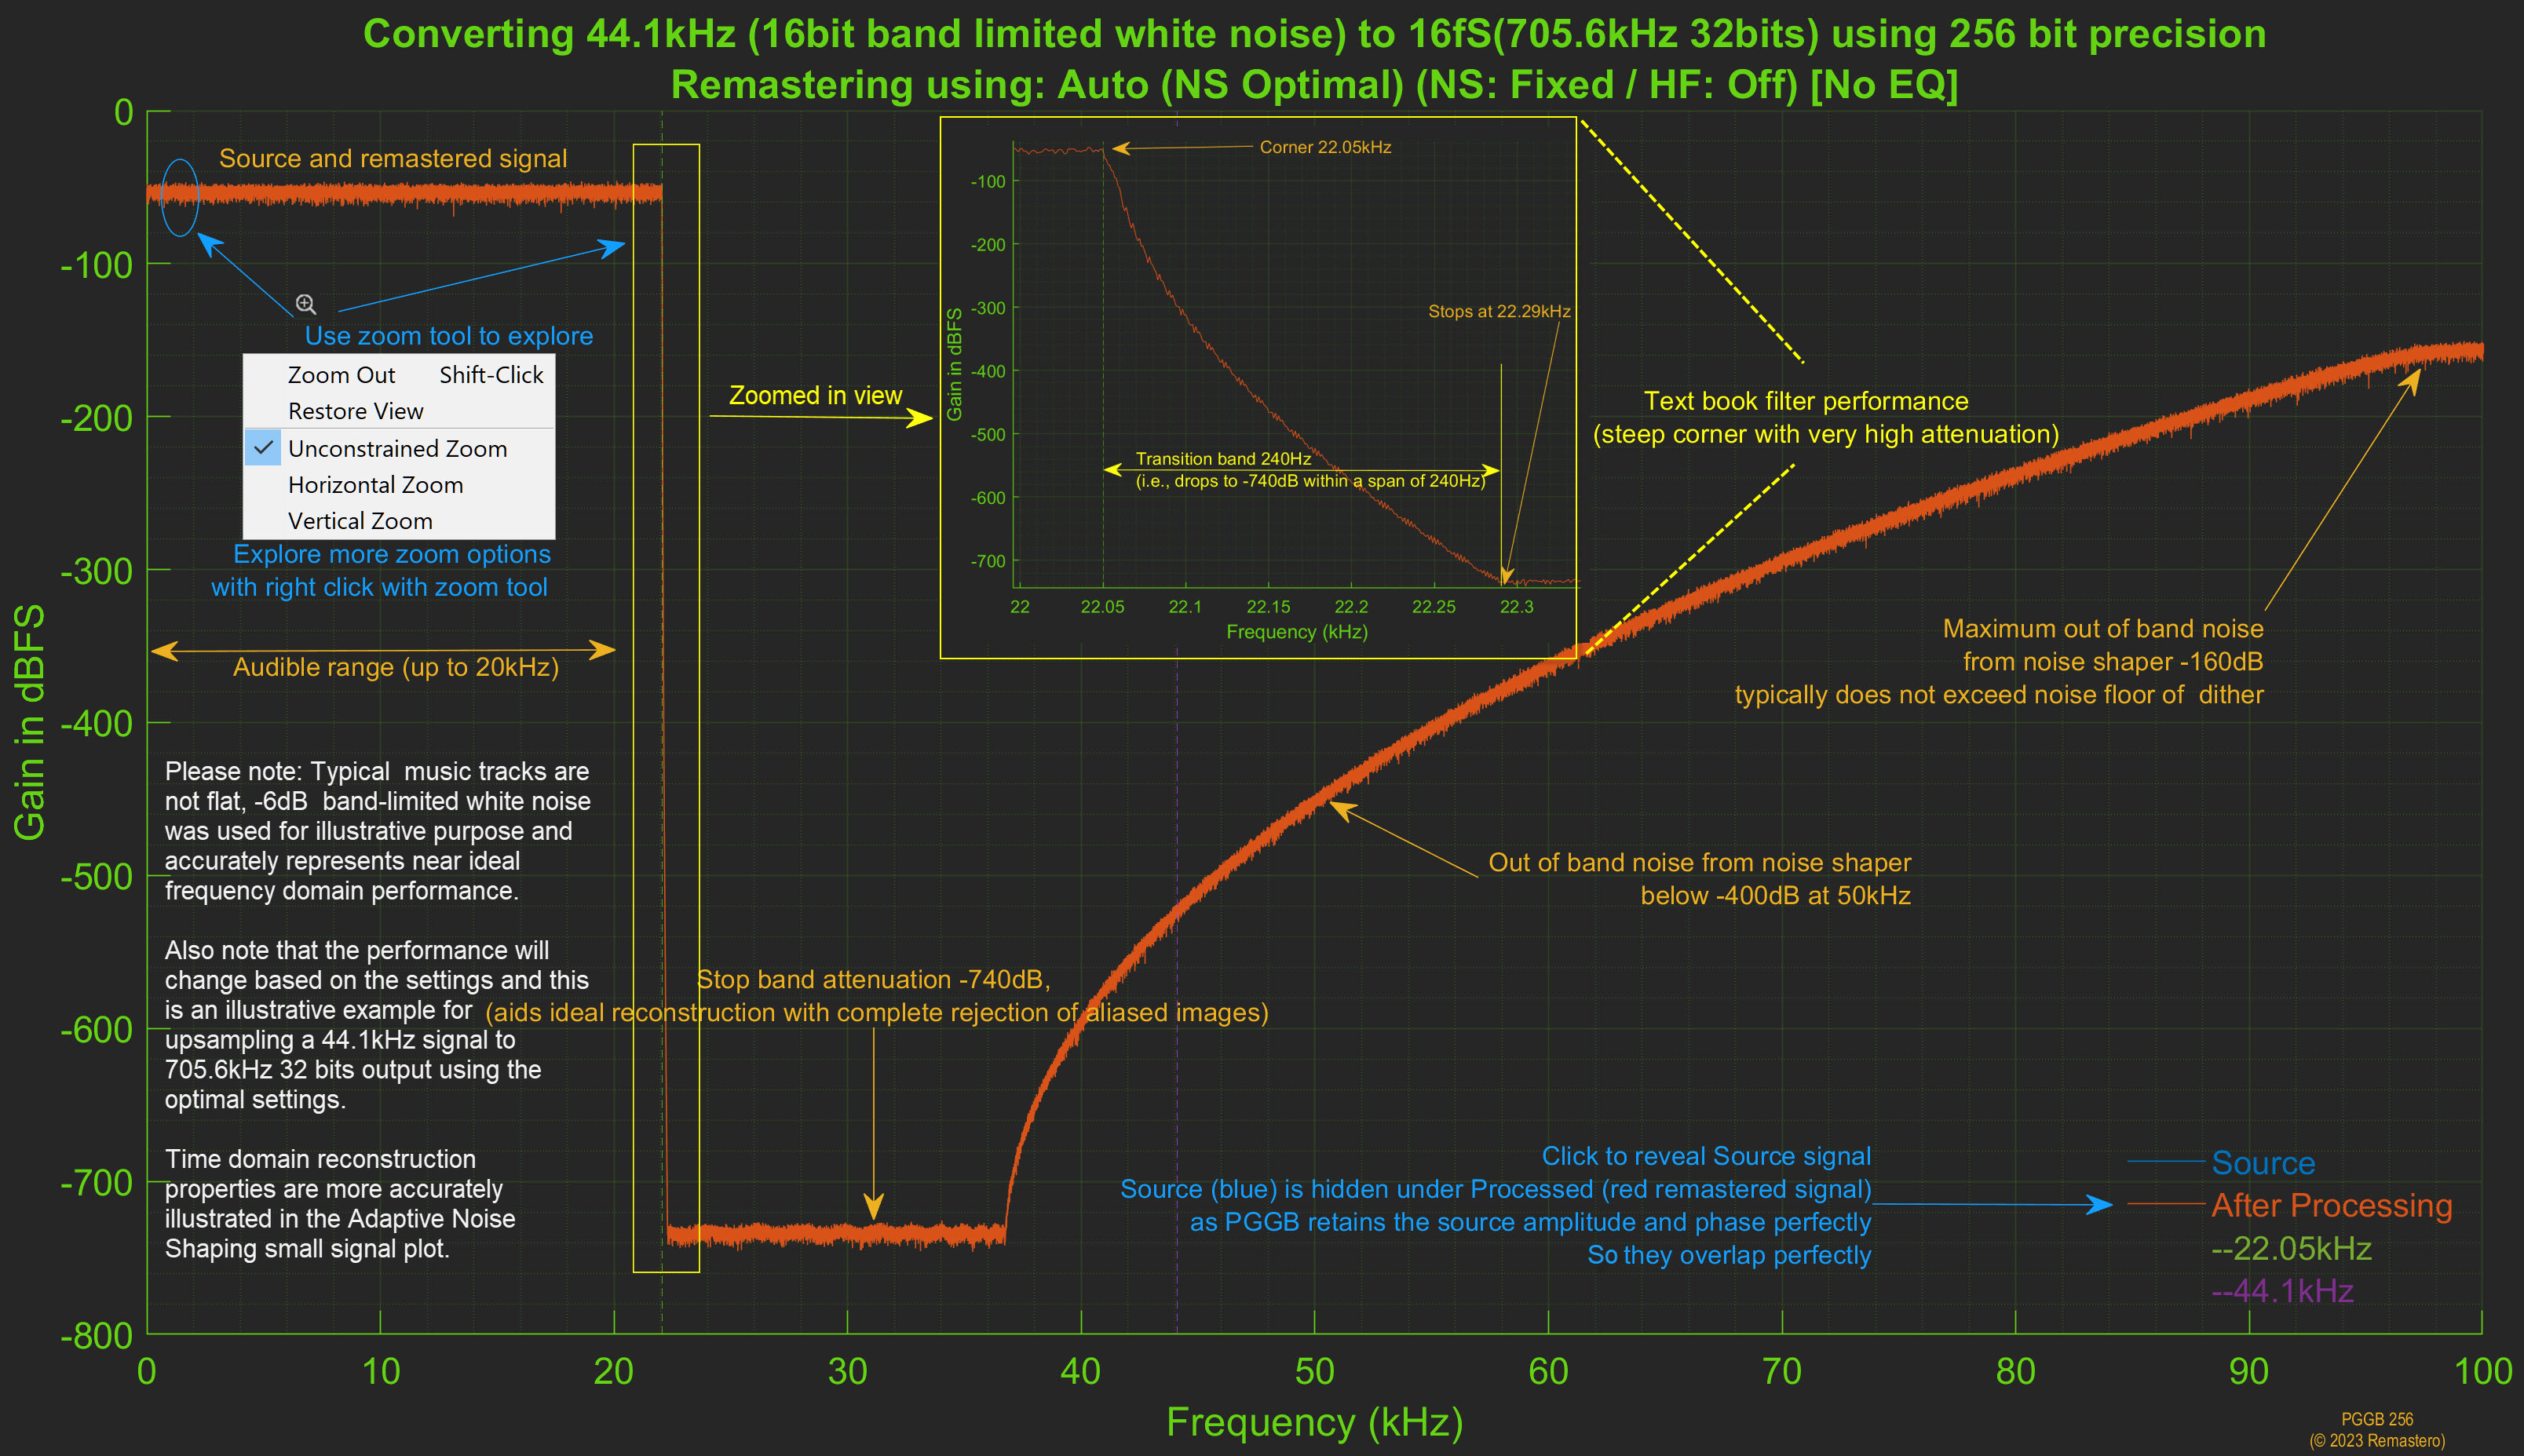
Here is an annotated example of the plot preview of remastering performance of 1fS CD rate test signal (you can also access this plot by pressing the ‘?’ below the last plot preview button under preferences in the configuration tab).
Here is an annotated example comparing the different noise shaper options (you can also access this plot by pressing the ‘?’ button on top of the noise shaper plot preview button).
Here is an annotated example comparing the different HF Filtering options (you can also access this plot by pressing the ‘?’ button to the right of last plot preview button under preferences section of the configuration tab).
Load or Save Settings

If you own multiple DACS or if you wish to process your library with different settings, you can create multiple settings. To create new settings, enter the name of the setting you wish to create and press Save. To overwrite the existing setting, select the setting from the drop-down, make the setting changes and press Save. You can also remove existing settings; just choose the setting you wish to remove and press Remove.
Note: Default setting cannot be removed but can be overwritten.
Gain,Trim and Silence
If you are someone who thinks your tracks do not meet the required peak level, dynamic range DR, and acceptable silence at the beginning and end of a music track, this section is for you. That is why we have added the “Secondary Mastering” functionality, which allows you to bring all your tracks to a single loud peak level, a distinct beginning and end of the track, and set a uniform silence interval between tracks.
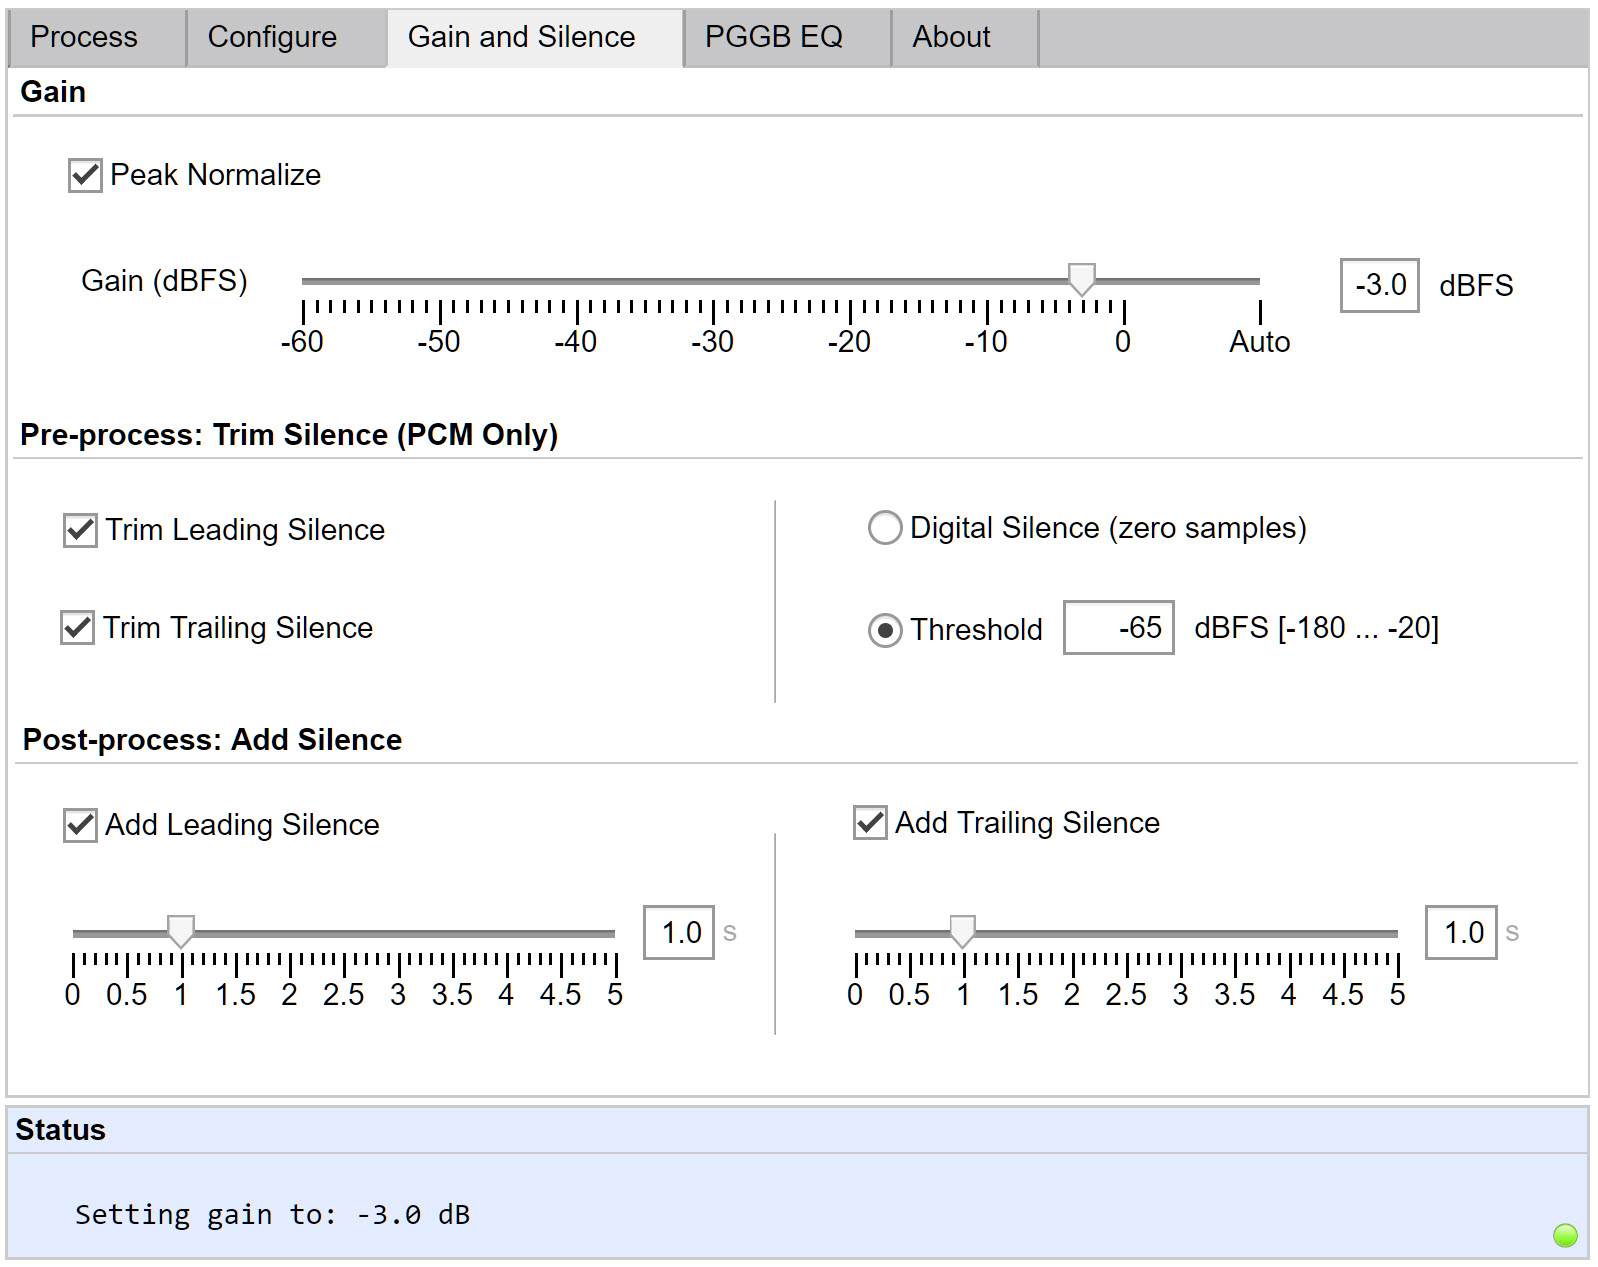
Peak normalization
This functionality allows you to set the final volume of a track based on the peak level after performing oversampling and optionally EQ. The peak level of recordings can be different even within an album, not to mention across different artists. Peak normalization ensures similar volume of all audio recordings, set to a given value. Even if this is a set of albums from different artists and different DR ranges, then objectively the entire set of tracks will play at approximately the same RMS volume too. Additional peak normalization avoids secondary overloads that may occur when further processing happens in your DAC. The recommended value is "-3dBFS" or change it to an appropriate level if you are using PGGB for volume control instead of preamp.
Trim silence
Sometimes due to sloppy mastering in recording studios, tracks often have some unintended digital silence (blank samples) at the beginning and end of the track, as well as very quiet background levels until the music itself begin. Sometimes the value of silence and background noise at the beginning of a track may occur for a few seconds and not be the same at the end of the track. During these periods, you hear digital silence or a subtle background noise. If necessary, you can completely trim digital silence, as well as background noise at the beginning and end of the track. This functionality will allow you to listen only to music, without gaps. The recommended value is “Threshold -60/-70” dBFS.
Add silence
After trimming digital silence and background noise, you may find your tracks play one after another without a pause (this may be preferable on gap-less albums or some long classical movements, so please use your judgment). To correct this situation, you can choose to add additional silence to the beginning and end of the track, but this time the digital silence period is fixed. This will allow you to have a consistent and noticeable pause between the tracks being played. The additional silences at the start and tail of the track may also allows you to avoid the beginning and end of the track being "swallowed" when played on some players. The recommended value is 1 second.
Here is the summary of recommended settings
PGGB-EQ
PGGB 256 supports EQ. You can access EQ configuration through the ‘PGGB-EQ’ tab. The interface is quite simple. You can import both convolution EQ filters (.wav) or parametric EQ filters (.txt)
Bring your own EQ
PGGB uses the concept of ‘Bring your own EQ’:
- DRC: If you are interested in Digital Room Correction (DRC), PGGB is not a substitute for measurement software. You would use your favorite measurement software to create the convolution filter. Alternately you can also enlist the services of someone who can help you with measurements and EQ. The filters need to be stereo in .wav format.
- Headphones: You have a few choices
- If you have your own headphone EQ filters, you can import them.
- You can use the Auto EQ project, choose your headphone, choose ‘EqualizerAPO ParametricEq’ as the EQ app, then download the .txt file for import int o PGGB EQ.
- Alternately you can use the Auto EQ project to find your headphone and import the 48kHz or 44.1kHz Minimum phase wav file.
- Download headphone EQs from here. This list will expand as we get more feedback and submissions.
Filter Type: Two ways to import and apply EQ
Applying EQ is a simple mathematical operation. However, the quality of your filters affects the quality of the resulting remastered track. Ideally, applying equalization should impart tonal changes only, with no degradation in other qualities like dynamics, transparency, depth, and resolution. For the best results, we recommend using linear phase.
PGGB Optimized: PGGB-EQ provides an option to import your EQ filter and apply them during the remastering process in a transparent fashion. PGGB does not resample your filters for different input rates, but instead creates new filters from scratch from the imported filters and applies them in a way that retains transparency and only alters the tonal balance when you choose 'Linearize phase for EQ' option.
Note: An option to use your EQ filters as-is will be implemented in the future, but it is not currently implemented.
When you have an option to use both convolution filters and parametric filters, we recommend that you import parametric filters.
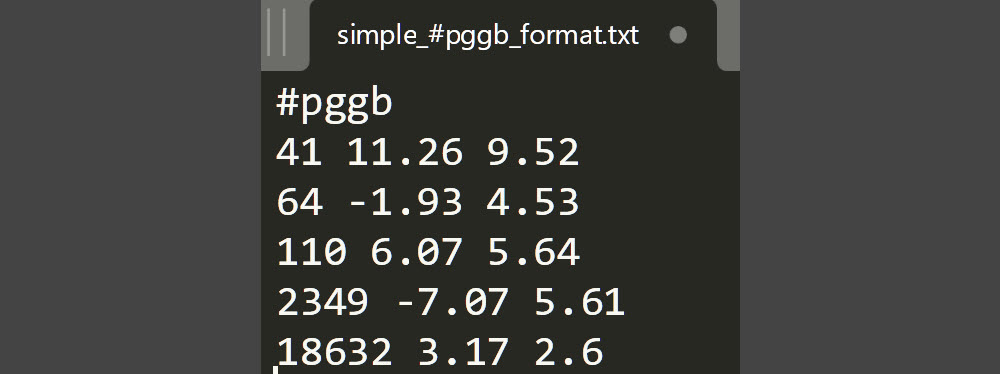
Import Parametric EQ Filters (REW, Equalizer APO): PGGB now allows you to import parametric EQ filters. You can create parametric EQ filters in REW and export them as unformatted text, or you can create the parametric EQ filters in Equalizer APO or you can use autoeq.app and export the filters for Equalizer APO Parametric EQ. You can also choose a simple space delimited format such as below, first line #pggb, followed by Fc, Gain, Q values (peak filters only, use space not commas).
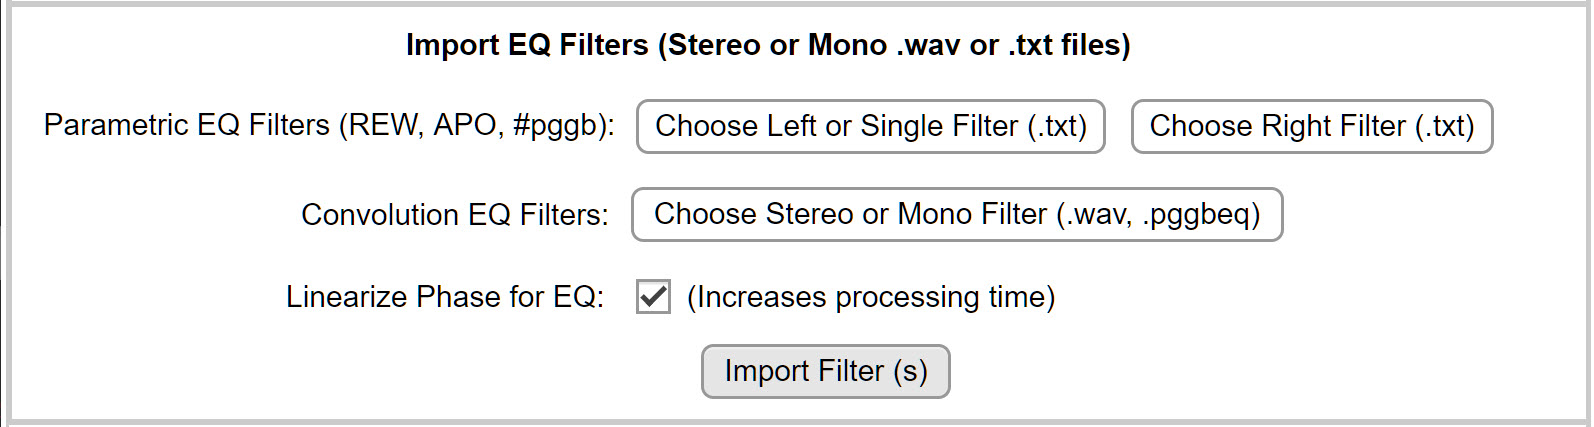
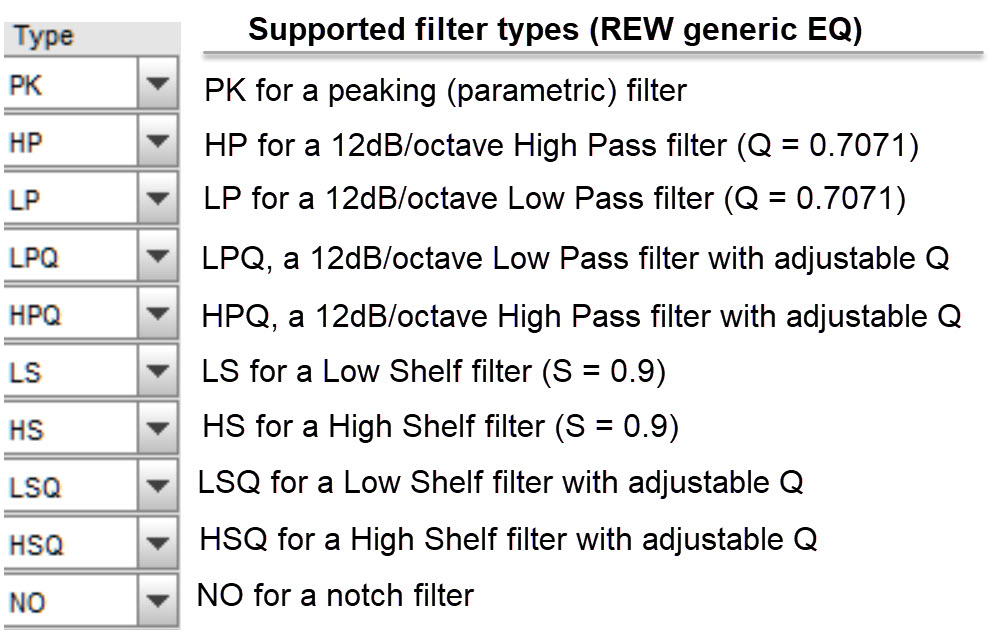
Once you have the exported .txt files, you can import them in PGGB EQ. If you wish to apply the same EQ for both the left and right channel, or want to import the left channel EQ, use ‘Choose Left or Single Filter (.txt)’ button to browse to the file. The Import button will now be enabled. If you wish to use a different EQ for the right channel, then use ‘Choose Right Filter (.txt)’ to browse to the right channel filter. You can then proceed to import the filters by pressing ‘Import Filters (s)’ button. The import of the parametric EQ filters will happen quickly (a few seconds). The supported filter types are listed below.
Please note: When exporting filters from autoeq.app and choosing 'Equalizer APO Parametric EQ', it will say LSC and HSC for Low Shelf and High Shelf filters, LSC and HSC, they are equivalent to LSQ and HSQ. In the next update we will make sure LSC is accepted too.
Import Convolution EQ Filters (.wav, .pggbeq): Use ‘Choose Stereo or Mono Filter (.wav, .pggbeq)’ button to browse to your convolution filter file in .wav format or as .pggbeq (if it is one you downloaded from our website).If the convolution filter is mono, then the same EQ will be applied to both left and right channels. The import button will now be enabled. You can then proceed to import the filters by pressing ‘Import Filters (s)’ button. The import process can take a minute to several minutes, because PGGB is generating a new set of filters. The process will be longer for 256 bit precision and can take several minutes when ‘Increase LF fit’ is checked.
Note: You will need to re-import filters for every precision you choose (i.e., Insane, Ridiculous etc.) or if your output sample rate changes or you decide to choose ‘Increase LF fit’.
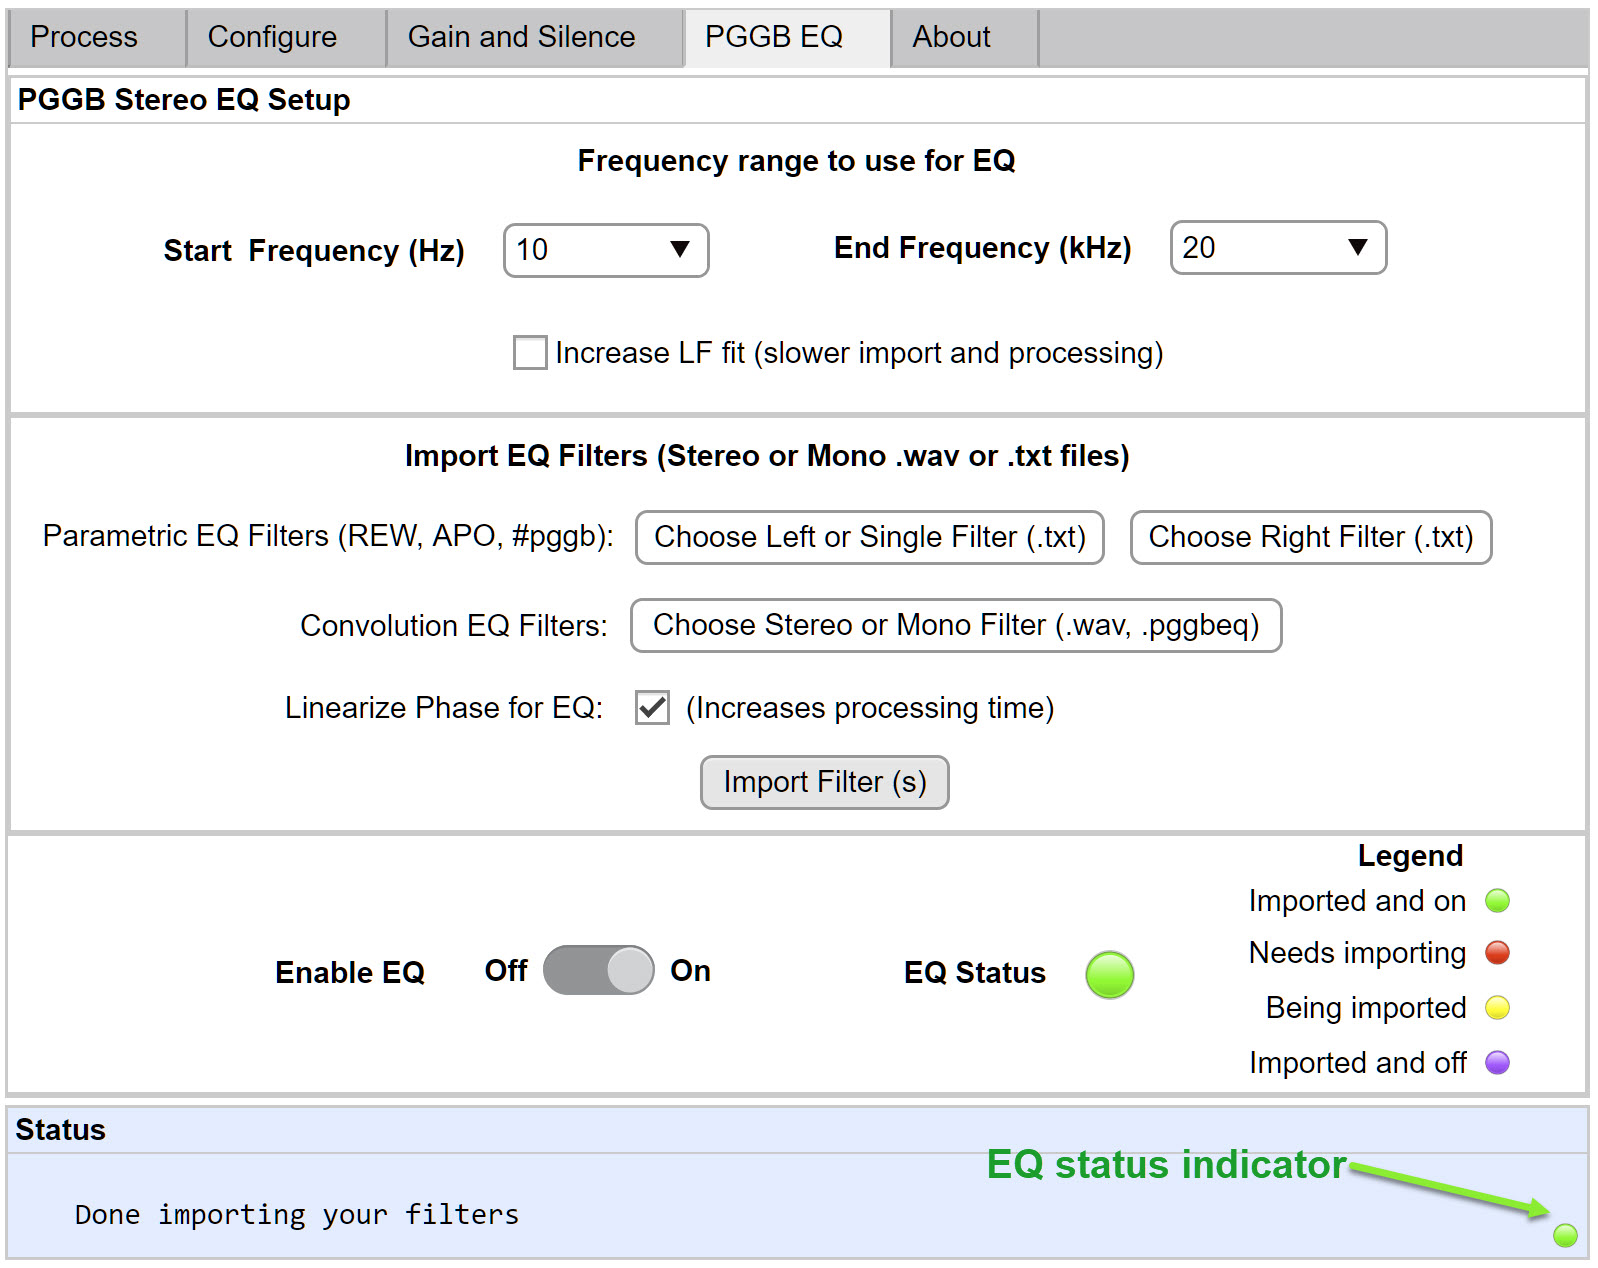
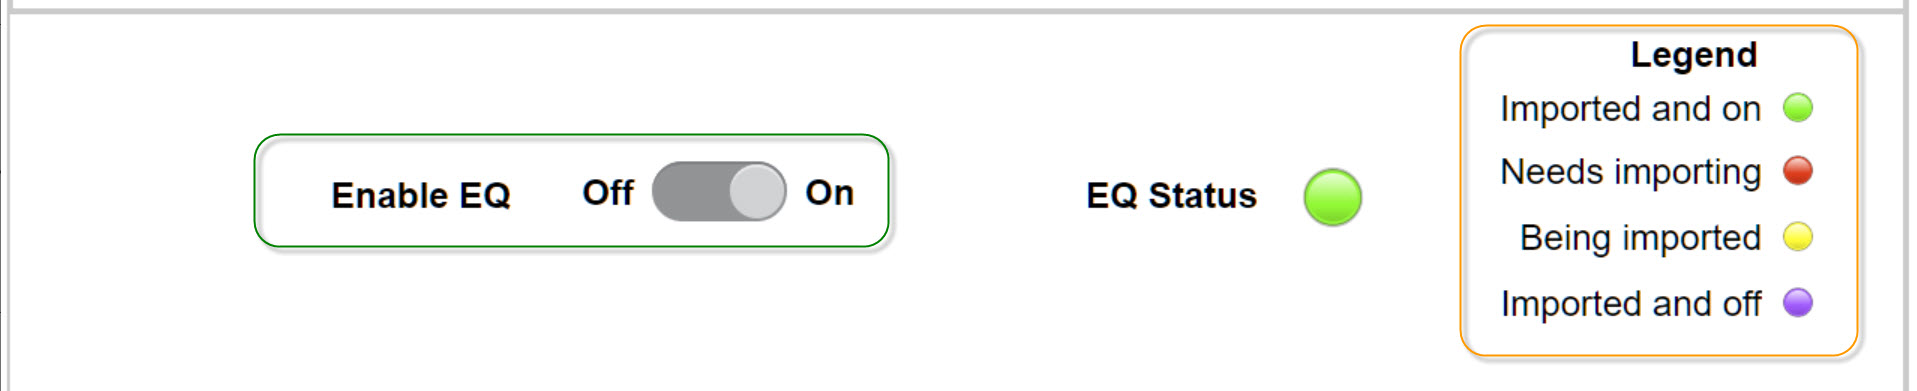
Enable or Disable EQ and Status
Once you import EQ filters, you have the option to turn EQ on or off using the Enable EQ switch. A status lamp shows current status of EQ . The status lamp is always available on all tabs on the bottom right corner. When the status light is green, it implies filters have been successfully imported and EQ is enabled. Please refer to the legend below for all possible EQ status indications.
Select Frequency Range
This setting is applicable only if you choose to import convolution EQ filters. Sometimes, you may prefer to apply EQ only to a range of frequencies. You can choose the start and end frequency over which you want EQ to be applied. In most cases, you can leave this setting at the default values if you have already created your EQ filters only for the desired range of frequencies.
If your EQ involves significant low frequency correction (below 100Hz), you may choose ‘Increase LF fit’ checkbox. Choosing this option will increase the time taken for importing your filter and it will also increase the time taken for EQ to be applied during processing of your tracks.

Combining Tracks
Longer tracks benefit from better reconstruction accuracy when remastered using PGGB 256. Depending on how tracks were indexed, it is possible that some albums (especially long classical works) may have been cut into multiple tracks even though they were a single long recording. In these cases, to take advantage of longer track lengths that would have been available had the tracks not been cut, PGGB allows you to treat contiguous groups of tracks as one. Please be aware that PGGB currently does not split the tracks back to the original track numbering after processing.
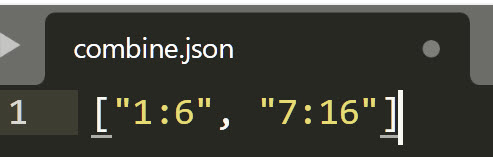
To allow PGGB to combine tracks, you will need to create a text file named ‘combine.json’ in the album folder containing the tracks to be combined. Insert a single line in the combine.json containing a comma separated list of track number ranges within double quotes, enclosed in []. In the example below, tracks 1-6 will be combined into one track and tracks 7-16 into another.
 For Combine to work, there are a few requirements
- The sets of tracks being combined cannot have overlaps
- The tracks should have the track numbers in their metadata
Status
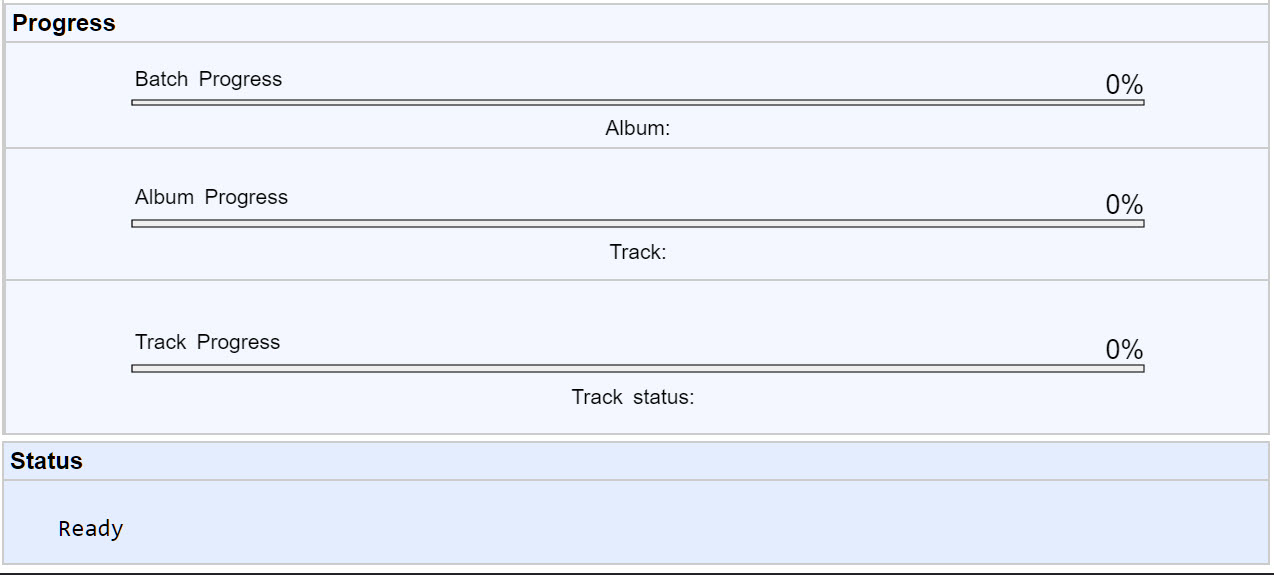
The status window at the bottom provides useful information about the current state of PGGB. This includes error messages, displays values when you change a setting, the current file it is processing etc. When PGGB is processing files, the status window may be a bit slow to refresh. This is normal. PGGB also displays detailed messages in a command window and logs them too. Progress bars show Batch, Album and Track level progress.
Log files
The output log file can be found by typing ‘%HOMEPATH%\PGGB’ in the Windows Explorer Address Bar. Album level logs can be found in remastered output folders. . On Mac Go to Home (cmd-shift-H)\PGGB.
Between PGGB and Your DAC
Digital processing within PGGB has been done with the utmost care. When playing back PGGB remastered tracks, a bit perfect transmission to your DAC will yield the best results and when possible, your DAC must be configured to do the least processing.
Setting up your DAC:
- A direct connection (or the equivalent) to your DAC from the end point
is ideal (i.e., not using any upsamplers).
Use of re-clockers or regens that do not alter the bits are OK
- Set PGGB output rate to the maximum input PCM rate your DAC supports.
- Set PGGB output bit depth to the native bit depth of your DAC (not the
maximum allowed by the Audio driver). In the
case of some R2R DACs, the optimal bit depth may depend on the sample
rate.
- If your DAC has the option, set your DAC to NOS mode.
Your playback software:
Any playback software you use should not do any processing of the PGGB remastered tracks. This includes volume control, dither, noise shaping, further upsampling, bit depth conversion (padding is OK). I.e., PGGB remastered tracks should be transmitted to your DAC bit for bit without any change for the best results.
A note about software volume control:
Software volume control may look innocuous, what possible harm could come from converting to 64 bit doubles and changing the level? PGGB’s noise shaper all but eliminates quantization noise in the audible range. Any sort of processing such as volume control leads to 64 bit conversion and then truncation back to your DAC’s bit depth (16, 24 or 32). This conversion adds quantization noise back into the track that PGGB worked hard to remove.
Sometimes your DAC does not provide volume control and/or you may prefer to use software volume control. You have couple of choices:
- Best option: Set PGGB to Remaster output as 64 bit, the downside is large file size. Use software volume control and output at desired bit-depth. Enable Noise shaping or dither if your playback software supports it
- Alternate option: Enable noise shaping in PGGB and output in 32 bit format. Use software volume control and output at desired bit-depth. Enable Noise shaping or dither if your playback software supports it
- Another option (use with caution): This is a good option if you do not use the volume knob much and generally leave it at a fixed level (like say -3dB). Enable noise shaping in PGGB, and set the gain slider to the reduced gain (same as what you would set in your player such as HQP) and gargle-blast your tracks. During playback, disable noise shaping or dither in your playback back software but start with a reduced level (first set the volume to where you will normally set it in your player) and gradually bring it up to 0dB or max.
Folder Paths and Permissions
Please make sure you have Read permission to the input folder and read/write permission to the output folder. In addition to this, PGGB needs write permission to:
- Windows
- The APPDATA folder. PGGB installs the license and also saves the configuration in this folder. Typically, this is C:\Users\[user name]\AppData\Roaming\PGGB or you can access it by typing %appdata%\PGGB in the Windows Explorer Address Bar.
- The HOMEPATH folder. PGGB writes logs into this folder in addition to writing logs into output folder. Typically, this is C:\Users\[user name]\PGGB or you can access it by typing %homepath%\PGGB in the Windows Explorer Address Bar.
- Mac
- PGGB installs the license and also saves the configuration in /Users/[user name]/PGGB
- PGGB writes logs (in addition to writing logs into output folder) to /Users/[user name]/PGGB
System Requirements
DAC
DACs that support PCM rates of 705.6/768kHz or more will benefit most from PGGB remastered tracks. On DACs that support up to DXD rates, remastering CD quality tracks using PGGB to DXD rate (352.8kHz) is likely to be beneficial too. DACs that do little to no processing (such as R2R DACs that can be run in NOS mode) and DACs whose oversampling filter can be turned off will benefit significantly from PGGB remastered tracks. If you have a DAC that supports PCM only, then you can use PGGB to remaster DSD to the highest rate supported by your DAC with excellent results. If you have a DAC that supports only 96kHz or 192kHz, you can use PGGB to remaster DSD or DXD files to rates that are supported by your DAC.
System and OS
PPGGB requires 64-bit Windows 10 PC or Mac (Mojave or higher). It is possible to run PGGB on Linux either within a virtual machine running Windows with the enough RAM and CPU cores allotted for the VM.
Note: PGGB requires Internet access during installation. It also needs Internet access for the trial version. On the first run, PGGB will request firewall permission to enable parallel processing. PGGB is mostly harmless, we do not use or share your personal information nor do we use the idle CPU cycles to mine Ethereum.
Memory
PGGB requires 64-bit Windows 10 PC or Mac (Mojave or higher). 32GB RAM and 8 core processor is recommended, but if your library consists of tracks that do not exceed about 12 minutes of length, you may find 16GB RAM* and a 4-core processor sufficient On Windows, an SSD drive for virtual memory (minimum of 128GB)* is recommended. Fast SSD drives for input and output folder improve processing performance further.
*Please note: Memory requirements increase with quad precision (128 bits - Insane) and with octuple (256 bits - Ludicrous) precision. A minimum of 16GB is recommended for up to quad precision and 32GB for octuple precision (for tracks up to 12 minutes long) and 64GB RAM for even longer tracks (up to 24 minutes). On Windows, with a virtual memory of 128GB, one can accommodate longer tracks but at the cost of slower processing. The above is for upsampling to 16fS. Memory requirements double if upsampling to 32fS. For more detailed information on memory requirements.
More on Memory
Compared to both the original PGGB and PGGB-AP, even at a precision of 256 bits, PGGB 256 is a lot more memory efficient. one could do a lot more with 16GB RAM and PGGB 256 than previously possible. To help with figuring out how much RAM you will need, here is a summary and a simple step by step guide (also available as a pdf version). The table helps in two use cases:
- If you already have a PC/Mac and wish to find out the longest track, you could process.
- If you wish to the acquire more RAM or a new PC/Mac
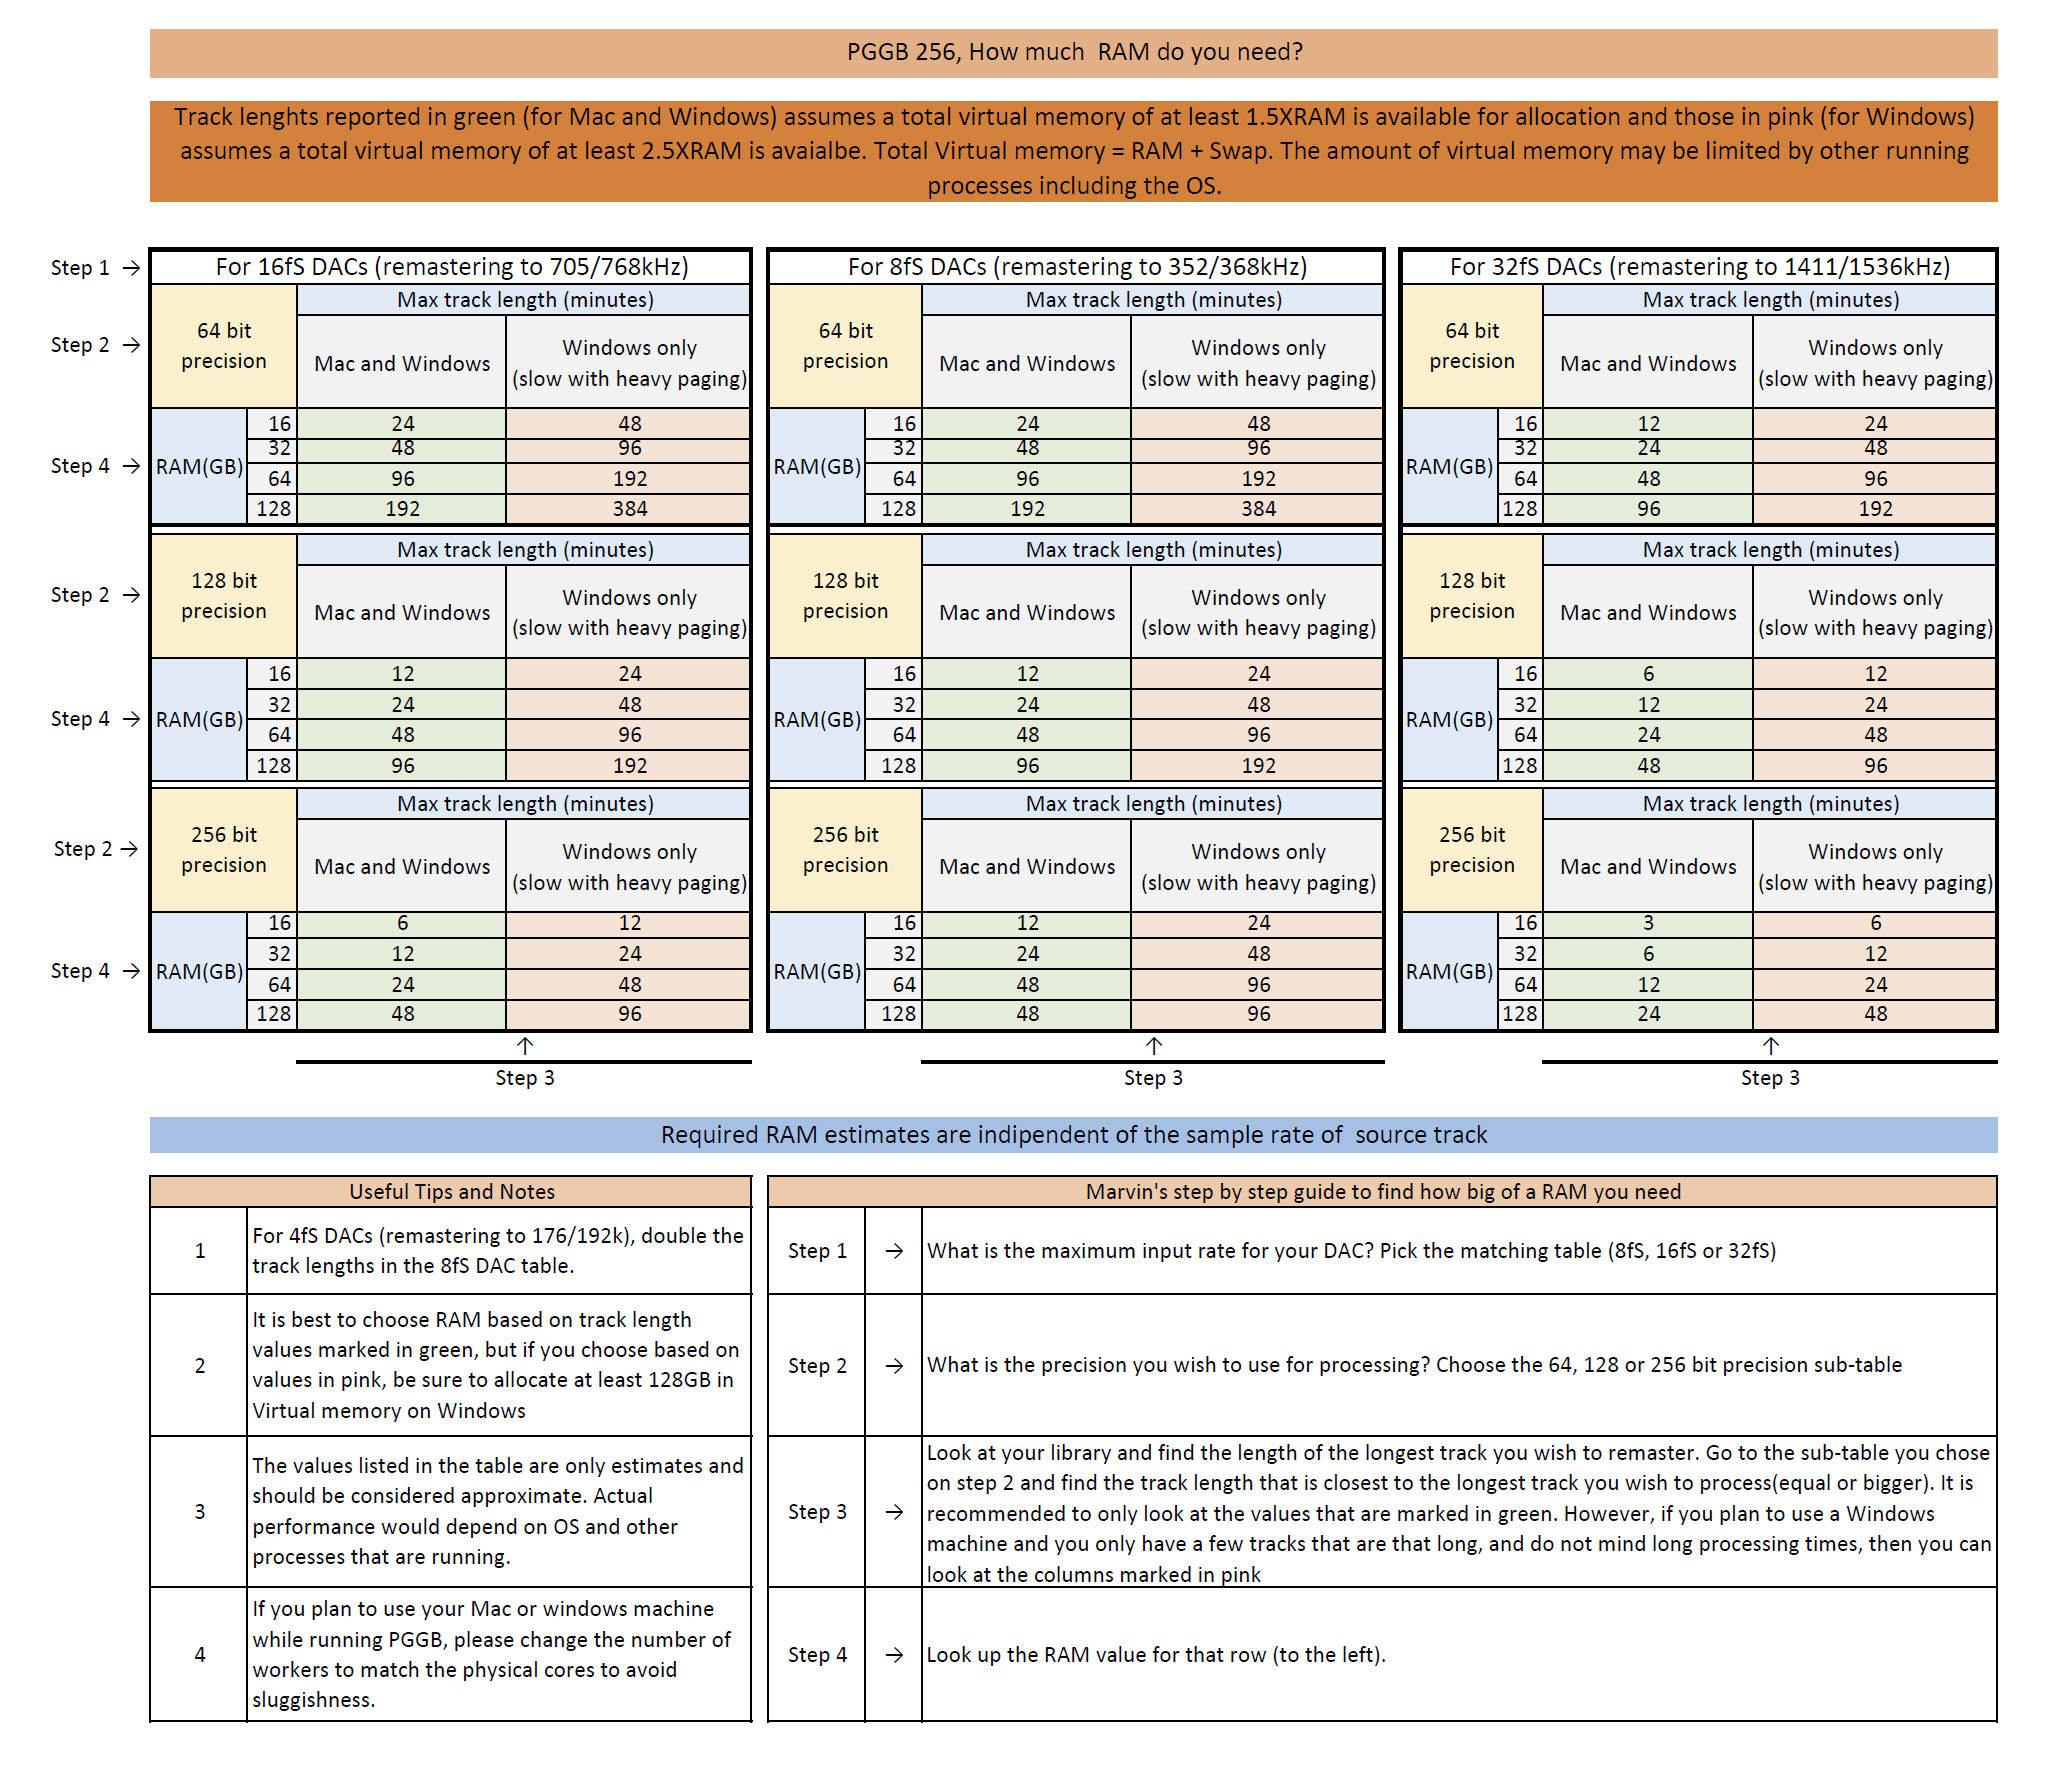
For use case 1: Say you have a 16GB of RAM and your DAC accepts a maximum of 352/368kHz PCM, then you can go to the
second table (For 8fS DAC) and look at the Rows corresponding to 16GB RAM in 64, 128 and 256 bit precision
sub-tables. You will see you can process tracks up to 12 minutes long on both Mac and Windows (green column) at 128 bit precision. If you
look under the pink column, you will also see 24 minutes listed, this is only if you only have a few tracks that are
that long and are OK with longer processing times.
For use case 2: Say you have a R2R DAC that accepts 32fS input and you wish to remaster at 256 bit precision, go to
'For 32fS DAC' table and the '256 bit precision' sub table. Say you listen mostly to Jazz and Rock music and most of
your tracks are within 10 minutes in length. Then you can look at the track length closest to 10 that is bigger or
equal under the green column. The closest is 12 minutes, if you look at the corresponding RAM, you will see 64GB RAM
would be a safe option to choose.
Bonus Example: As there are many with 16fS capable DACs, say you are like me and mostly listen to jazz and some
chamber music and wish to remaster at 256 bits and most of your tracks are within 12 minutes in length. Then go to
the 'For 16fS DACs' table, then to the '256 bit precision' sub-table. Look for '12' in the green column, then look
for the corresponding RAM size for that row to the left, you will find you need 32GB of RAM.
Track lengths reported in green (for Mac and Windows) assumes a total virtual memory of at least 1.5XRAM is
available for allocation and those in pink (for Windows) assumes a total virtual memory of at least 2.5XRAM is
available. Total Virtual memory = RAM + Swap file(s). The amount of virtual memory may be limited by other running
processes including the OS.
On Mac, user has no control over how much and what rate swap files can grow, so a conservative estimate is about
half of the total RAM. However, if there are other running processes, the amount of actual available virtual memory for PGGB
will be much lower. Closing all apps and doing a restart of your Mac would give a good idea of how much RAM is left
(I use iStat menu app in Mac). So the values reported for Mac can be a too optimistic if there are number of processes
running. So, one needs to account for reduced RAM available when figuring out the longest track that can be
processed.
On windows, it is possible to increase swap file size by changing virtual memory settings. This provides enough
freedom
for the reported maximum track lengths to be close to what is possible with available RAM.
PGGB 256 uses adaptive algorithms that do not compromise on the quality of reconstruction to fit in available RAM (previously one could do this by setting taps). Currently the reconstruction quality at a given precision does not change, instead PGGB 256 adapts the processing pipeline to fit in memory and trades speed to achieve this (i.e., runs slower, to make sure the data being processed fits in memory).
What this means is one could do a lot more with 16GB RAM and PGGB 256 than previously possible. But there is still a limit to how much can be made it fit in RAM. At the minimum one needs enough RAM to hold the input data and upsampled data. So, this memory requirement depends on a few factors:
- Length of the track you are processing
- Output rate (which depends on your DAC and settings, if you are upsampling to 705/768khz or 352.384kHz)
- Precision (64, 128 or 256 bit)
- Input rate of the track (CD vs Hi-Res vs DSD etc). While there is a slight uptick in memory requirement for increasing PCM rates, for DSD, the memory requirement does not change with increased rate. It depends only on the output rate you choose and track length. In other words, a 10minute DSD 64 track would need the same amount of memory as DSD 256 as long as you are choosing the same output sample rate and also bit precision. But DSD 256 will take about 4x more time to process compared to a DSD 64 track of same length because there are simply 4x more samples to process.
Virtual Memory (Windows only)
It is best to set the virtual memory (both the initial size and the maximum
size) to the same value and equal.
128 GB or more is recommended. Choose the fastest internal drive for
setting the virtual memory. Make sure the drive has
free space greater than the virtual memory size you set. For all other dries set
'No paging file'.
Restart your PC once you have set the virtual memory. After restart, check if
the drive you set
virtual memory for has a 'pagefile.sys' file with the size close to the virtual
memory size.
Note 1: Please make sure you have free space that is
comfortably greater than the
the virtual memory you allocated on the drive.
Note 2: Windows optimization programs such as Audiophile
Optimizer or Process Lasso
will interfere with the normal operation of PGGB. Please make sure programs
that could throttle paging, memory and CPU
usage are either deactivated or uninstalled.
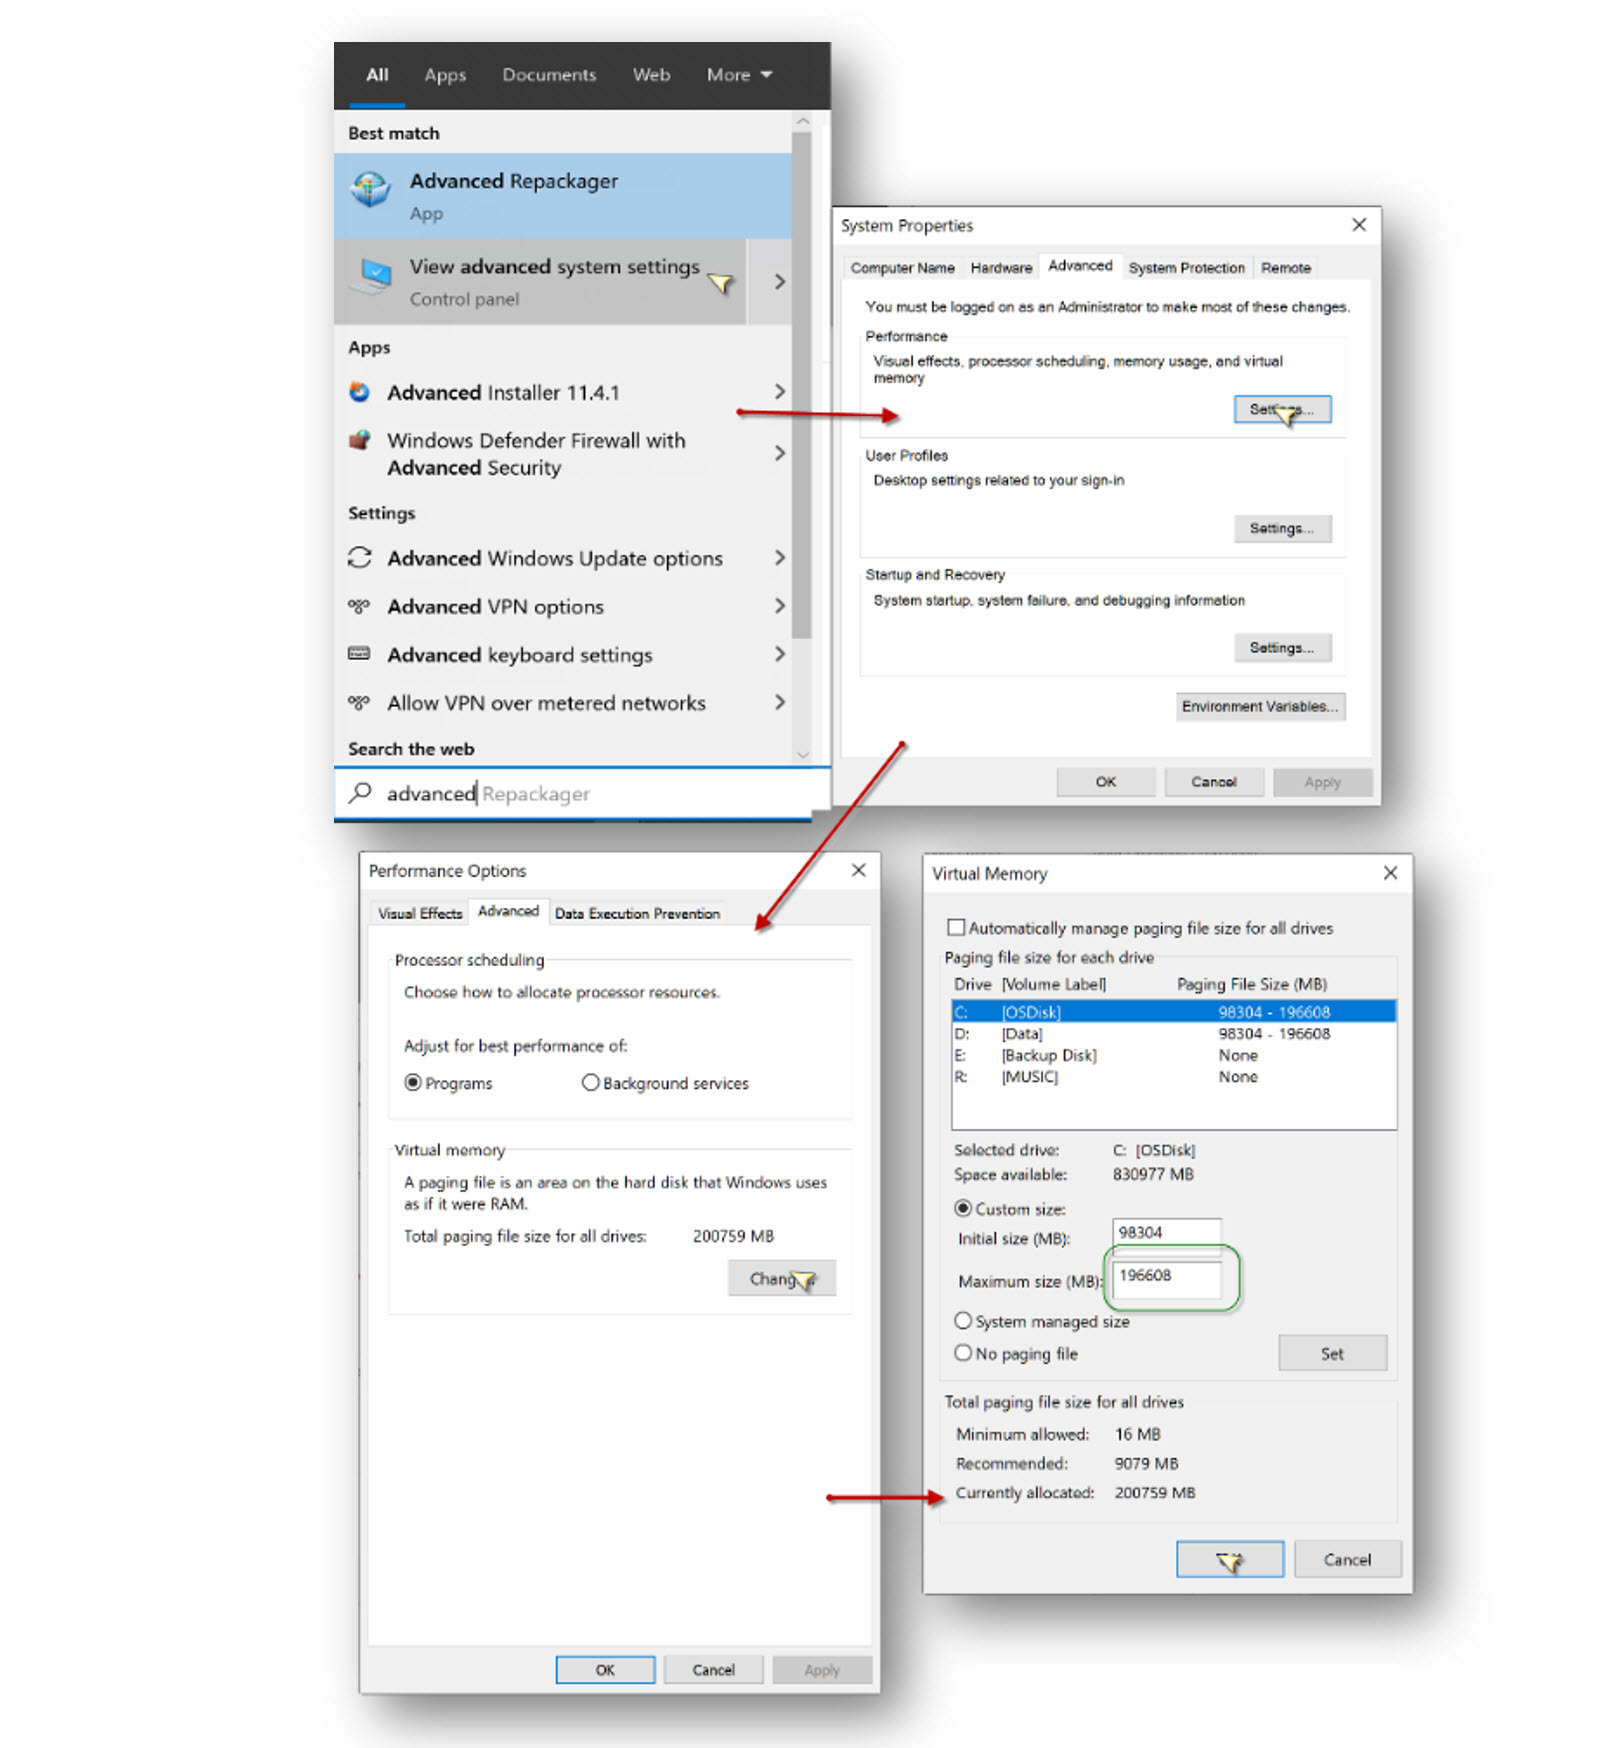
To set virtual memory, use the system property command-let. Go to start
menu and start typing ‘advanced’ and select
"View Advanced System Settings." Then click Advanced-> Performance Settings.
This will open the Performance Options
dialog. Click on Advanced tab, then click the ‘Change’ button under ‘Virtual
memory’. Finally, in the Virtual memory
dialog, uncheck ‘automatically manage paging file’ and enter a value greater
than 128000 under Maximum size in Mb.
Virtual memory availability and drives are system dependent. Below is just one
example.
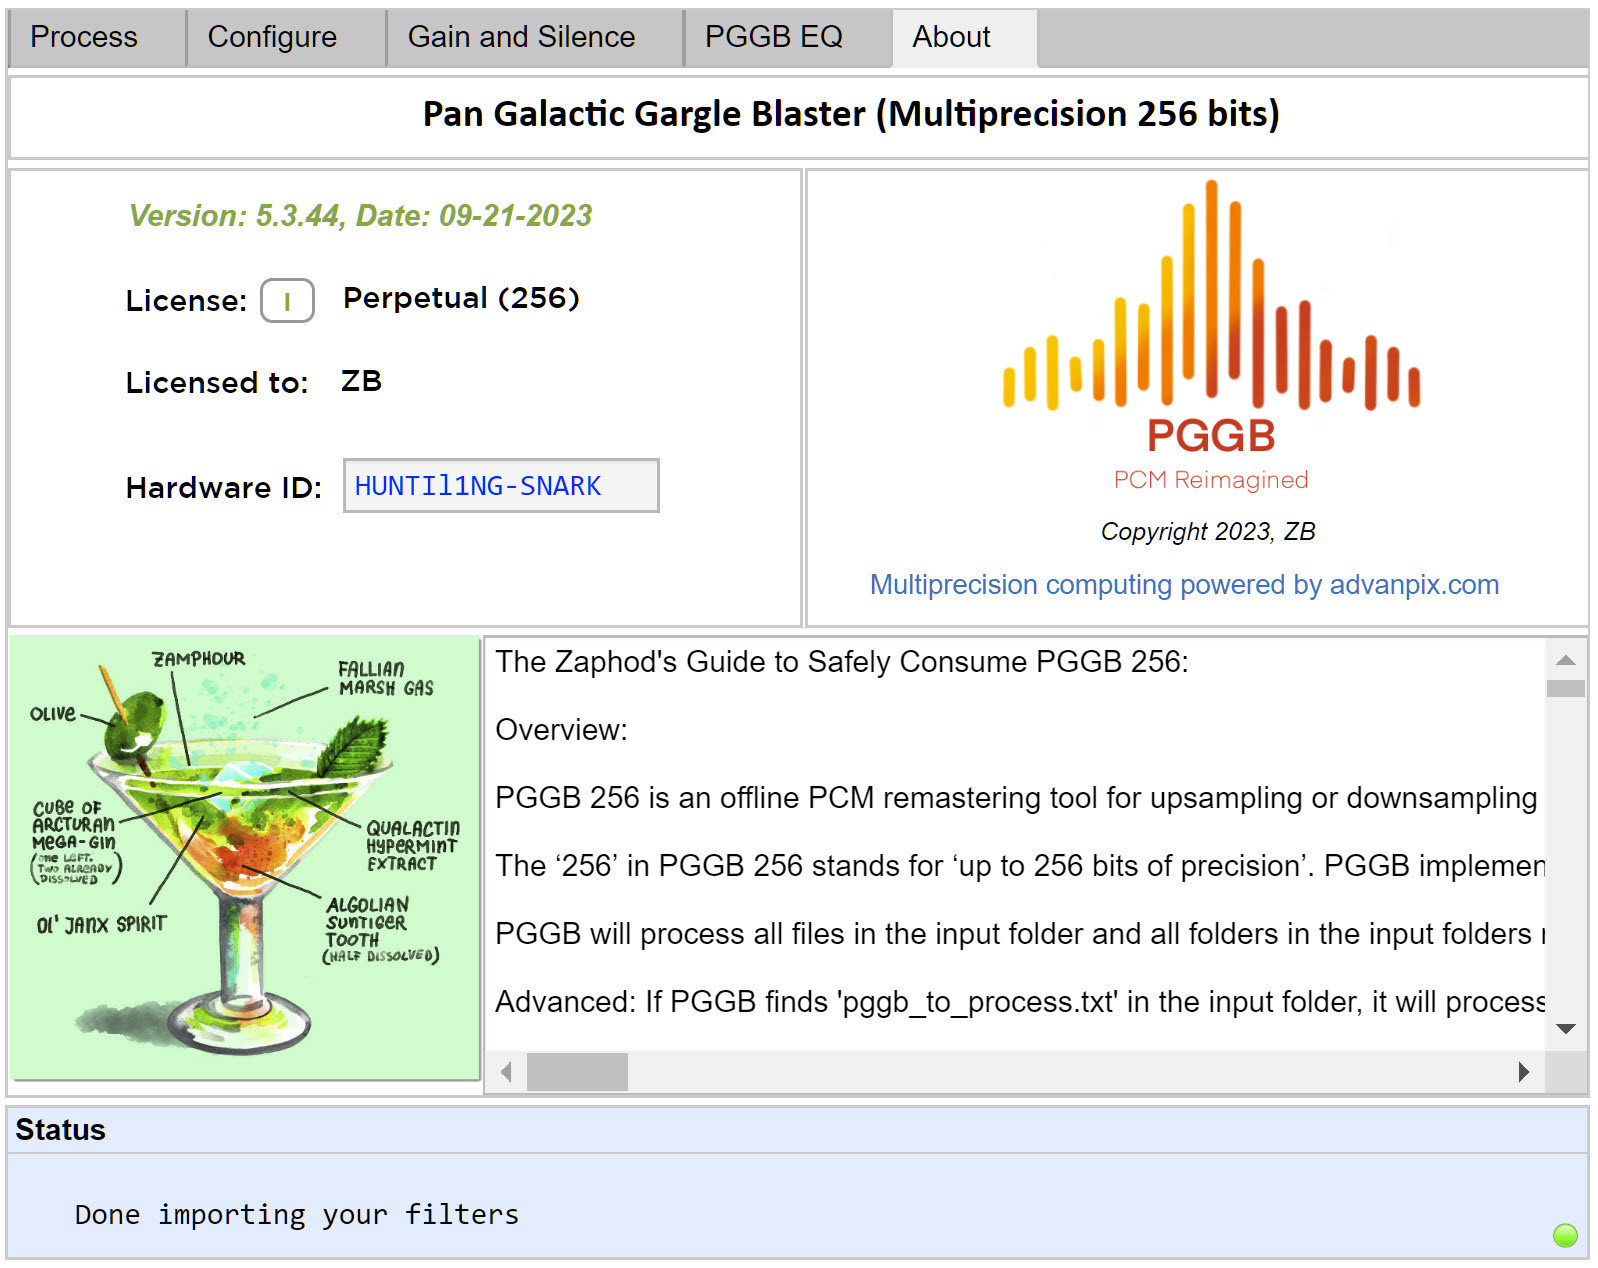
Licensing
PGGB requires a license and PGGB license is tied to your Hardware ID. You will also need to provide your name and email address to get a PGGB license. Your Hardware ID will be displayed if you go to the ‘About’ tab. Use 'Ctrl + C' or 'Cmd + C' to copy your Hardware Id and paste it in the email. Refer here to get a license.
When you install PGGB for the first time and it does not find a valid license, it will run in trial mode. If you need to reinstall a license or you have upgraded your license, use the ‘I’ button next to ‘License’ to do so. Hardware-id is tied to the PC you run it on. The license is non-transferable. When your Hardware-id changes, you may request a new license. PGGB is not for commercial use unless you have purchased a commercial license. There are three levels of license:
| License type | Description | Installs | Validity | Upgrades and support | Cost |
|---|---|---|---|---|---|
| Free trial | Fully functional, processing stops after 5 tracks for 64 bits and stops after 2 tracks for 256 bits. You can restart app and process again | Single PC/Mac | 30 days | 30 days | Free |
| Personal: Perpetual (256) | Fully functional, for non commercial use. Enables up to 256 bit processing with no limitations. | Single PC/Mac | Perpetual | 1 year email support. Free upgrades for at least 1 year** | $1030* |
| Personal: Perpetual (128) | Fully functional, for non commercial use. Enables up to 128 bit processing with no limitations. 256 bit processing is limited to 2 tracks at at time. | Single PC/Mac | Perpetual | 1 year email support. Free upgrades for at least 1 year** | $520* |
| Personal: Upgrade to (256) | Fully functional, for non commercial use. Upgrade PGGB-AP and Perpetual (128) licenses to perpetual (256). Enables up to 256 bit processing with no limitations. | Single PC/Mac | Perpetual | 1 year email support. Free upgrades for at least 1 year** | $520* |
| Personal: PGGB-AP | Fully functional, for non commercial use. PGGB-AP runs without any limitations. PGGB 256 runs as Perpetual (128). Can be upgraded to Perpetual (256) | Single PC/Mac | Perpetual | 1 year email support. Free upgrades for at least 1 year** | Legacy |
| Commercial | Fully functional, advanced settings, for both personal and commercial use | Multiple users/PCs/Macs | Perpetual | Contact Us | Contact Us |
License upgrades: If you have already purchased a perpetual license for version 3 (PGGB-AP), your license is still valid and will be automatically upgraded to ‘Perpetual (128)’. You can also upgrade to 'Perpetual (256)’ from PGGB-AP license.
Hidden Menu (#42)
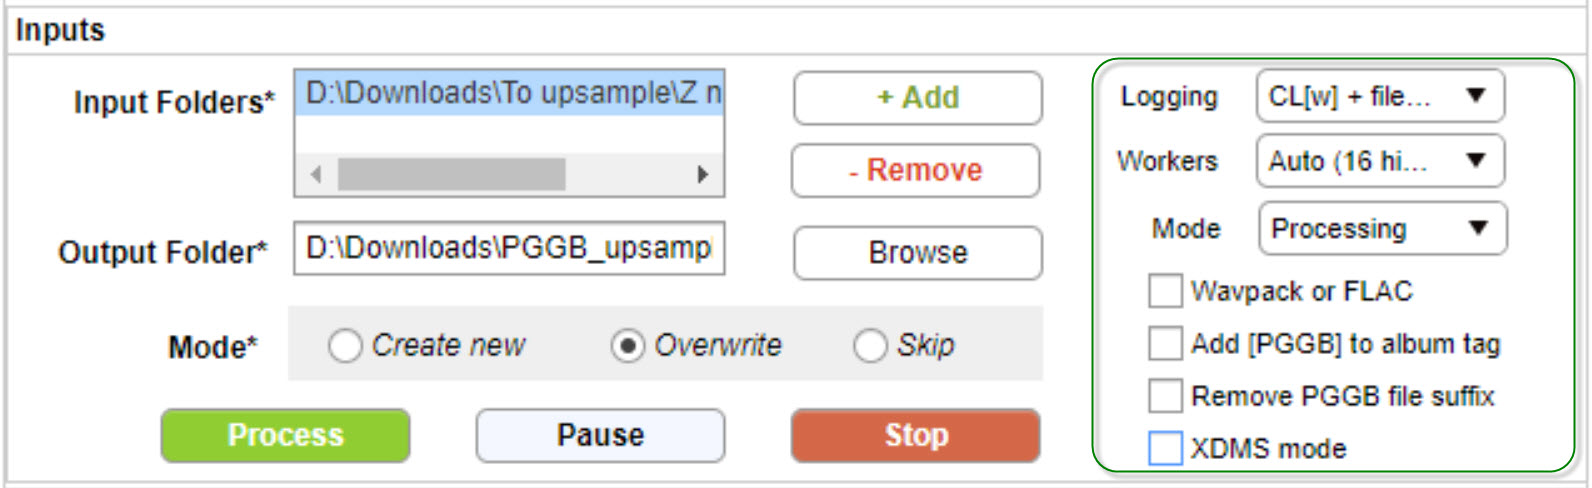
You can activate the hidden menu by using the key combination ‘Ctrl+4’, you can exit the hidden menu by using the key combination ‘Ctrl+2’. If the keys do not work, just click on the cocktail picture to reveal the hidden menu. The hidden menu provides five options:
- Logging: Choose the level of logging you prefer, with -2 being near silent to 2 that is extremely chatty.
- Workers: PGGB improves processing speeds by distributing the workload over multiple worker threads. It uses a heuristic based on the available RAM and logical cores to choose the optimal number of worker threads for each track. However, there are other factors (such as heat dissipation and fan noise) that PGGB is not aware. Here, you may use your judgment to cap the maximum number of worker threads. By default, this is the number of logical cores. If you set it to 1 there is no parallism and it may be beneficial to choose this option on a resource constrained PC for processing 176.4k or higher tracks including DXD and DSDs.
- Mode: PGGB can run under two modes
- Processing: PGGB processes and upsamples files, this is the default mode.
- Analysis: PGGB does no processing but instead prints statistics on how the tracks will be processed.
- WavPack or FLAC: Off by default. When set, it will output file as FLAC instead of Wav if two conditions are met - Sample rate is 8fS(DXD) or less and bit depth is 24 bits or less. For all other rates and bit depths, it will output lossless WavPack compressed files (.wv).
- Add PGGB to album tag: Optionally adds suffix to album tag, '[PGGB][bitdepth-sample rate]' for example [PGGB][24-705.6]. It does not affect album discovery, but makes it easier to know instantly and to search for gargle-blasted albums.
- Remove PGGB file suffix: Optionally remove ‘(… PGGB)’ descriptor at the end of processed tracks.
- XDMS mode: If set, PGGB 256 splits remastered files into 1.25GB parts for playback on Taiko Audio’s XDMS player.
Note: PGGB remembers all your current settings on the next start, except the processing mode. This is intentional as you may forget the processing mode was set to analysis.
Inter-Sample-Overs
During reconstruction of the music signal after upsampling, the new samples can have values greater than 1.0, which are generally referred to as inter-sample-overs. Inter-sample overs will cause clipping and can be unpleasant. When gain is set to Auto as shown above, PGGB detects inter-sample overs and applies just enough attenuation to avoid clipping.
Legal
This SOFTWARE PRODUCT is provided by THE PROVIDER "as is" and "with all faults." THE PROVIDER makes no representations or warranties of any kind concerning the safety, suitability, lack of viruses, inaccuracies, typographical errors, or other harmful components of this SOFTWARE PRODUCT. There are inherent dangers in the use of any software, and you are solely responsible for determining whether this SOFTWARE PRODUCT is compatible with your equipment and other software installed on your equipment. You are also solely responsible for the protection of your equipment and backup of your data, and THE PROVIDER will not be liable for any damages you may suffer in connection with using, modifying, or distributing this SOFTWARE PRODUCT.